After the interfacing of the Arduino with DHT11 (RHT01) sensor, let’s see how to connect the Arduino with DHT22 (AM2302 – RHT03) digital humidity and temperature sensor.
Arduino interfacing with DHT11 sensor and LCD
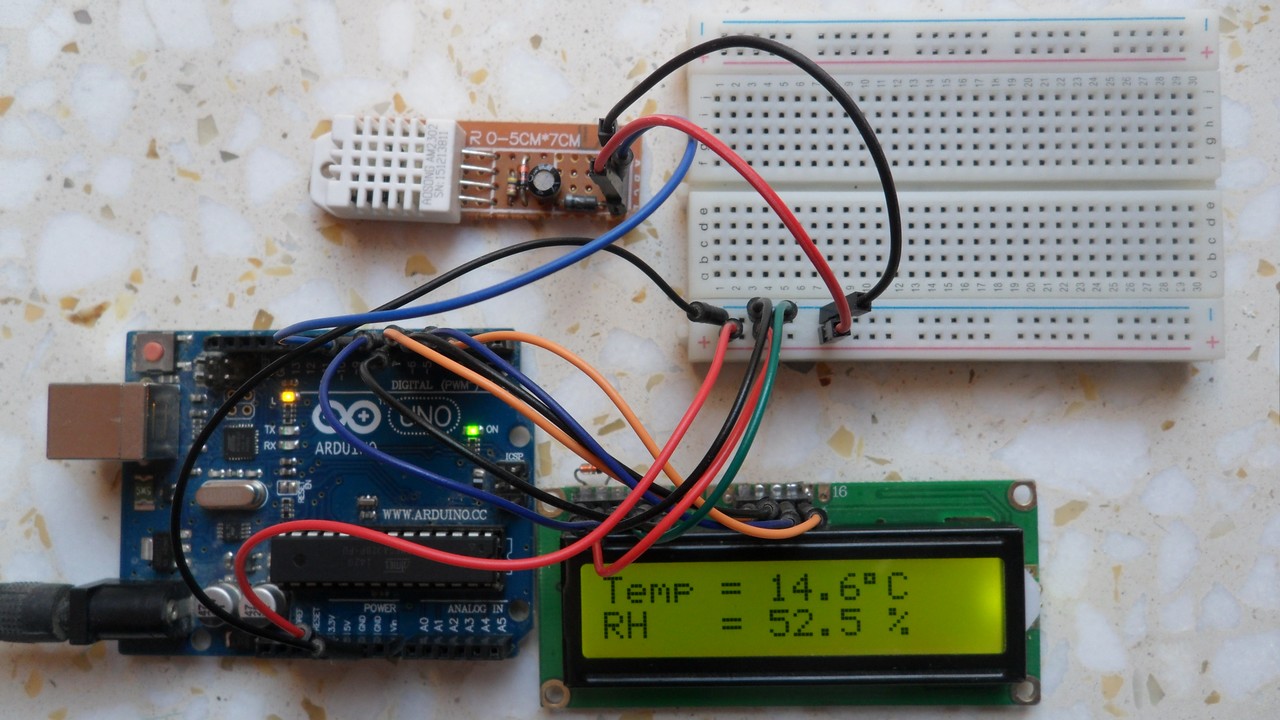
As what was done in the previous topic, the measured temperature and humidity values are displayed on 1602 LCD screen.
DHT22 Sensor technical specifications:
- Humidity Range: 0 ~ 100% RH
- Humidity Accuracy: ±2% RH (max ±5% RH)
- Temperature Range: -40 ~ 80 °C
- Temperature Accuracy: ±0.5 °C
- Operating Voltage: 3.3V ~ 5.5V
- Resolution = 0.1
Hardware Required:
- Arduino board
- DHT22 (or AM2302 – RHT03) sensor
- 1602 LCD screen
- 4.7K ohm resistor
- 10K ohm variable resistor (or potentiometer)
- 330 ohm resistor
- Breadboard
- Jumper wires
Arduino + DHT22 + LCD connection circuit:
Interfacing circuit diagram is shown below.
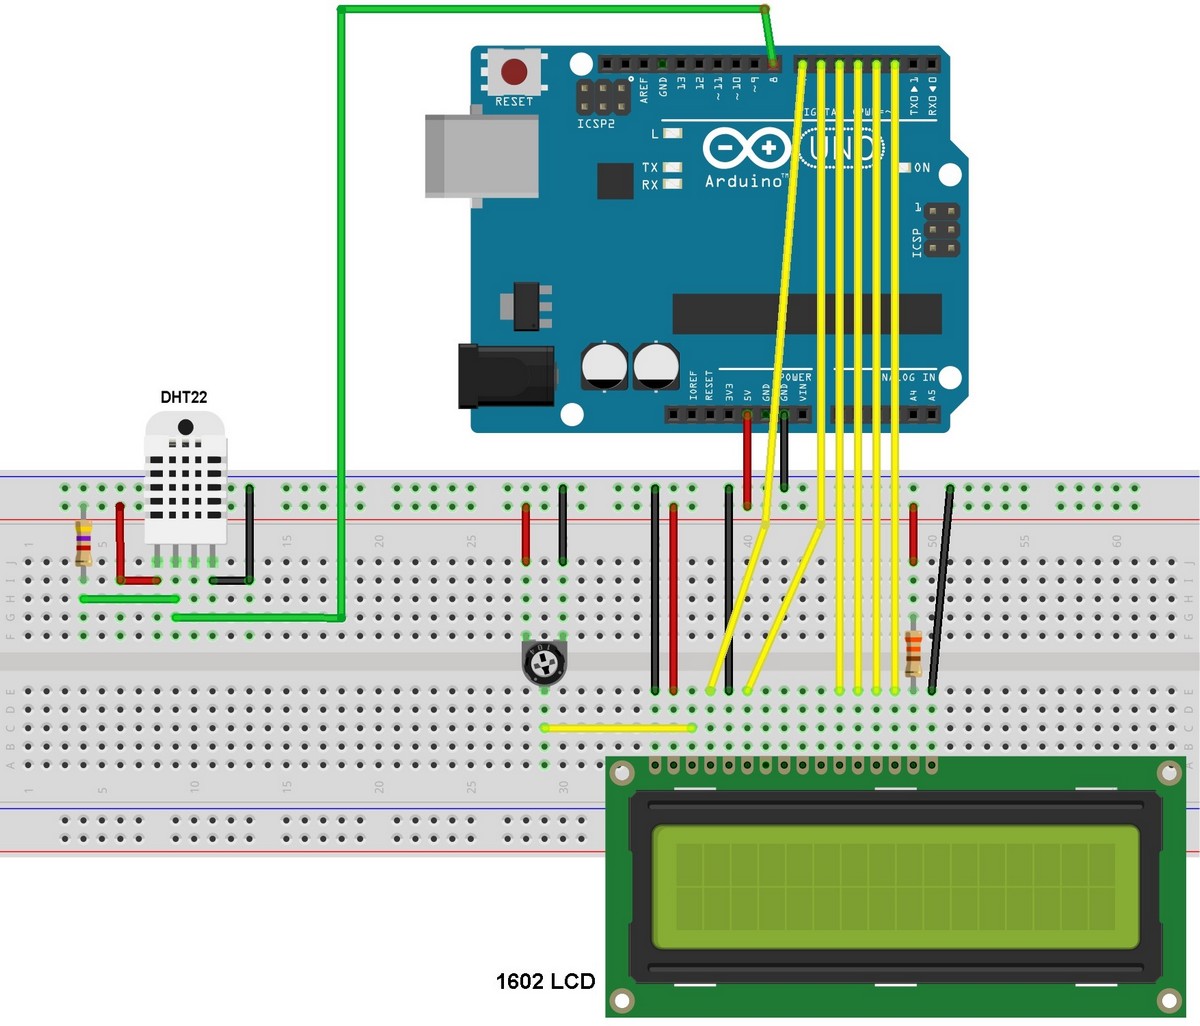
The DHT22 has 4 pins: VCC (+5V), Data pin, NC(not connected pin) and GND (from left to right). A pull-up resistor should be added to the data pin with a value between 4.7K and 10K.
The 10K variable resistor is used to control the contrast of the LCD screen and the 330 ohm resistor supplies the LCD backlight LED.
Arduino Code:
In this interfacing I used DHT sensors library (DHT11, DHT21 and DHT22) from Adafruit. This library initiates the DHT22 sensor and reads the values of the humidity and temperature.
The Adafruit DHT library returns a float number of the humidity as well as the temperature and since the resolution of the DHT22 sensor is 0.1 we need only 1 number after the point. For that I used two variables with type int (signed 16-bit) which are RH and Temp. multiplying the float numbers by 10 gives us what we need as an integer numbers without any point.
The integer values of the humidity and temperature needs to be displayed on the LCD after the reading, and for that I used two character arrays named: temperature (char temperature[] = “Temp = 00.0 C “;) and humidity (char humidity[] = “RH = 00.0 % “;). Humidity and temperature values are copied to the previous arrays before displaying it. For example the temperature value is copied to the array temperature as follows:
temperature[7] = (Temp / 100) % 10 + 48;
This line means the 7th character of the array is equal to the hundreds Temp
temperature[8] = (Temp / 10) % 10 + 48;
this line means the 8th character of the array is equal to the tens of Temp
temperature[10] = Temp % 10 + 48; (Temp%10 equals to the remainder of Temp/10)
and this line means the 10th character of the array is equal to the ones of Temp
For example if the temperature = 37.2 °C and this is the value which the Adafruit library returns using the function dht.readTemperature(), by multiplying this value by 10 we get 372.
yields: (372 / 100) % 10 = 3
(372 / 10) % 10 = 7
372 % 10 = 2
The number 48 is used to convert decimal numbers to AscII because the LCD works with AscII format.
The line temperature[11] = 223; is for the degree symbol ( °).
The full Arduino code is below.
1 2 3 4 5 6 7 8 9 10 11 12 13 14 15 16 17 18 19 20 21 22 23 24 25 26 27 28 29 30 31 32 33 34 35 36 37 38 39 40 41 42 43 44 45 46 47 48 49 50 51 52 53 54 55 56 57 58 59 60 | // Interfacing Arduino with DHT22 humidity and temperature sensor // include LCD library code #include <LiquidCrystal.h> // include DHT library code #include "DHT.h" #define DHTPIN 8 // DHT22 data pin is connected to Arduino pin 8 // LCD module connections (RS, E, D4, D5, D6, D7) LiquidCrystal lcd(7, 6, 5, 4, 3, 2); #define DHTTYPE DHT22 // DHT22 sensor is used DHT dht(DHTPIN, DHTTYPE); // Initialize DHT library char temperature[] = "Temp = 00.0 C"; char humidity[] = "RH = 00.0 %"; void setup() { // set up the LCD's number of columns and rows lcd.begin(16, 2); dht.begin(); } void loop() { delay(1000); // wait 1s between readings // Read humidity int RH = dht.readHumidity() * 10; //Read temperature in degree Celsius int Temp = dht.readTemperature() * 10; // Check if any reads failed and exit early (to try again) if (isnan(RH) || isnan(Temp)) { lcd.clear(); lcd.setCursor(5, 0); lcd.print("Error"); return; } if(Temp < 0){ temperature[6] = '-'; Temp = abs(Temp); } else temperature[6] = ' '; temperature[7] = (Temp / 100) % 10 + 48; temperature[8] = (Temp / 10) % 10 + 48; temperature[10] = Temp % 10 + 48; temperature[11] = 223; // Degree symbol ( °) if(RH >= 1000) humidity[6] = '1'; else humidity[6] = ' '; humidity[7] = (RH / 100) % 10 + 48; humidity[8] = (RH / 10) % 10 + 48; humidity[10] = RH % 10 + 48; lcd.setCursor(0, 0); lcd.print(temperature); lcd.setCursor(0, 1); lcd.print(humidity); } |
Arduino + DHT22 simulation video:
The video below shows simulation of the example using Proteus.
Downloads:
Adafruit library for DHT series (after extracting put the folder named DHT in the library folder of Arduino):
Download
To be able to simulate this example, Proteus needs the Arduino library which can be downloaded from the link below. After extracting the files (ARDUINO.IDX and ARDUINO.LIB) put it in the Library folder (ex: C:\Program Files\Labcenter Electronics\Proteus 8 Professional\LIBRARY):
Download
Arduino + DHT22 + LCD Proteus simulation file download:
Download


do the following:
in the DHT22 properties, change the parameter “Time Select Low” (or “TSEL”), to 1ms (1 millisecond). This is the default time for this Sensor (for DHT11 this time is 18ms).
I also advise changing this parameter to “Show All”, so that it is always visible in the schematic, and so it can always be checked if it is ok.
Hello, for some reason, the DHT22 does not simulate in Proteus, the reading is wrong or zero.
DHT11 if it simulates well, does anyone know how to fix it?
Facing some difficulties
After uploading the code in the Arduino and simulating it the LCD shows temp = 0.0°C and RH = 0 00% what ever I’m doing it does not change.
Please need help.
Help I’m getting temp and humidity reading at 0 and I am unable to install protues
cannot find the model file DHTXX msg came in proteus & not running kindly comment
Use a newer Proteus version (8.2 or higher).
Temp and RH data is 0.0
need some help
If you’re facing some problems, please use the provided Proteus simulation file!