This example shows how to display Bitmap (BMP) image files from SD card on ST7735 1.8″ (128×160) TFT screen using PIC18F4550 microcontroller and CCS PIC C compiler.
The MCU reads BMP image from the SD card and prints it on the ST7735 color display.
To build this project we need the ST7735 TFT driver, SD card driver and FAT16 library. The three source files must be added to the project folder (or CCS C driver folder) in order to compile the C code.
The ST7735 driver is update to support the display of BMP images from the SD card.
The ST7735 TFT display driver topic:
ST7735 SPI TFT Display Driver for CCS PIC C compiler
The SD card driver topic:
MMC/SD Card driver for CCS PIC C compiler
The FAT16 library topic:
FAT16 Library for CCS C compiler
Related topics:
Some posts related to this project if you want to go through them.
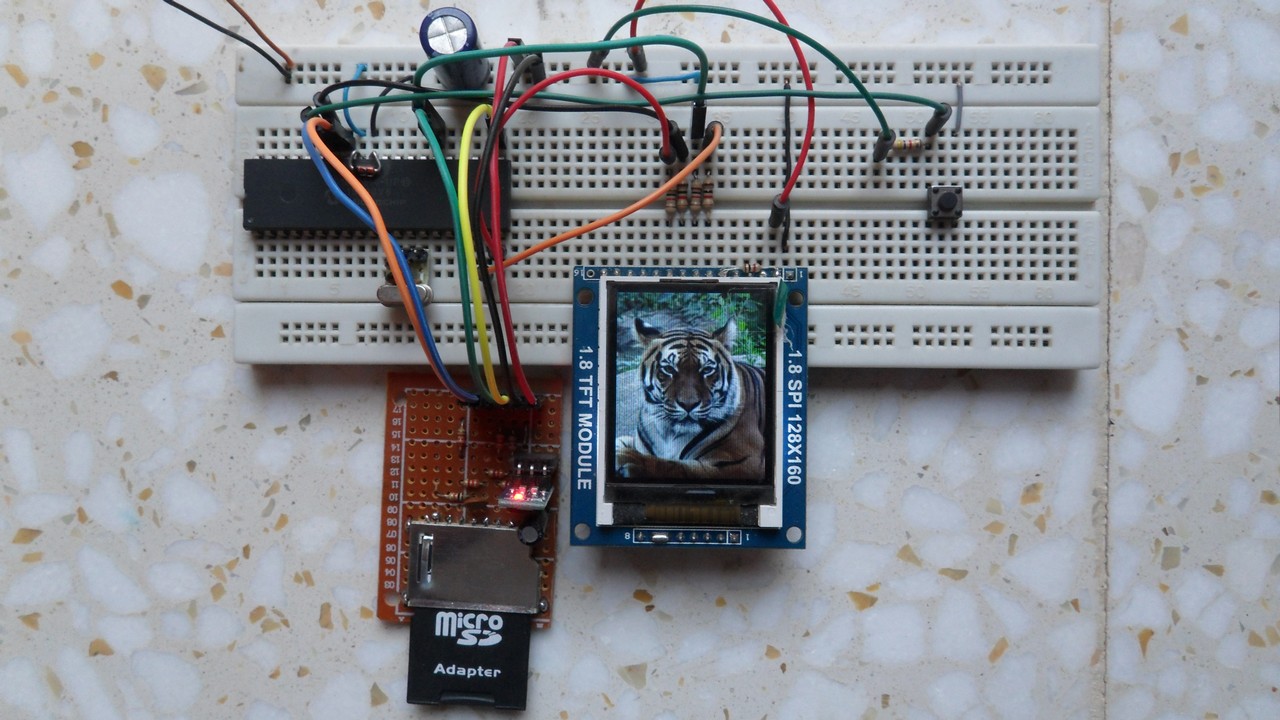
Interfacing PIC18F4550 with 1.8″ TFT display
Hardware Required:
- PIC18F4550 microcontroller —> datasheet
- SD Card with FAT16 file system ( <= 2GB)
- ST7735R (or S) 1.8″ TFT screen
- AMS1117 3.3V voltage regulator
- 8MHz crystal oscillator
- 2 x 22pF ceramic capacitor
- Push button
- 3 x 3.3K ohm resistor
- 3 x 2.2K ohm resistor
- 2 x 10K ohm resistor
- 5 x 1K ohm resistor
- 100nF ceramic capacitor
- 10uF polarized capacitor
- 5V Power source
- Breadboard
- Jumper wires
Draw BMP images on ST7735 TFT display using PIC18F4550 MCU:
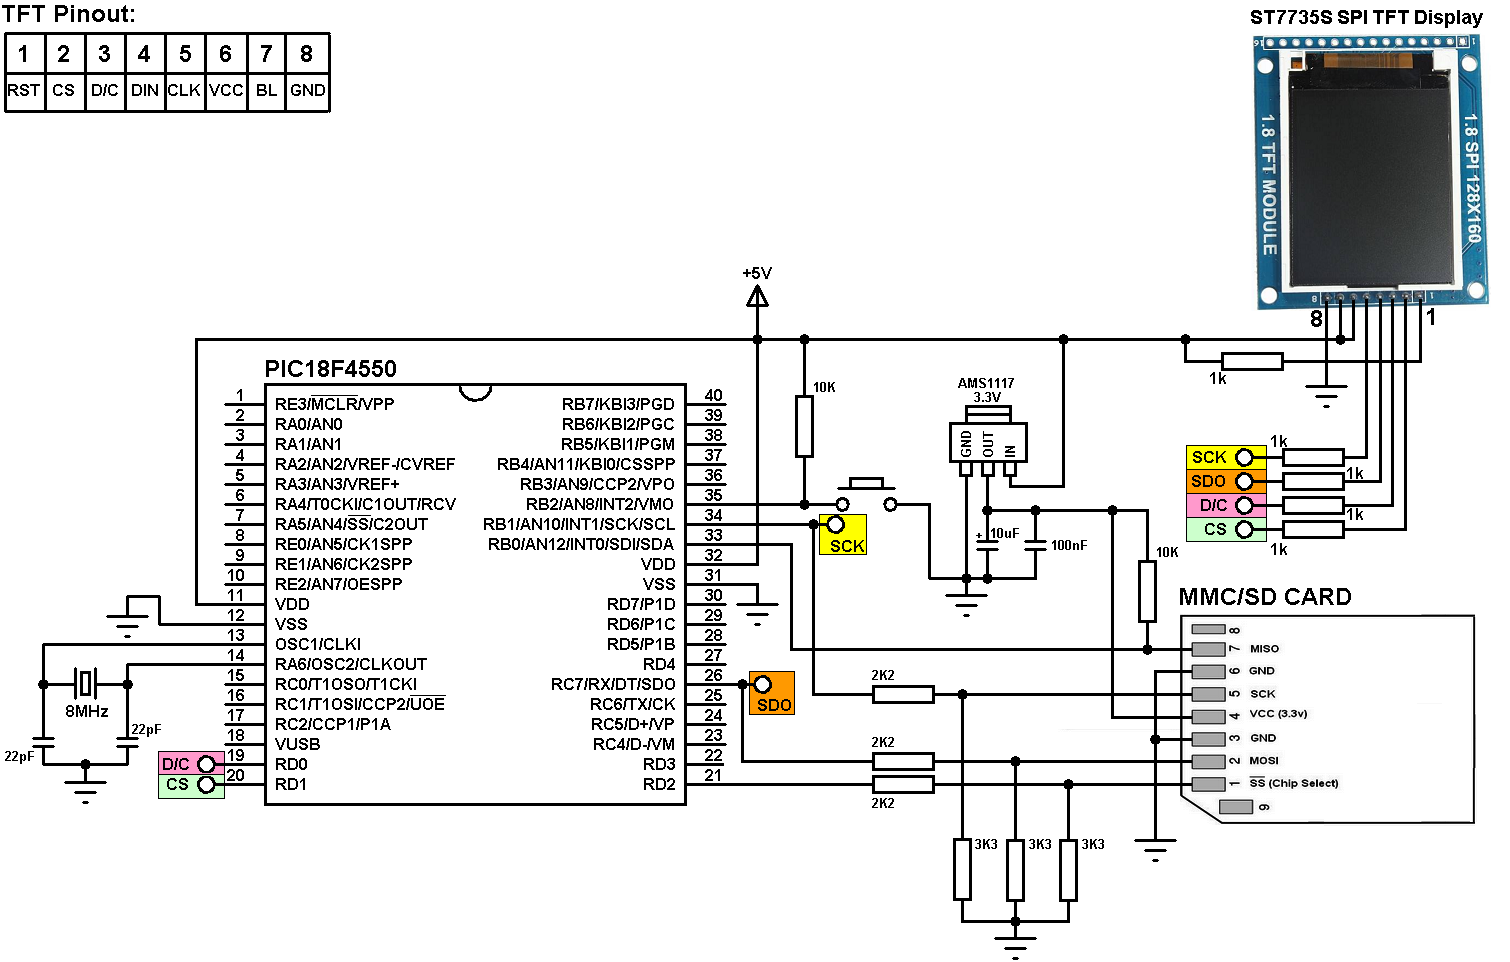
The microcontroller PIC18F4550 has 1 SPI module only, both the ST7735 TFT and the SD card share the same SPI module. We could use software SPI but the hardware SPI is much faster.
The AMS1117 3.3V voltage regulator steps down the 5V into 3.3V, it is used to supply the SD card with 3.3V. Also there are 3 voltage dividers in the circuit, each voltage divider consists of 3K3 and 2K2 resistors, it is used to get about 3V from the outputs of the PIC18F4550.
The ST7735 board also has AMS1117 3.3V regulator which can be used to supply the SD card.
Connecting the PIC18F4550 data pins directly to the SD card without the voltage dividers may damage the SD card. The only pin which is connected directly from the microcontroller to the SD card is the SDI pin (MISO).
The PIC18F4550 runs with 8MHz crystal oscillator and with the PLL enabled the microcontroller now becomes run @ 48MHz and this is the maximum frequency of this type. With the frequency of 48MHz we get an SPI data transfer rate of 12Mbps.
The ST7735 D/C (Data/Command) pin is connected to pin RD0 and CS (Chip Select) pin is connected to pin RD1. The other pins which are DIN (Data IN) and CLK (Clock) are connected to hardware SPI pins of the MCU.
There is a button connected to pin RB2, this button is used to switch the images.
Display BMP images from SD card on ST7735 TFT screen C code:
This was tested with CCS PIC C compiler versions 5.059 and 5.070 with no error or warning.
As mentioned above to be able to compile this code the ST7735 TFT display and SD card drivers and the FAT16 library for CCS C compiler must be added to the project folder.
To use the hardware SPI module with the ST7735 we’ve to define:
#define TFT_SPI_HARDWARE
To enable the drawing of Bitmap (BMP) images from the SD card we’ve to define:
#define DRAW_BMP_FROM_MMCSD_CARD
We can define the pixel buffer with the following line. If it is not defined the pixel buffer default value is 10 bytes. Bigger pixel buffer ==> higher speed.
#define pixel_buffer 500
SD Card uses the hardware SPI by defining:
#define SDCARD_SPI_HW
The the drivers of the ST7735 TFT and the SD card and the FAT16 library are included:
#include <sdcard.c>
#include <fat16.c>
#include <ST7735_TFT.c>
On my SD card there are 28 bmp images named from ‘a’ to ‘z’ (a.bmp, b.bmp, c.bmp …….). To write all the names in the code is painful and may consumes more RAM. For that, I used a string of 5 characters named bmp[6] (6 = 5 characters + ” ) and I copied the string “A.bmp” into it and used the variable i to change the first letter of the array bmp. The letter ‘A’ in ASCII code decimal = 65 , ‘B’ = 66 ……………..’Z’ = 90. If i > ‘Z’ ==> i = ‘A’ (if i > 90 ==> i = 65).
Note that FAT16 library is letter insensitive ( ‘A’ = ‘a’ ………….).
The function fat16_init() returns 0 if OK and 1 if an error occurred.
To draw any BMP image file just use the function bmpDraw(x, y, bmp_file_name); where:
bmp_file_name: is the BMP image file name (file name + extension must be < 13 character).
x and y: are the TFT screen coordinates.
If there is no SD card or there is a problem while the initialization of the SD card and FAT16 file system the display will show the message “FAT16 Initialization Error!”. This text is displayed using the function drawtext(x, y, text, text_color, background_color, text_size); .

If the BMP image is not 128×160 the TFT screen will display the upper left 128×160 part as shown in this picture:
The full C code is the one below.
1 2 3 4 5 6 7 8 9 10 11 12 13 14 15 16 17 18 19 20 21 22 23 24 25 26 27 28 29 30 31 32 33 34 35 36 37 38 39 40 41 42 43 44 45 46 | // Display BMP images from SD card on ST7735 1.8" (128x160) TFT screen. // ST7735 TFT driver, MCC/SD card driver and Fat16 library for CCS C compiler // must be installed! // TFT module connections #define TFT_CS PIN_D1 #define TFT_DC PIN_D0 #define TFT_SPI_HARDWARE // Hardware SPI module is used for the TFT // End TFT module connections #define DRAW_BMP_FROM_MMCSD_CARD // Enable BMP draw from SD card #define pixel_buffer 500 // Set pixel buffer to 500 // SD Card module connections #define SDCARD_SPI_HW // Hardware SPI module is used for the SD card #define SDCARD_PIN_SELECT PIN_D2 // End SD card module connections #include <18F4550.h> #fuses NOMCLR HSPLL PLL2 CPUDIV1 #use delay(clock = 48MHz) #use fast_io(D) #include <sdcard.c> // SD card diver source code #include <fat16.c> // FAT16 library source code #include <ST7735_TFT.c> // ST7735 TFT driver source code const int8 *txt = "FAT16 Initialization Error!"; int8 i = 'A', bmp[6]; void main(){ set_tris_d(0); // Configure PORTD pins as outputs delay_ms(2000); TFT_BlackTab_Initialize(); fillScreen(ST7735_BLACK); if(fat16_init() == 0){ strcpy (bmp, "A.bmp"); while(TRUE){ bmpDraw(0, 0, bmp); while(input(PIN_B2)); i++; if(i > 90) i = 'A'; bmp[0] = i; } } else drawtext(0, 10, txt, ST7735_YELLOW, ST7735_BLACK, 2); } |
Display BMP images from SD card on ST7735 TFT video:
All the used BMP images are 128×160 and can be downloaded from the link below:
BMP images for ST7735 1.8″ TFT
Images Reference:
wallpaper.mob.org
//With PIC18F4550 did not work.
//It works with PIC18F45K22. Thank you!
//Changed and tested the code:
// SD Card module connections
#define SDCARD_SPI_HW // Hardware SPI module is used for the SD card
#define SDCARD_PIN_SELECT PIN_D3 // SD card chip select pin is connected to pin RD3
// End SD card module connections
// TFT module connections
#define TFT_CS PIN_D0
#define TFT_DC PIN_D1
#define TFT_SPI_HARDWARE
// End TFT module connections
#define DRAW_BMP_FROM_MMCSD_CARD // Enable BMP draw from SD card
#define pixel_buffer 350 // Set pixel buffer to 350
#include
#fuses NOMCLR NOWDT
#use delay(crystal = 20MHz)
#use fast_io(D)
#include // SD card diver source code
#include // FAT16 library source code
#include // ST7735 TFT driver source code
const int8 *txt = “FAT16 Initialization Error!”;
int8 i = ‘A’, bmp[6];
void main()
{
set_tris_d(0); // Configure PORTD pins as outputs
delay_ms(2000);
TFT_GreenTab_Initialize();
fillScreen(ST7735_BLUE);
if(fat16_init() == 0)
{
strcpy (bmp, “A.bmp”);
while(TRUE)
{
bmpDraw(0, 0, bmp);
while(input(PIN_B2));
i++;
if(i > 90)
i = ‘A’;
bmp[0] = i;
}
}
else
drawtext(0, 10, txt, ST7735_YELLOW, ST7735_BLACK, 2);
}
Good day!
Everything works with Arduino UNO: http://simple-circuit.com/draw-bmp-images-arduino-sd-card-st7735/#comment-6307, thank you!
The PIC18F4550 does not work: I think it is due to SPI. Everything is fine with LCD. Not with FAT16.
I only have 20MHz crystal. Simple-circuit can you please help?
I checked the data sheet, tried everything, nothing, no FAT16 initialization.
Your PIC runs with a 48MHz crystal. I have to change the setting for SPI in sdcard.c (for 20MHz). How do the SPI settings for crystal 20MHz look like?