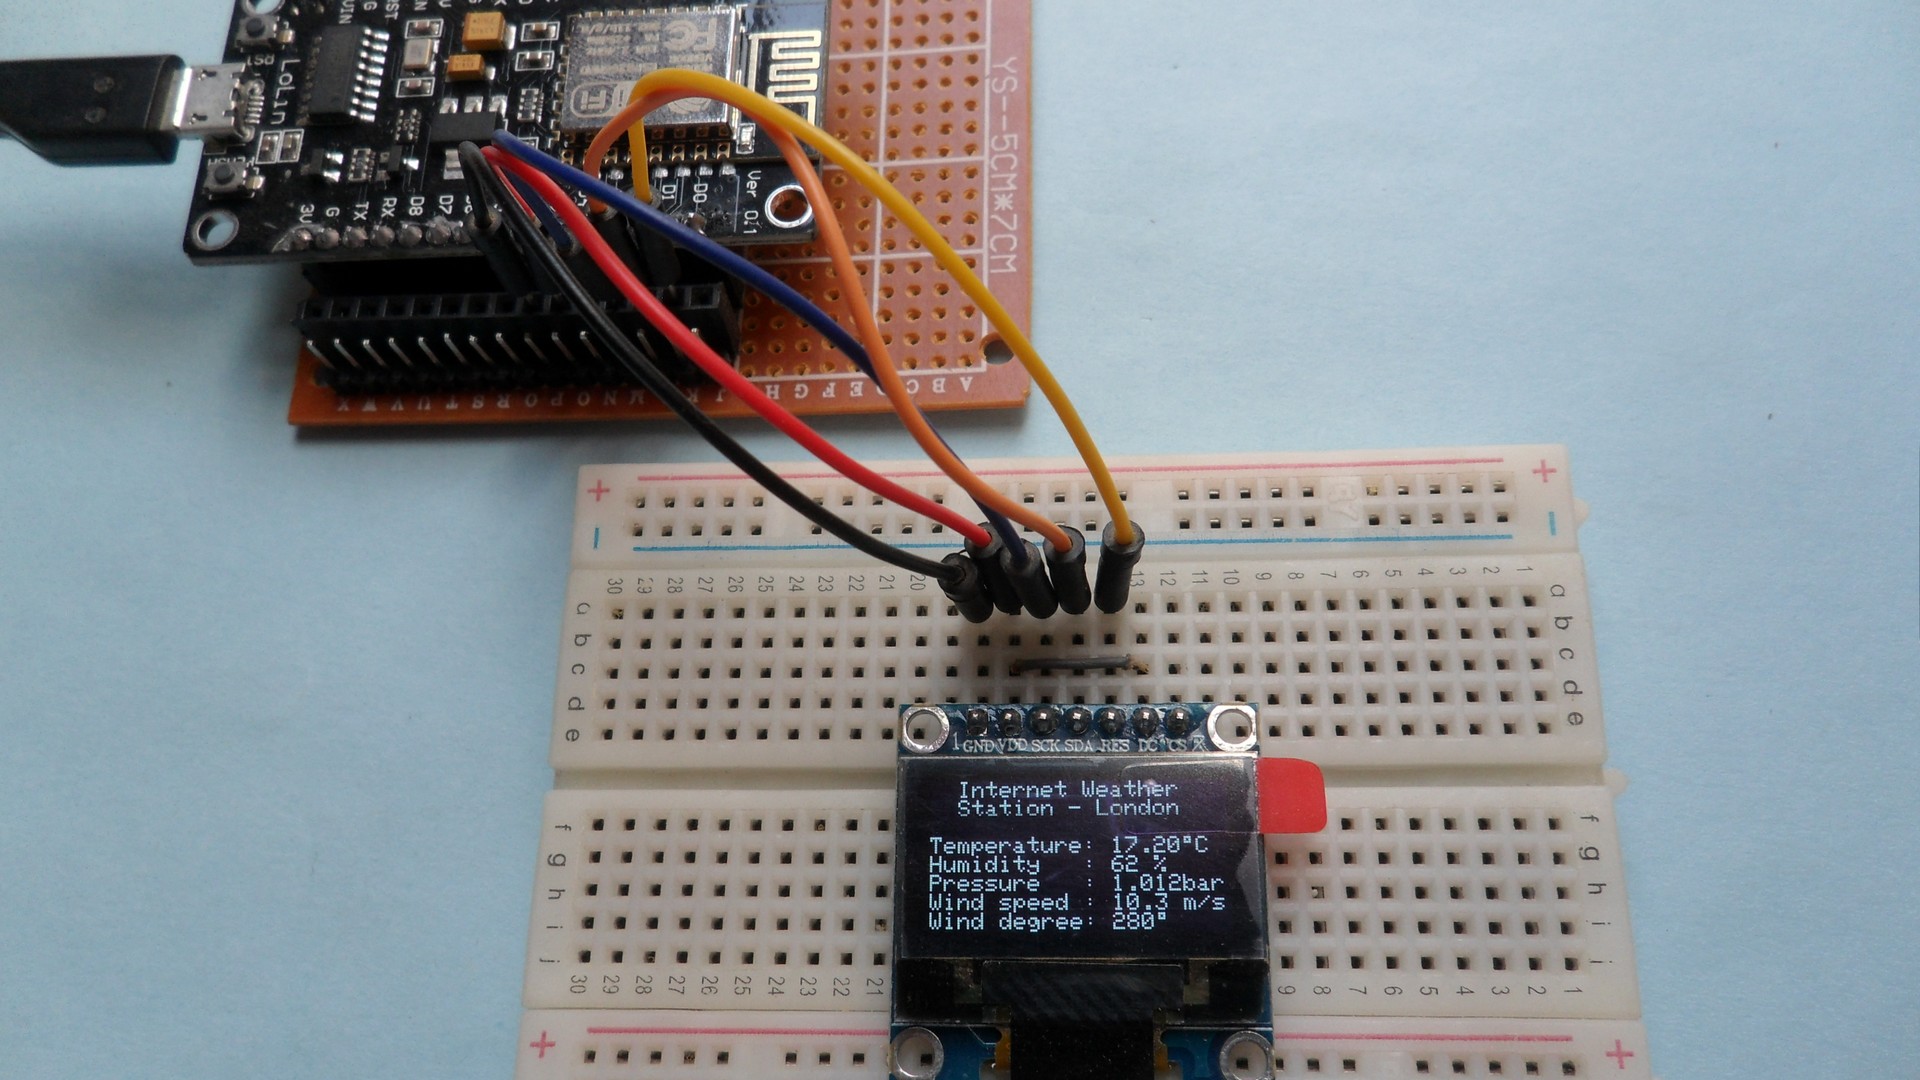
In this IoT project, I’m going to show how to make a simple internet weather station using ESP8266 NodeMCU (ESP-12E) Wi-Fi development board and SSD1306 OLED display (128×64 Pixel). The NodeMCU pulls weather data (temperature, humidity, pressure, wind speed and wind degree) from weather website openweathermap.org and display it on SSD1306 screen.
The SSD1306 OLED used in this project is configured to work in I2C mode, some SSD1306 OLED boards may require a small hardware modifications (to select between SPI mode or I2C mode) such as soldering, placing jumpers ….
Related Projects:
ESP8266 NodeMCU interfacing with SSD1306 OLED
NodeMCU Internet clock and weather station | IoT Projects
IoT | Internet weather station with ESP8266 Wi-Fi module
Hardware Required:
- ESP8266 NodeMCU development board
- SSD1306 OLED display with 128×64 Pixel resolution
- micro USB cable (for programming and powering the circuit)
- Breadboard
- Jumper wires
Internet weather station with NodeMCU and SSD1306 OLED circuit:
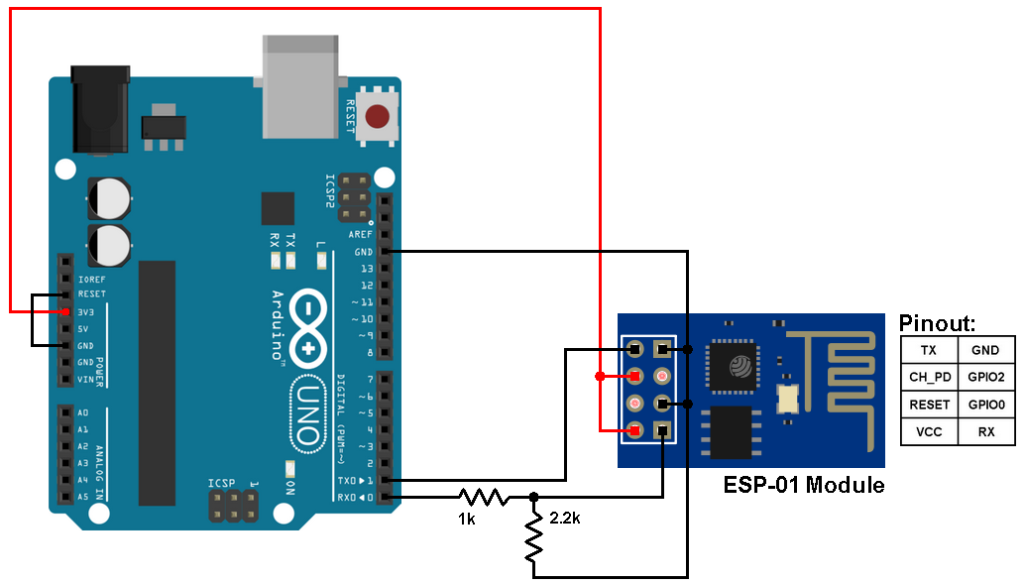
The following image shows project circuit schematic diagram.

And the following one shows fritzing circuit:
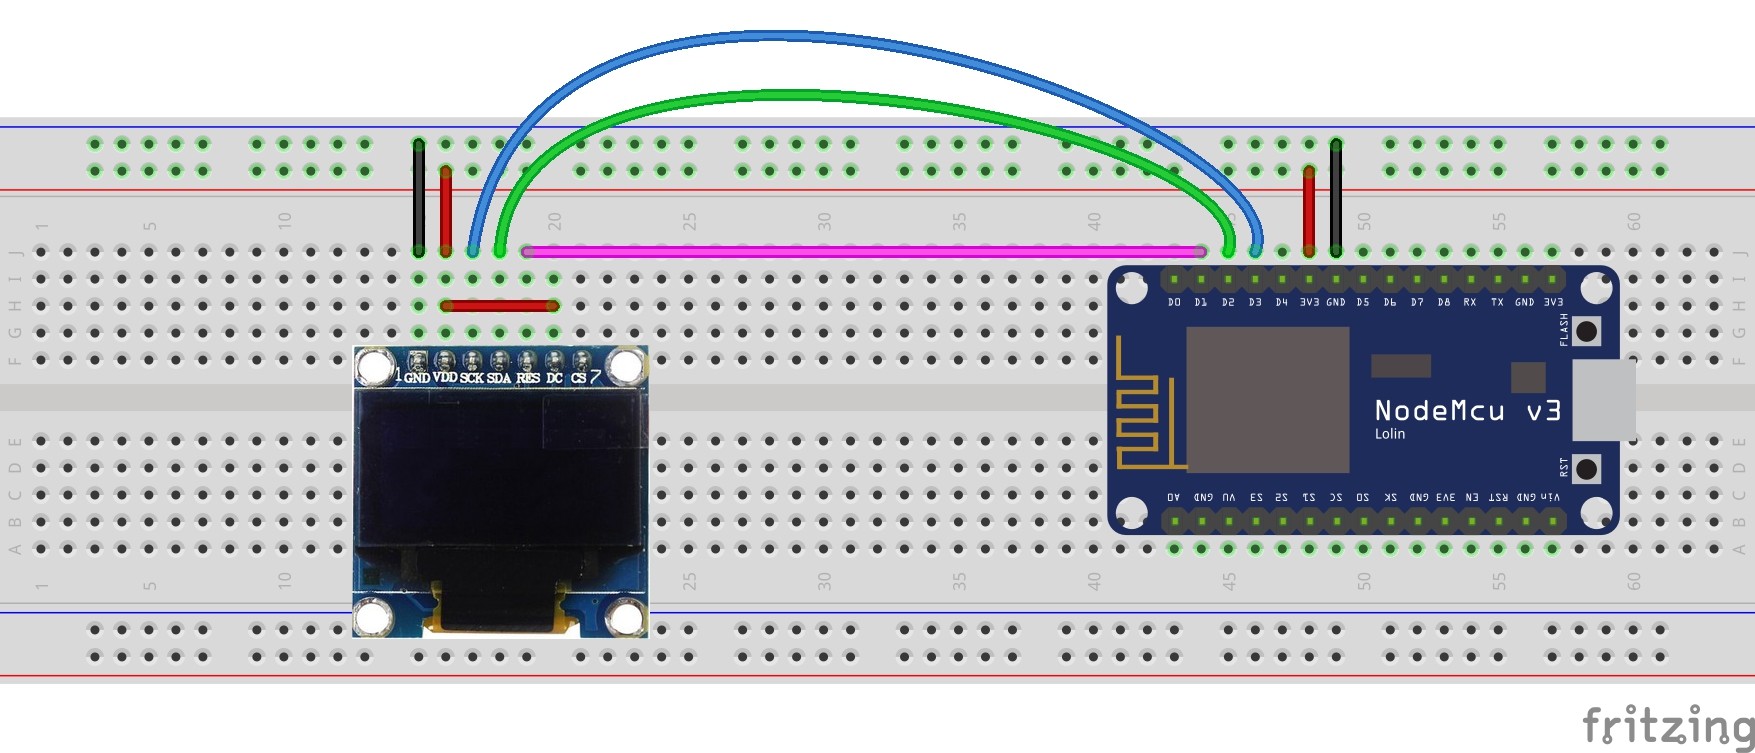
The SDA and SCL lines of the I2C bus come from GPIO4 (D2) and GPIO0 (D3) of the NodeMCU board (respectively), they are connected to SDA and SCL (SCK) pins of the SSD1306 display module.
Reset pin (RES) of the display module is connected to GPIO5 (D1) of the NodeMCU development board.
The SSD1306 display module is supplied with 3.3V which comes from the NodeMCU board.
Internet weather station with NodeMCU and SSD1306 OLED code:
The Arduino IDE code below uses Adafruit SSD1306 OLED driver and Adafruit GFX library for the communication between the NodeMCU and the screen module. Download links and how to install them, in the following post:
ESP8266 NodeMCU interfacing with SSD1306 OLED
To get weather data, I used openweathermap.org website, so first we’ve to sign up for a free account in order to get an API key which is important in this project. With the openweathermap.org website we can:
- Access current weather data for any location including over 200,000 cities
- Current weather is frequently updated based on global models and data from more than 40,000 weather stations
- Data is available in JSON, XML, or HTML format
- Available for Free and all other paid accounts
Once you sign in to your account (of course after the free registration), you’ll be directed to member area, go to API keys and you’ll find your API key as shown in the following image:
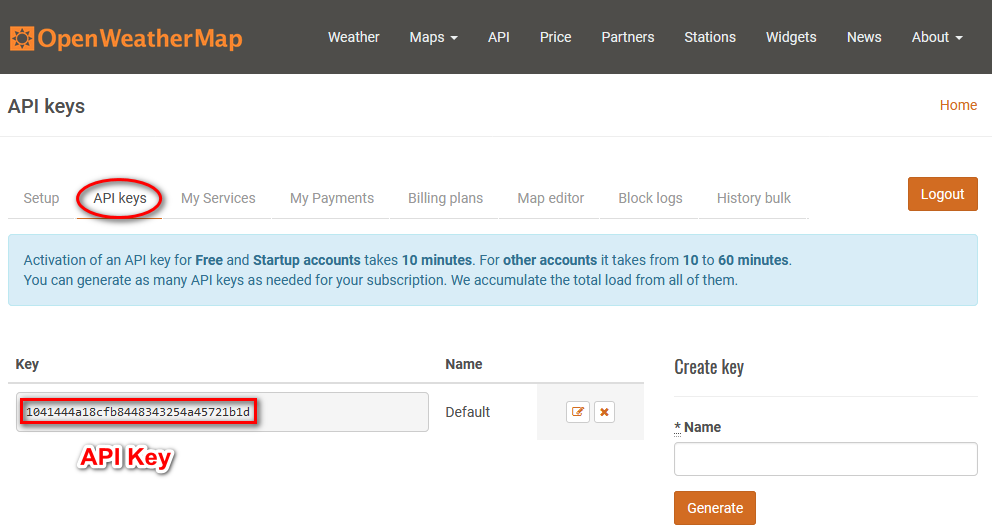
The API code is well shown, we’ll use it later.
With that key we can access weather data provided by the website, all what we do is entering the following URL into web browser (google Chrome, Mozilla Firefox …):
1 | http://api.openweathermap.org/data/2.5/weather?q=CITY,COUNTRY_CODE&APPID=YOUR_API_KEY |
Replace CITY by with the city you want weather data for, COUNTRY_CODE with the country code for that city (for example uk for the United Kingdom, us for the USA …) and YOUR_API_KEY with your API key which is shown above.
For example the weather in London, United Kingdom URL is (with my API key):
http://api.openweathermap.org/data/2.5/weather?q=London,uk&APPID=1041444a18cfb8448343254a45721b1d
Accessing this URL with a web browser gives:
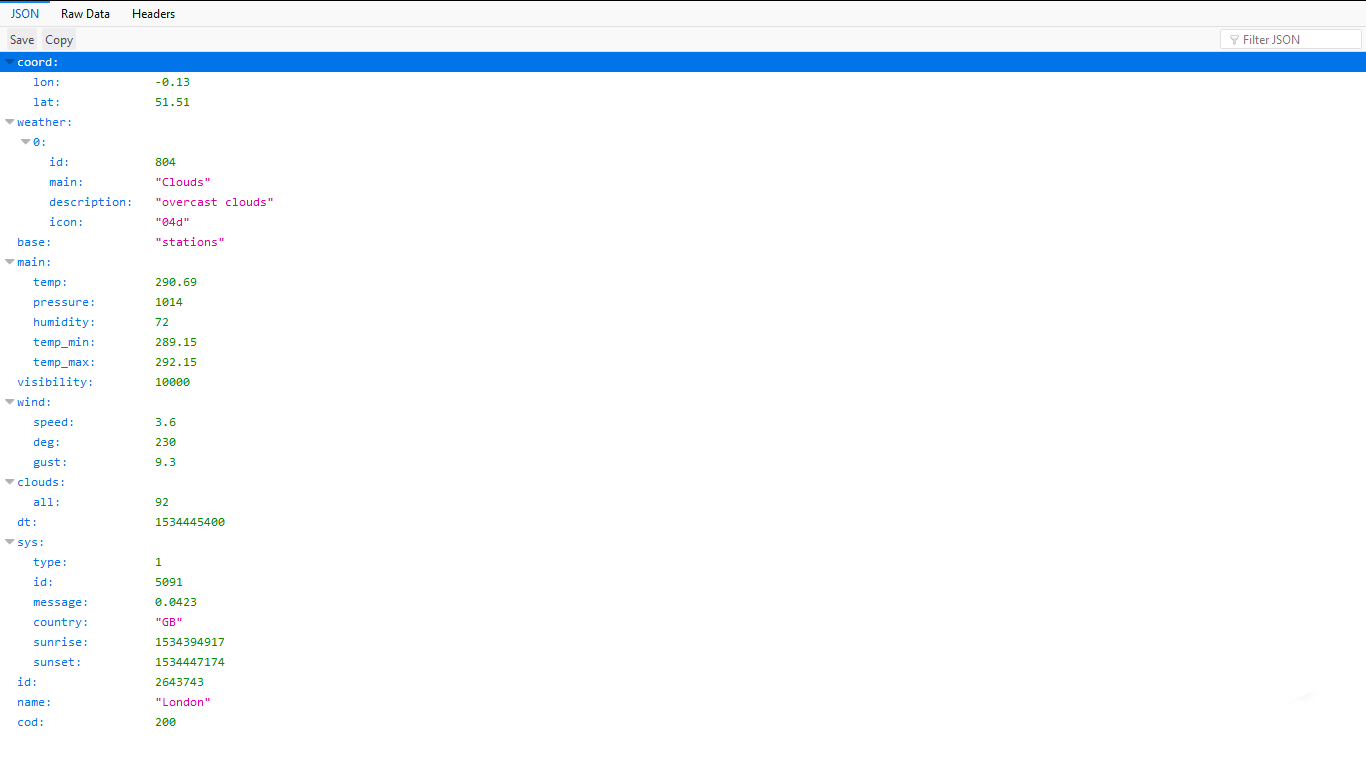
As mentioned above the openweathermap.org website provides weather data in JSON, XML, or HTML format. In this project we’ll use the JSON format which can be parsed using an Arduino library called ArduinoJSON.
Installing ArduinoJson library:
It’s easy to install the ArduinoJson library, we can do it by going to:
Arduino IDE –> Sketch –> Include Library –> Manage Libraries…
a new window will open, in the search box write: arduinojson
choose library version (I’m using version 5.13.2) and click on install.
We can install the library manually by downloading it from the following URL:
ArduinoJSON library
After the download, extract the zipped file and a folder with name ArduinoJSON-5.13.2 should appear. Move the folder to Arduino libraries folder, the folder should be renamed to ArduinoJSON (remove -5.13.2).
With a built-in library named: ESP8266HTTPClient we can read http pages, accessing a page is simple with this library, just by putting its URL as shown below where I placed the URL of London city weather:
1 | http.begin("http://api.openweathermap.org/data/2.5/weather?q=London,uk&APPID=1041444a18cfb8448343254a45721b1d"); |
After that we’ve to read and save the whole JSON page as a string:
1 | String payload = http.getString(); //Get the request response payload |
And finally the ArduinoJSON library does its job and decodes the JSON string:
1 | JsonObject& root = jsonBuffer.parseObject(payload); |
the openweathermap.org website provides temperature in °K (degree Kelvin) and to convert the °K into °C (degree Celsius) we’ve to substruct 273.15 from it. For that I used the following line:
1 | float temp = (float)(root["main"]["temp"]) - 273.15; // get temperature |
Also, it gives the pressure in hPa (Hectopascal) with 1 hPa = 100 Pascal = 1/1000 bar:
1 | float pressure = (float)(root["main"]["pressure"]) / 1000; // get pressure |
Humidity is in %, wind speed in m/s (meters per second) and wind degree in degrees (°).
The following website provides a good help with JSON format:
ArduinoJson Assistant
In code, don’t forget to replace YOUR WIFI SSID and YOUR WIFI PASSWORD.
1 2 3 | // set Wi-Fi SSID and password const char *ssid = "YOUR WIFI SSID"; const char *password = "YOUR WIFI PASSWORD"; |
Also we can set the location and the API key using the following two lines (number 25 and 26) where in this example I’m setting the location to London, United Kingdom and the API key to my API key:
1 2 3 | // set location and API key String Location = "London,uk"; String API_Key = "1041444a18cfb8448343254a45721b1d"; |
Full code:
1 2 3 4 5 6 7 8 9 10 11 12 13 14 15 16 17 18 19 20 21 22 23 24 25 26 27 28 29 30 31 32 33 34 35 36 37 38 39 40 41 42 43 44 45 46 47 48 49 50 51 52 53 54 55 56 57 58 59 60 61 62 63 64 65 66 67 68 69 70 71 72 73 74 75 76 77 78 79 80 81 82 83 84 85 86 87 88 89 90 91 92 93 94 95 96 97 98 99 100 101 102 103 104 105 106 107 108 109 110 111 112 113 114 115 116 117 118 119 120 121 122 123 | /************************************************************************************** ESP8266 NodeMCU WiFi Internet weather station with SSD1306 OLED display This is a free software with NO WARRANTY. http://simple-circuit.com/ ***************************************************************************************/ #include <ESP8266WiFi.h> #include <ESP8266HTTPClient.h> // http web access library #include <ArduinoJson.h> // JSON decoding library // Libraries for SSD1306 OLED display #include <Wire.h> // include wire library (for I2C devices such as the SSD1306 display) #include <Adafruit_GFX.h> // include Adafruit graphics library #include <Adafruit_SSD1306.h> // include Adafruit SSD1306 OLED display driver #define OLED_RESET 5 // define SSD1306 OLED reset at ESP8266 GPIO5 (NodeMCU D1) Adafruit_SSD1306 display(OLED_RESET); // set Wi-Fi SSID and password const char *ssid = "YOUR WIFI SSID"; const char *password = "YOUR WIFI PASSWORD"; // set location and API key String Location = "London,uk"; String API_Key = "1041444a18cfb8448343254a45721b1d"; void setup(void) { Serial.begin(9600); delay(1000); Wire.begin(4, 0); // set I2C pins [SDA = GPIO4 (D2), SCL = GPIO0 (D3)], default clock is 100kHz // by default, we'll generate the high voltage from the 3.3v line internally! (neat!) display.begin(SSD1306_SWITCHCAPVCC, 0x3D); // initialize with the I2C addr 0x3D (for the 128x64) // init done Wire.setClock(400000L); // set I2C clock to 400kHz display.clearDisplay(); // clear the display buffer display.setTextColor(WHITE, BLACK); display.setTextSize(1); display.setCursor(0, 0); display.println(" Internet Weather"); display.print(" Station - London"); display.display(); WiFi.begin(ssid, password); Serial.print("Connecting."); display.setCursor(0, 24); display.println("Connecting..."); display.display(); while ( WiFi.status() != WL_CONNECTED ) { delay(500); Serial.print("."); } Serial.println("connected"); display.print("connected"); display.display(); delay(1000); } void loop() { if (WiFi.status() == WL_CONNECTED) //Check WiFi connection status { HTTPClient http; //Declare an object of class HTTPClient // specify request destination http.begin("http://api.openweathermap.org/data/2.5/weather?q=" + Location + "&APPID=" + API_Key); // !! int httpCode = http.GET(); // send the request if (httpCode > 0) // check the returning code { String payload = http.getString(); //Get the request response payload DynamicJsonBuffer jsonBuffer(512); // Parse JSON object JsonObject& root = jsonBuffer.parseObject(payload); if (!root.success()) { Serial.println(F("Parsing failed!")); return; } float temp = (float)(root["main"]["temp"]) - 273.15; // get temperature in °C int humidity = root["main"]["humidity"]; // get humidity in % float pressure = (float)(root["main"]["pressure"]) / 1000; // get pressure in bar float wind_speed = root["wind"]["speed"]; // get wind speed in m/s int wind_degree = root["wind"]["deg"]; // get wind degree in ° // print data Serial.printf("Temperature = %.2f°C\r\n", temp); Serial.printf("Humidity = %d %%\r\n", humidity); Serial.printf("Pressure = %.3f bar\r\n", pressure); Serial.printf("Wind speed = %.1f m/s\r\n", wind_speed); Serial.printf("Wind degree = %d°\r\n\r\n", wind_degree); display.setCursor(0, 24); display.printf("Temperature: %5.2f C\r\n", temp); display.printf("Humidity : %d %%\r\n", humidity); display.printf("Pressure : %.3fbar\r\n", pressure); display.printf("Wind speed : %.1f m/s\r\n", wind_speed); display.printf("Wind degree: %d", wind_degree); display.drawRect(109, 24, 3, 3, WHITE); // put degree symbol ( ° ) display.drawRect(97, 56, 3, 3, WHITE); display.display(); } http.end(); //Close connection } delay(60000); // wait 1 minute } // End of code. |
The following image shows Arduino IDE serial monitor output:

per usare una ESP8266-01 cambia qualcosa nel codice?
mi potresti aiutare con quello grazie.
Make sure you are using ArduinoJson 5 (last) and not the others or 6.
Arduino: 1.8.8 (Windows 10), Board: “NodeMCU 1.0 (ESP-12E Module), 80 MHz, Flash, Enabled, 4M (no SPIFFS), v2 Lower Memory, Disabled, None, Only Sketch, 115200”
C:\Users\walma\OneDrive\Documents\Arduino\weather_screen\weather_002\weather_002.ino: In function ‘void loop()’:
weather_002:82:7: error: ‘DynamicJsonBuffer’ was not declared in this scope
DynamicJsonBuffer jsonBuffer(512);
weather_002:82:25: error: expected ‘;’ before ‘jsonBuffer’
DynamicJsonBuffer jsonBuffer(512);
\
What did I do Wrong?
Make sure that the ArduinoJson library is correctly installed!