PIC18F4550 microcontroller has USB module which can work as a HID (Human Interface Device). The USB HID device doesn’t need any additional driver because it’s already installed in most of modern operating systems.
Using PIC18F4550 as a HID device we can easily transfer data between PC and the microcontroller as shown at the following URL:
PIC18F4550 USB HID Example using CCS PIC C
This topic shows how to build a simple USB HID mouse using PIC18F4550 microcontroller (PIC18F2550 can also be used).
Required Components:
- PIC18F4550 Microcontroller ( or PIC18F2550)
- 8MHz Crystal Oscillator
- 2 x 22pF capacitors
- 470nF Capacitor
- 6 Push-Buttons
- USB Connector
- +5V Power Supply (USB VCC can be used)
- Protoboard
- Jumper Wires
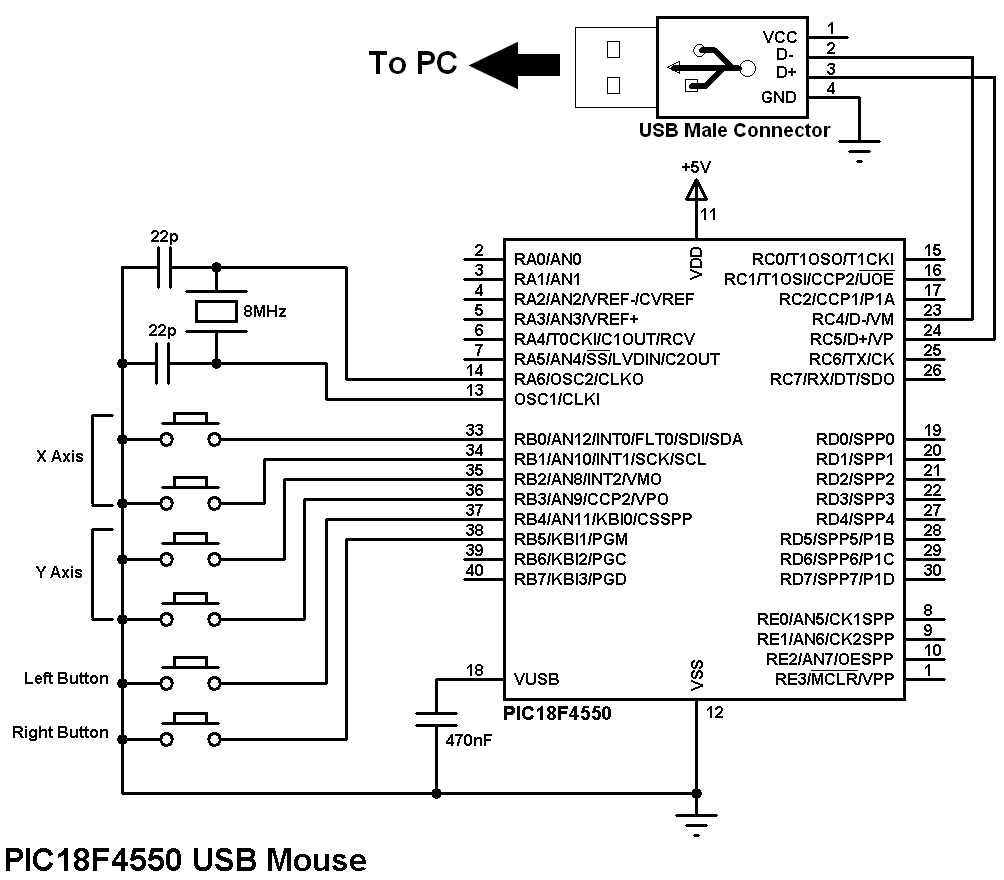
Project circuit schematic is shown below:
USB Mouse using PIC18F4550 C code:
The CCS C compiler has USB Mouse driver which allows us to build a USB mouse more easily. The following line is used to add this driver to this project:
#include <usb_desc_mouse.h>
In this project there is no need to receive data from the HID device, we have only to send data to this device using the following line:
usb_put_packet(1, out_data, 4, USB_DTS_TOGGLE);
Where out_data is an array of 4 elements (4 bytes):
Byte 1 corresponds to button status. The left button of the mouse is represented by 0x01 and the right button is represented by 0x03.
Byte 2 and byte 3 correspond to X axis and Y axis directions.
Byte 4 for the mouse wheel which is not used in this project.
The X axis and Y axis bytes are signed int8 which can vary from -127 to 127. The ( – ) sign indicates direction ( for X axis left/right and for Y axis up/down) and the number means number of steps at a time.
The complete C code is as the one below, it was tested with version 5.051.
1 2 3 4 5 6 7 8 9 10 11 12 13 14 15 16 17 18 19 20 21 22 23 24 25 26 27 28 29 30 31 32 33 34 35 36 37 38 39 40 41 42 43 44 45 46 47 48 49 50 51 52 53 54 55 56 57 58 59 60 61 62 63 64 65 66 67 68 69 70 71 72 | // PIC18F4550 USB Mouse CCS C code #include <18F4550.h> #fuses HSPLL PLL2 CPUDIV1 USBDIV VREGEN NOMCLR #use delay(clock = 48000000) #include <usb_desc_mouse.h> #include<pic18_usb.h> #include<usb.c> #use fast_io(B) char out_data[4]; void main(){ setup_adc_ports(NO_ANALOGS); // Configure all AN pins as digital output_b(0); // PORTB initial state set_tris_b(0x3F); // Configure RB0 to RB5 as inputs port_b_pullups(TRUE); // Enable PORTB pull-ups usb_init_cs(); // Initialize USB hardware delay_ms(1000); while(TRUE){ usb_task(); if(usb_enumerated()){ // If the device has been enumerated by the PC while(!input(PIN_B0)){ out_data[0] = 0; out_data[1] = 1; out_data[2] = 0; out_data[3] = 0; usb_put_packet(1,out_data,4,USB_DTS_TOGGLE); } while(!input(PIN_B1)){ out_data[0] = 0; out_data[1] = -1; out_data[2] = 0; out_data[3] = 0; usb_put_packet(1,out_data,4,USB_DTS_TOGGLE); } while(!input(PIN_B2)){ out_data[0] = 0; out_data[1] = 0; out_data[2] = 1; out_data[3] = 0; usb_put_packet(1,out_data,4,USB_DTS_TOGGLE); } while(!input(PIN_B3)){ out_data[0] = 0; out_data[1] = 0; out_data[2] = -1; out_data[3] = 0; usb_put_packet(1, out_data, 4, USB_DTS_TOGGLE); } while(!input(PIN_B4)){ out_data[0] = 1; out_data[1] = 0; out_data[2] = 0; out_data[3] = 0; usb_put_packet(1,out_data,4,USB_DTS_TOGGLE); } while(!input(PIN_B5)){ while(!input(PIN_B5)); out_data[0] = 3; out_data[1] = 0; out_data[2] = 0; out_data[3] = 0; usb_put_packet(1,out_data,4,USB_DTS_TOGGLE); } out_data[0] = 0; out_data[1] = 0; out_data[2] = 0; out_data[3] = 0; usb_put_packet(1,out_data,4,USB_DTS_TOGGLE); } } } |
USB Mouse using PIC18F4550 video:
This video shows a simple hardware circuit connected to PC where the screen is divided into two parts, the left part is a recorded video of the PC screen and the right side shows the hardware circuit.
Do you think that it can be controlled by potentiometers instead of switches?
I’m experimenting with the code to use the gamepad analog stick as a mouse.
I have a signed int8 variable for X and Y (signed int x=0,y=0;) but i was wondering if it can be changed to int16 to use the full 10bit ADC on the pic18f4550 for more precision of movement, because when i move the joystick it jumps very fast to the left corner or rigth corner, up and down respectively.
My code at the moment looks like this:
set_adc_channel(0);
delay_us(20);
x=read_adc();
delay_us(20);
set_adc_channel(1);
delay_us(20);
x=read_adc();
delay_us(20);
out_data[0]=0; //Boton izquierdo
out_data[1]=x; //Eje X positivo y negativo
out_data[2]=y; //Eje Y positivo y negativo
out_data[3]=0; //Boton derecho
usb_put_packet(1,out_data,4,USB_DTS_TOGGLE);