Generally the LCD display needs at least 6 data lines to operate. But there are some microcontrollers don’t have this number of available pins like the PIC12F family, which means that we have to find a solution to decrease the number of pins used by the LCD display.
The idea is sending data serially to the LCD display via shift register, this shift register is serial-in parallel-out which receives serial data from the microcontroller via two pins data pin and clock pin.
Any serial-in parallel out shift register can be used for example: 74HC595, 74HC164, CD4094 (HEF4094)… Circuit schematics are below.
3-Wire LCD driver CCS C source code:
This is the full C code of the driver.
This driver tested with 1602 (16×2) LCD and 2004 (20×4) with crystal frequencies 8MHz and 48MHz.
1 2 3 4 5 6 7 8 9 10 11 12 13 14 15 16 17 18 19 20 21 22 23 24 25 26 27 28 29 30 31 32 33 34 35 36 37 38 39 40 41 42 43 44 45 46 47 48 49 50 51 52 53 54 55 56 57 58 59 60 61 62 63 64 65 66 67 68 69 70 71 72 73 74 75 76 77 78 79 80 81 82 83 84 85 86 87 88 89 90 91 92 93 94 95 96 97 98 99 100 101 102 103 104 105 106 107 108 | // 3-Wire LCD driver for CCS PIC C compiler (for HD44780 compliant controllers) #define LCD_FIRST_ROW 0x80 #define LCD_SECOND_ROW 0xC0 #define LCD_THIRD_ROW 0x94 #define LCD_FOURTH_ROW 0xD4 #define LCD_CLEAR 0x01 #define LCD_RETURN_HOME 0x02 #define LCD_CURSOR_OFF 0x0C #define LCD_UNDERLINE_ON 0x0E #define LCD_BLINK_CURSOR_ON 0x0F #define LCD_MOVE_CURSOR_LEFT 0x10 #define LCD_MOVE_CURSOR_RIGHT 0x14 #define LCD_TURN_ON 0x0C #define LCD_TURN_OFF 0x08 #define LCD_SHIFT_LEFT 0x18 #define LCD_SHIFT_RIGHT 0x1E short RS; void lcd_write_nibble(unsigned int8 n){ unsigned int8 i; output_low(LCD_CLOCK_PIN); output_low(LCD_EN_PIN); for( i = 8; i > 0; i = i >> 1){ if(n & i) output_high(LCD_DATA_PIN); else output_low(LCD_DATA_PIN); Delay_us(10); output_high(LCD_clock_PIN); Delay_us(10); output_low(LCD_clock_PIN); } if(RS) output_high(LCD_DATA_PIN); else output_low(LCD_DATA_PIN); for(i = 0; i < 2; i++){ Delay_us(10); output_high(LCD_clock_PIN); Delay_us(10); output_low(LCD_clock_PIN); } output_high(LCD_EN_PIN); delay_us(2); output_low(LCD_EN_PIN); } void LCD_Cmd(unsigned int8 Command){ RS = 0; lcd_write_nibble(Command >> 4); lcd_write_nibble(Command & 0x0F); if((Command == 0x0C) || (Command == 0x01) || (Command == 0x0E) || (Command == 0x0F) || (Command == 0x10) || (Command == 0x1E) || (Command == 0x18) || (Command == 0x08) || (Command == 0x14) || (Command == 0x02)) Delay_ms(50); } void LCD_GOTO(unsigned int8 col, unsigned int8 row){ switch(row){ case 1: LCD_Cmd(0x80 + col-1); break; case 2: LCD_Cmd(0xC0 + col-1); break; case 3: LCD_Cmd(0x94 + col-1); break; case 4: LCD_Cmd(0xD4 + col-1); break; } } void LCD_Out(unsigned int8 LCD_Char){ RS = 1; lcd_write_nibble(LCD_Char >> 4); delay_us(10); lcd_write_nibble(LCD_Char & 0x0F);break; } void LCD_Initialize(){ RS = 0; output_low(LCD_DATA_PIN); output_low(LCD_CLOCK_PIN); output_low(LCD_EN_PIN); output_drive(LCD_DATA_PIN); output_drive(LCD_CLOCK_PIN); output_drive(LCD_EN_PIN); delay_ms(40); lcd_Cmd(3); delay_ms(5); lcd_Cmd(3); delay_ms(5); lcd_Cmd(3); delay_ms(5); lcd_Cmd(2); delay_ms(5); lcd_Cmd(0x28); delay_ms(50); lcd_Cmd(0x0C); delay_ms(50); lcd_Cmd(0x06); delay_ms(50); lcd_Cmd(0x0C); delay_ms(50); } |
Or you can download the driver .C file from the following link:
3-Wire LCD driver
It is easy to add this file to your project just put it in your project folder or in the CCS PIC C driver folder.
As any file driver the 3-wire LCD driver must be included using the following line:
#include <3WireLCD.c>
3-Wire LCD CCS C driver routines:
When the 3-wire Lcd driver is used, the following variables must be declared as in this example where the data line mapped at RB0,the clock line at RB1 and the enable line at RB2:
#define LCD_DATA_PIN PIN_B0
#define LCD_CLOCK_PIN PIN_B1
#define LCD_EN_PIN PIN_B2
The driver routines are described below:
LCD_Initialize(); // Must be called before any other function.
LCD_GOTO(unsigned int8 col, unsigned int8 row); // Set write position on LCD (upper left is 1,1 and second row first position is 1,2)
LCD_Out(unsigned int8 LCD_Char); // Display Char on the LCD.
LCD_Cmd(unsigned int8 Command); // Send a command to the LCD
The following commands can be used with LCD_Com() (example: LCD_Com(LCD_CLEAR);)
LCD_FIRST_ROW Move cursor to the 1st row
LCD_SECOND_ROW Move cursor to the 2nd row
LCD_THIRD_ROW Move cursor to the 3rd row
LCD_FOURTH_ROW Move cursor to the 4th row
LCD_CLEAR Clear display
LCD_RETURN_HOME Return cursor to home position, returns a shifted display to its original position. Display data RAM is unaffected.
LCD_CURSOR_OFF Turn off cursor
LCD_UNDERLINE_ON Underline cursor on
LCD_BLINK_CURSOR_ON Blink cursor on
LCD_MOVE_CURSOR_LEFT Move cursor left without changing display data RAM
LCD_MOVE_CURSOR_RIGHT Move cursor right without changing display data RAM
LCD_TURN_ON Turn Lcd display on
LCD_TURN_OFF Turn Lcd display off
LCD_SHIFT_LEFT Shift display left without changing display data RAM
LCD_SHIFT_RIGHT Shift display right without changing display data RAM
3-Wire LCD circuit schematic:
The hardware circuit is simple all what we need is a shift register (74HC595, 74HC164, CD4094).
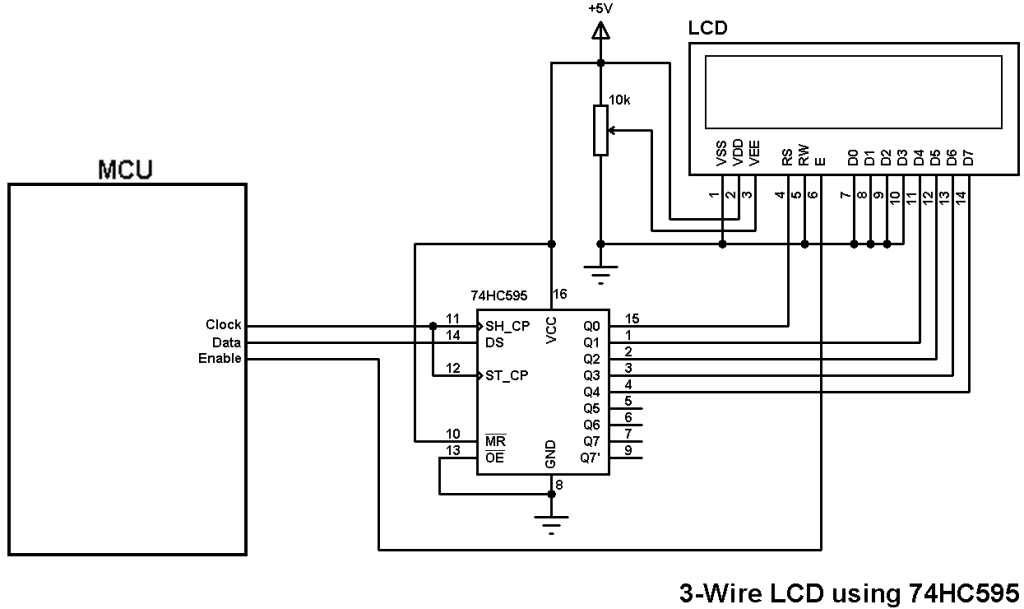
3-Wire LCD using 74HC595 shift register:
The following circuit schematic shows the connection circuit between the LCD, 74HC595 and the microcontroller.
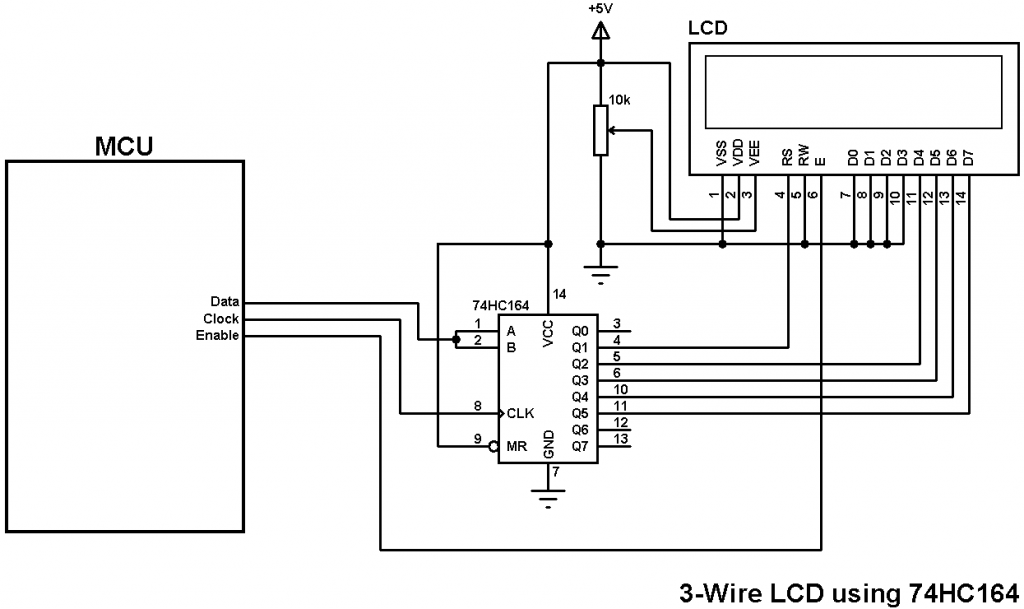
3-Wire LCD using 74HC164 shift register:
The following circuit schematic shows 3-wire LCD connection using 74HC164 shift register.
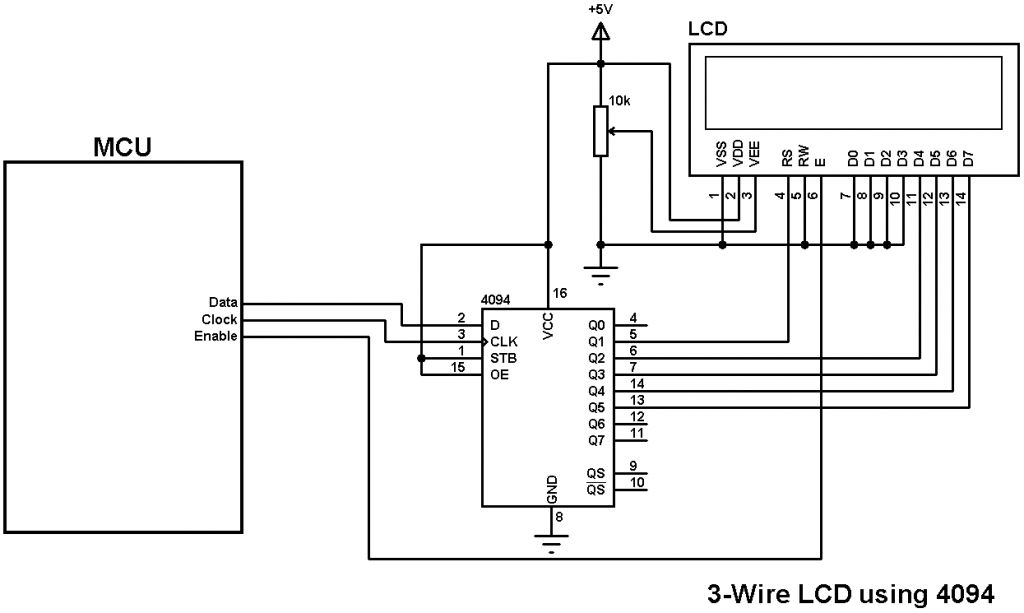
3-Wire LCD using 74HC4094 (HEF4094, CD4094) shift register:
The following circuit for LCD display connection with HEF4094 shift register.
Example:
The following URL shows how to interface PIC16F877A microcontroller with 3-wire LCD.
Interfacing PIC16F877A with 3-wire LCD
Discover more from Simple Circuit
Subscribe to get the latest posts sent to your email.