This post shows how to interface the PIC16F877A microcontroller with GPS module in order to receive data from satellites where the GPS module used in this project is u-blox NEO-6M (other modules also should work). With the NEO-6M GPS module we can measure position (latitude, longitude and altitude), time (UTC), date, speed and some other data. — GPS: Global Positioning System —
In this project I’ll send information of latitude, longitude, altitude, time (UTC), date, speed and course serially (using serial port) to the laptop (PC). Data are sent to the laptop after receiving it from the GPS module. The laptop displays all data with serial monitor software such as Windows hyper terminal, Arduino serial monitor, CCS C IDE (C-Aware IDE) serial monitor …
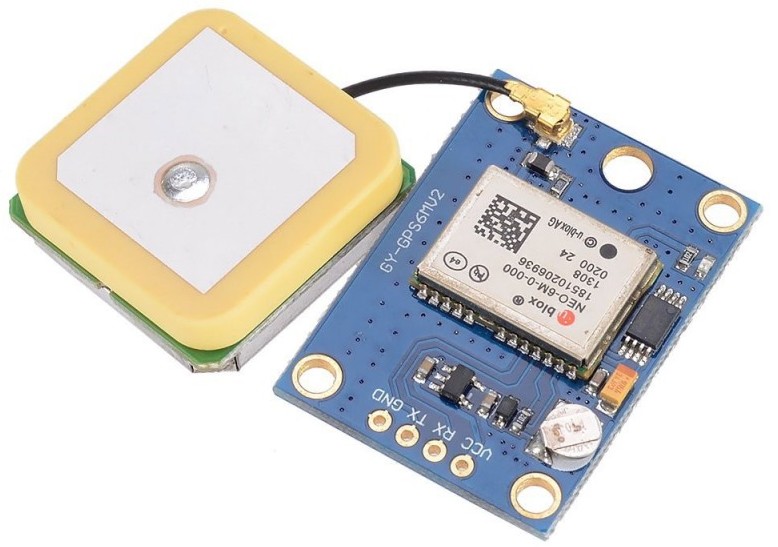
The NEO-6M GPS module which I’m using is similar to the one shown below:
Generally the NEO-6M GPS module has 4 pins: VCC, RX, TX and GND. It uses serial communication (UART protocol) to communicate with the microcontroller where RX/TX pins are for receiving/transmitting data from/to the microcontroller.
GPS Library for CCS C compiler:
To simplify this project I wrote a small library for GPS modules, this library decodes (parses) GPS NMEA sentences (the GPS module serially sends NMEA sentences to the MCU, these sentences contain all data we need, but they need to be decoded). This library gets all data from 2 sentences: RMC ($GPRMC) and GGA ($GPGGA). — NMEA: National Marine Electronics Association —
The GPS library decodes the RMC sentence which gives latitude, longitude, time, date, speed and course. It also decodes the GGA sentence in order to get altitude and number of satellites used by the module.
$GPRMC: Recommended minimum specific GPS/Transit data
$GPGGA: Global Positioning System Fix Data
GPS Library for CCS C compiler can be downloaded from the link below, its full name is “GPS_Lib.c“:
GPS Library download
after the download, add the library file (GPS_Lib.c) to project folder or CCS C compiler drivers folder.
Hardware Required:
- PIC16F877A microcontroller
- NEO-6M GPS module
- USB to serial converter (such as FT232RL)
- 8MHz crystal oscillator
- 2 x 22pF ceramic capacitor
- 10k ohm resistor
- 5V source
- Breadboard
- Jumper wires
Interfacing PIC16F877A with NEO-6M GPS module circuit:
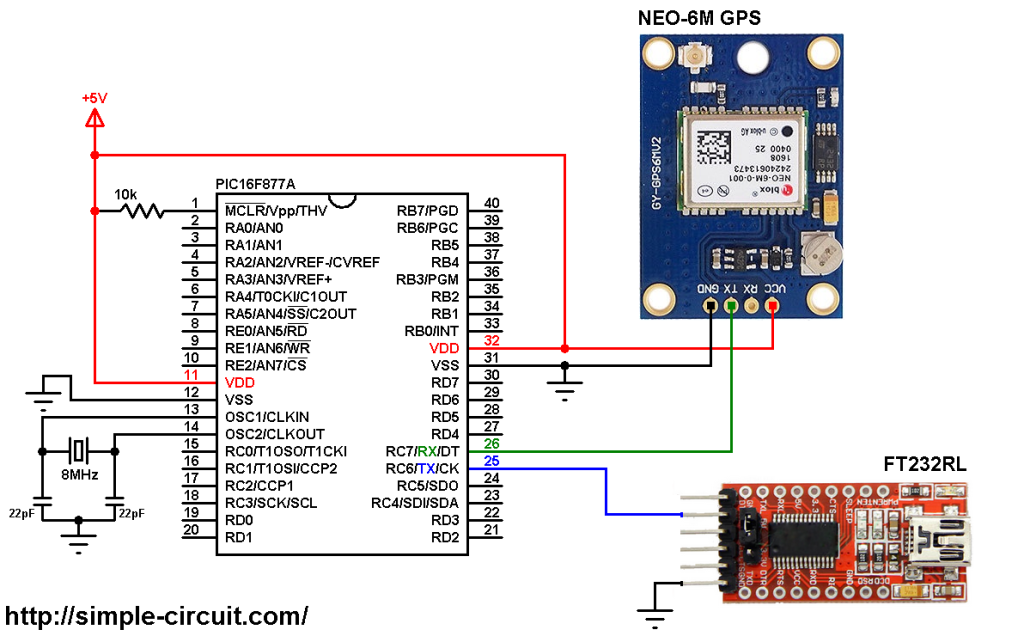
PIC16F877A project with the GPS module circuit is shown below.
(All grounded terminal are connected together)
The NEO-6M GPS module board has 4 pins connected as follows:
GND (Ground) pin connected to circuit GND
TX pin goes to PIC16F877A RX (RC7) pin (pin #26)
RX pin is not connected (there is no need to send data from the microcontroller to the GPS module)
VCC pin goes to circuit +5V pin.
To be able to send data from the microcontroller to the laptop we need a USB-to-Serial converter module. In this project I used the FT232RL module (FTDI232), other modules can be used including the Arduino boards.
The GND pin of the USB-to-Serial converter is connected to circuit ground and RX pin is connected to PIC16F877A TX (RC6) pin (pin #25).
In this project the PIC16F877A microcontroller runs with 8 MHz crystal oscillator.
Interfacing PIC16F877A with NEO-6M GPS module C code:
The C code below is for CCS C compiler, it was tested with version 5.051.
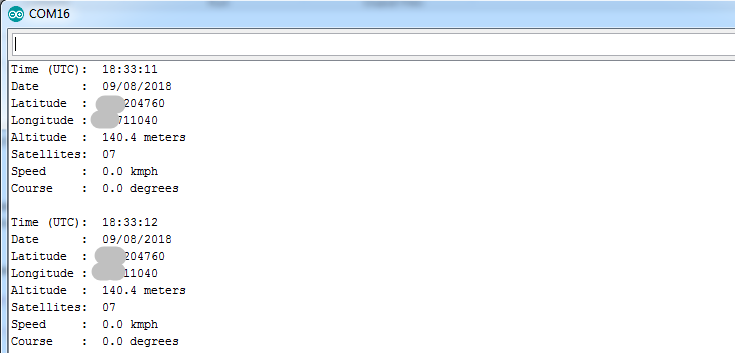
With the code below we can get the following data from the NEO-6M GPS module:
latitude, longitude, altitude, time (UTC), date , speed, course and number of satellites in use. The image below shows my result (I used Arduino IDE serial monitor):
CCS C Code:
1 2 3 4 5 6 7 8 9 10 11 12 13 14 15 16 17 18 19 20 21 22 23 24 25 26 27 28 29 30 31 32 33 34 35 36 37 38 39 40 41 42 43 44 45 46 47 48 49 50 51 52 53 54 55 56 | // Interfacing PIC16F877A with NEO-6M GPS module // http://simple-circuit.com/ #include <16F877A.h> #device PASS_STRINGS = IN_RAM #fuses HS,NOWDT,NOPROTECT,NOLVP #use delay(clock = 8MHz) #use RS232(UART1, BAUD = 9600, ERRORS) // UART configuration & initialization // include GPS library source file (GPS_Lib.c) #include <GPS_Lib.c> void main() { while(TRUE) { if(kbhit()) { if(GPSRead()) { // Time printf("Time (UTC): %02u", GPSHour()); printf(":%02u", GPSMinute()); printf(":%02u\r\n", GPSSecond()); //Date printf("Date : %02u", GPSDay()); printf("/%02u", GPSMonth()); printf("/20%02u\r\n", GPSYear()); // Latitude printf("Latitude : %.6f\r\n", Latitude()); // Longitude printf("Longitude : %.6f\r\n", Longitude()); // Altitude printf("Altitude : %.1f meters\r\n", Altitude()); // Number of satellites in use printf("Satellites: %02u\r\n", Satellites()); // Speed in kmph printf("Speed : %.1f kmph\r\n", Speed()); // Course in degrees printf("Course : %.1f degrees\r\n\r\n", Course()); } } } } // End of code |
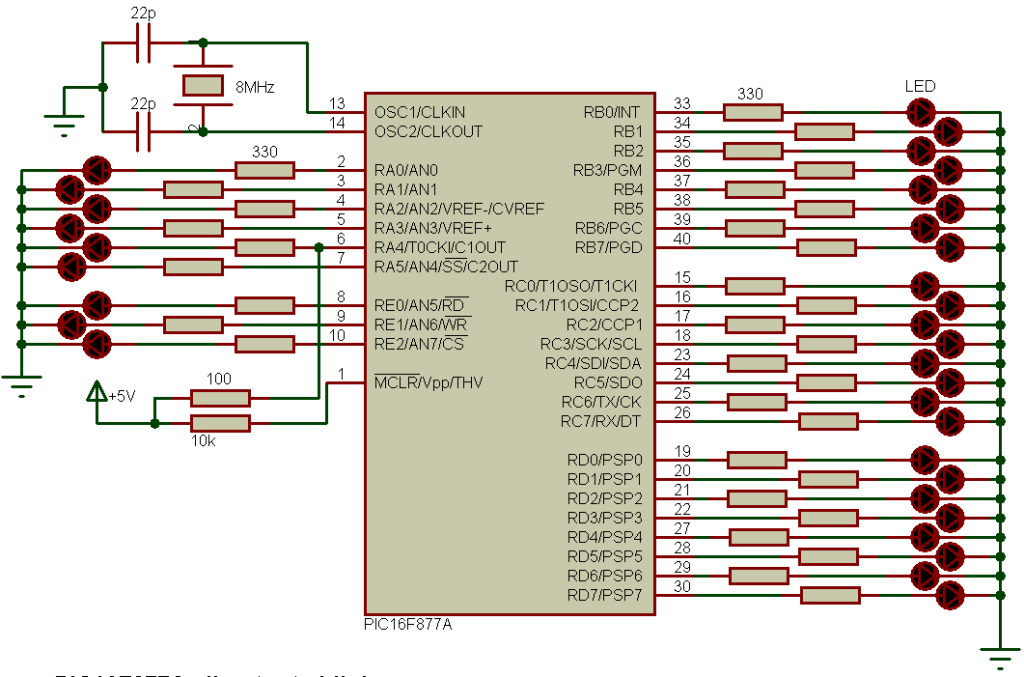
PIC16F877A + GPS module Proteus simulation:
We can easily simulate this project with Proteus simulation software. Proteus simulation file download link is below, use it with version 8.6 or higher:
PIC16F877A + GPS
The following video shows the simulation result:
Discover more from Simple Circuit
Subscribe to get the latest posts sent to your email.

Brother, when I define two separate rs232 ports as below and edit it as uint8_t c = fgetc(A); in GPS library, no data is coming from GPS. What could be the reason for this? When I write as uint8_t c = fgetc(A1); it works without any problem. How can I run this in stream=A?
#use rs232 (baud=9600, xmit=pin_C6, rcv=pin_C7, parity=N, stop=1, stream=A1, errors)
#use rs232 (baud=9600, xmit=pin_B6, rcv=pin_B7, parity=N, stop=1, stream=A, force_sw, errors)
Hello friend. First of all, it is a very nice work. I wish you continued success. My question is: how can we get location information with this module? For example, when it is done with Arduino, a location information like $GPRMC, 16…,A,…,N,05…,E,59… can be received and we can convert it to location information on the internet at https://rl.se/gprmc. How do we do this in CCS C? In other words, how can we get location information? Thank you in advance. I wish you a good day
Bro, excellent contributions, I have a problem … on a 4550 pic I’m making a datalogger, I’m using your example of controlling an SD memory together with 4 ADCs and it works perfectly … but when trying to append the gps control , everything works except the GPS … could you help me?
The detail is that the GPS does not send any type of information to the virtual terminal.
Brother, would the library be useful for the 18f4550?
Yes. This may help:
http://simple-circuit.com/neo-6m-gps-pic18f4550-interfacing/
#include file not opening.. plz help
Can u please share MPlabX c8 code. I am not aware about ccs??
Do you have a similar project compiled in xc8?
Using v5. 048
Try with this:
Directly after your device header file (example: #include <16F877A.h>) add the following line:
#device PASS_STRINGS = IN_RAM
I had already tried that for the record. I have solved the issue by removing changing line 50 from if(strcmp(sentence, “GPRMC”) == 0) to if(strcmp(sentence, GPRMC_ok) == 0), that appears to have resolved the issue
when compiling the program sends me an error with the library, because it sends that error?
Make sure that you’ve added GPS library source file (GPS_Lib.c) to your project folder.
I’ve been getting the same error, says “Line 50(36,37): Attempt to create a pointer to a constant. The GPS_Lib.c file is added to the project folder.
Which CCS C version are you using?
that same error getting for me also
Merhaba iyi akşamlar. Benim bir problemim vardı. Burada açıkladığınız ve gösterdiğiniz şekilde devreyi kurdum. Gps kütüphanesini de arduino ido uygulamasına yükledim. Lakin karşıma şöyle bir hata çıktı; ‘int1’ does not name a type. Yardımcı olursanız sevinirim.
If you’re using PIC microcontroller, use this code with CCS C compiler (not Arduino IDE),
and if you’re using Arduino, please visit this post:
Interfacing Arduino with NEO-6M GPS module