This small topic shows how to interface Arduino with Seeed Studio Grove LCD display that has 16 columns and 2 rows (16×2). This display communicates with the Arduino over I2C bus which means it requires only 2 data pins.
Currently, Seeed Studio provides 4 different models of the 16×2 LCD which are:
- The Grove – 16 x 2 LCD (RGB backlight)
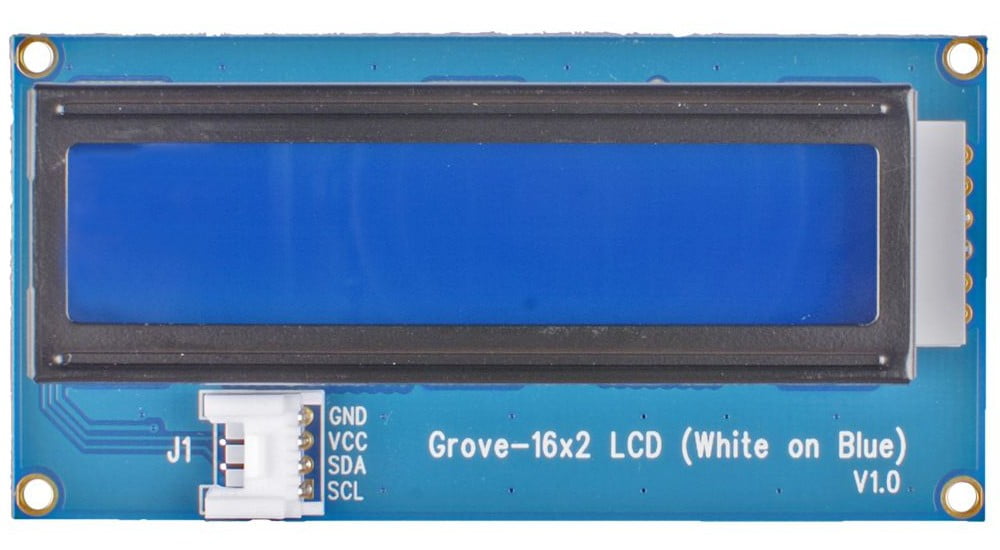
- The Grove – 16 x 2 LCD (White on Blue)
- The Grove – 16 x 2 LCD (Black on Red)
- The Grove – 16 x 2 LCD (Black on Yellow)
The RGB version of the Grove LCD allows us to fully control (through software) the backlight color whereas the other models has only one backlight color.
In this project I’m going to use Grove 16×2 LCD white on blue version which is shown below:
The Grove LCD display has the following features:
- Display construction: 16 Characters * 2 Lines
- Display mode: STN (Super-Twisted Nematic)
- On board MCU
- I2C-bus interface (only 2 data pins are required)
- Supports English and Japanese fonts
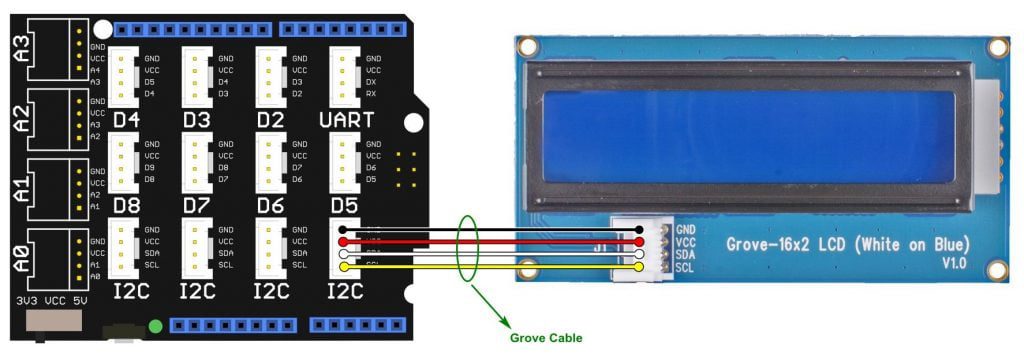
The Grove LCD display module is connected to Seeed Studio Base Shield via 4-pin Grove cable, the base shield is an add-on board that directly mounted to the Arduino/Genuino uno board.
The 4-pin cable pins are: GND, VCC, SDA (I2C serial data line) and SCL (I2C serial clock line).
Hardware Required:
- Arduino/Genuino UNO board —> Board details
- Grove base shield —> official page
- Grove LCD screen (1602 I2C LCD)
- Grove 4-pin cable
Interfacing Arduino with Grove LCD circuit:
The following image shows the connection of the 2 Grove modules (LCD and base shield) using 4-pin Grove cable.
Note that the base shield is directly mounted to the Arduino UNO board.
The Grove 16×2 LCD display is connected to base shield I2C port where:
GND pin is connected to Arduino GND,
VCC pin is connected to Arduino +5V pin,
SDA is connected to Arduino analog pin 4 (A4),
SCL is connected to Arduino analog pin 5 (A5).
Interfacing Arduino with Grove LCD Code:
Seeed Studio provides a nice open source library for their LCD module which can be installed from Arduino IDE library manager (Sketch —> Include Library —> Manage Libraries …, in the search box write “grove lcd” and install the one from Seeed Studio).
Or it can be installed manually, first download library compressed file from the following link:
Grove LCD display Library —> direct link
then, go to Arduino IDE —> Sketch —> Include Library —> Add .ZIP Library … and browse for the .zip file (previously downloaded).
Full Arduino code:
1 2 3 4 5 6 7 8 9 10 11 12 13 14 15 16 17 18 19 20 21 22 23 24 25 26 27 28 29 30 31 32 33 34 35 36 37 38 39 40 41 42 43 44 45 46 47 48 49 50 51 52 53 54 55 56 57 58 | /************************************************************************* * * Interfacing Arduino with Seeed Studio Grove LCD (I2C 16x2 LCD). * This is a free software with NO WARRANTY. * https://simple-circuit.com/ * ************************************************************************/ #include <Wire.h> // include Arduino Wire library #include "rgb_lcd.h" // include Seeed Studio LCD library rgb_lcd lcd; // initialize LCD library void setup() { // initialize the LCD with 16 columns and 2 rows: lcd.begin(16, 2); // move cursor to upper left position (0, 0) lcd.setCursor(0, 0); // print text on the LCD lcd.print("Hello, world!"); char txt[] = "Seeed Studio 16x2 LCD White on Blue \0"; lcd.setCursor(0, 1); // move cursor to second row lcd.print(txt); // print text array delay(1000); // wait a second while(txt[0] != '\0') { byte i = 0; lcd.setCursor(0, 1); while(txt[i] != '\0') // shift the text array to the left by 1 position { lcd.write(txt[i]); // print one character txt[i] = txt[i+1]; // shift the text array to the left i++; } lcd.write(' '); // print a space delay(200); // wait 200 milliseconds } delay(1000); // wait a second } // main loop void loop() { lcd.setCursor(0, 1); // move cursor to position (0, 1) // print number of seconds since the lase reset lcd.print( millis()/1000 ); delay(200); // wait 200 milliseconds } // end of example code. |
Interfacing Arduino with Grove LCD Video:
The following video shows my simple hardware circuit of Arduino with Grove LCD.
Discover more from Simple Circuit
Subscribe to get the latest posts sent to your email.


