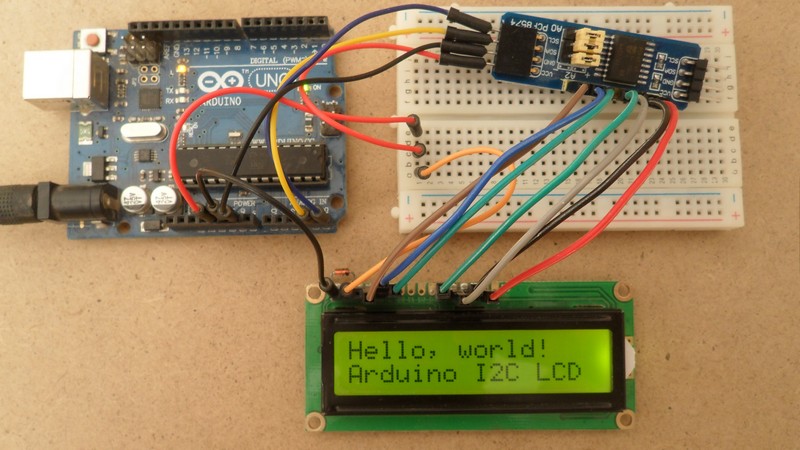
Generally to be able to use an LCD display we need at least 6 free pins, but the number of pins can be minimized with the help of external components like PCF8574 (or PCF8574A) I2C I/O expander, that’s allows us to use only 2 pins from our microcontroller. This small post shows how to connect the Arduino with I2C LCD provided with PCF8574 I/O expander.
Hardware Required:
- Arduino board
- LCD screen (16×2, 20×4 …)
- PCF8574 I/O expander (or PCF8574A) — PCF8574 datasheet
- 5 x 10k ohm resistor
- 330 ohm resistor
- 10k ohm variable resistor or potentiometer
- Breadboard
- Jumper wires
Interfacing Arduino with I2C LCD circuit:
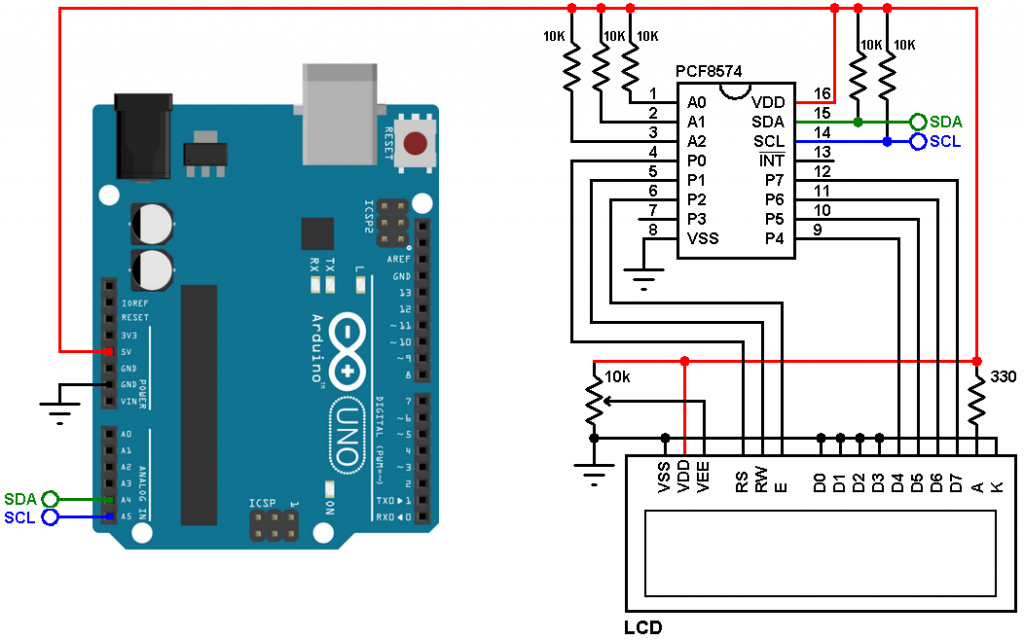
Example circuit diagram is shown in the image below.
(All grounded terminals are connected together)
The main component of the I2C LCD display is the PCF8574 I/O expander, with only two pins SDA and SCL we get a maximum of 8 pins from P0 to P7. PCF8574A also can be used but it has a different address.
All LCD data pins are connected to the PCF8574 where: RS, RW, E, D4, D5, D6 and D7 are connected to P0, P1, P2, P4, P5, P6 and P7 respectively.
PCF8574 I/O expander SDA and SCL pins are connected to Arduino pin A4 and A5 respectively (Arduino SDA and SCL pins).
PCF8574 I/O expander A0, A1 and A2 pins are the address pins which decide the I2C address of the chip. In this example each pin is connected to +5V through a 10k ohm resistor (the 10k resistor is optional, each pin can be connected directly to +5V).
The I2C address of the PCF8574 is: 0x20 | A2 A1 A0 ( | means OR)
In our circuit A2, A1 and A0 are connected to +5V (through 10k resistors) which means the I2C address is equal to 0x20 | 7 = 0x27
If the PCF8574A is used instead of the PCF8574 the I2C address is: 0x38 | 7 = 0x3F.
Interfacing Arduino with I2C LCD code:
In this interfacing I used a small library named LiquidCrystal_I2C (LiquidCrystal_I2C.h), this library simplifies the Arduino code, it can be downloaded from the links below. After downloading the library, unzip the folder and add it to Arduino libraries folder (for example: C:\Program Files\Arduino\libraries):
LiquidCrystal_I2C — direct link
1 2 3 4 5 6 7 8 9 10 11 12 13 14 15 16 17 18 19 20 21 22 23 | // Arduino with PCF8574T I2C LCD example #include <Wire.h> // Include Wire library (required for I2C devices) #include <LiquidCrystal_I2C.h> // Include LiquidCrystal_I2C library LiquidCrystal_I2C lcd(0x27, 16, 2); // Configure LiquidCrystal_I2C library with 0x27 address, 16 columns and 2 rows void setup() { lcd.init(); // Initialize I2C LCD module lcd.backlight(); // Turn backlight ON lcd.setCursor(0, 0); // Go to column 0, row 0 lcd.print("Hello, world!"); lcd.setCursor(0, 1); // Go to column 0, row 1 lcd.print("Arduino I2C LCD"); } void loop() { } |
Discover more from Simple Circuit
Subscribe to get the latest posts sent to your email.


Thank you for the nice tutorial. I am curious, what tool did you use to draw the schematic?
Thank you very much, great tutorial!