This post shows a quick guide to program ESP8266 WiFi module with Arduino UNO board and how to use Arduino IDE software in order to write codes for this module.
The ESP8266 board contain the microcontroller ESP8266EX (32-bit microcontroller) from Espressif Systems, this low cost Wi-Fi module is a very good choice for hobbyists to build IoT projects. IoT: Internet of Things.
The ESP8266 module comes with AT firmware which allows us to control it with AT commands through serial interface (RX and TX pins).
The most popular ESP8266 module is the ESP-01, it has only 8 pins as shown in the picture below (with pinout):
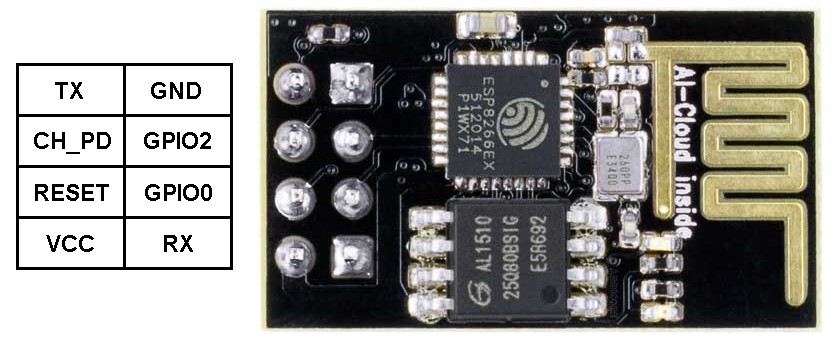
As show above, the ESP-01 board has 8 pins which are:
TX: UART data transmit pin which is also GPIO1 pin
GND: ground pin (0 V)
CH_PD: chip power down pin, used to turn off the ESP8266EX chip, when high the chip is enabled and when low the chip is off, also named as CH_PU (chip power up) and CHIP_EN (chip enable)
GPIO2: general purpose input/output pin 2
RESET: external reset pin (active low), when low the chip is in reset mode
GPIO0: general purpose input/output pin 0
VCC: power supply pin. ESP8266EX chip Operating voltage: 2.5V ~ 3.6V
RX: UART data receive pin which is also GPIO3 pin
ESP8266 Programming with Arduino IDE:
It’s easy to start ESP8266 programming, all what we’ve to do is adding it to the Arduino IDE software.
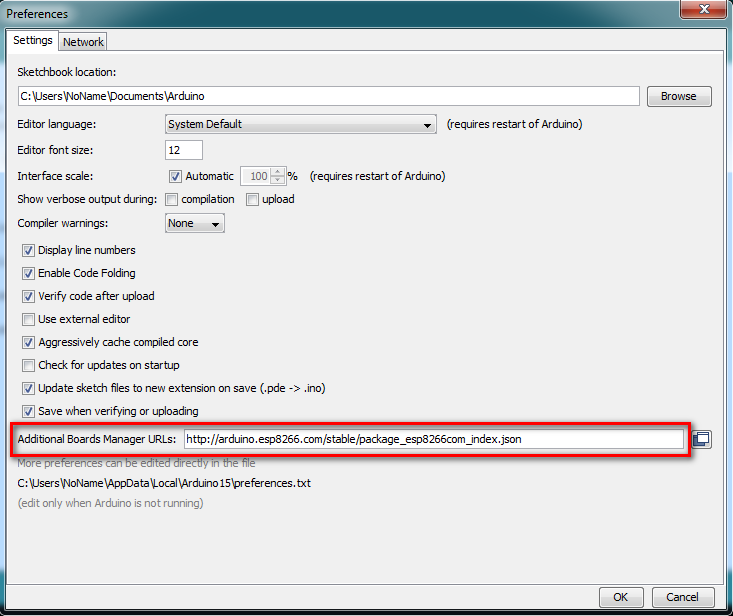
First, open Arduino IDE and go to File —> Preferences
Add the link below to Additional Boards Manager URLs and click on OK:
http://arduino.esp8266.com/stable/package_esp8266com_index.json
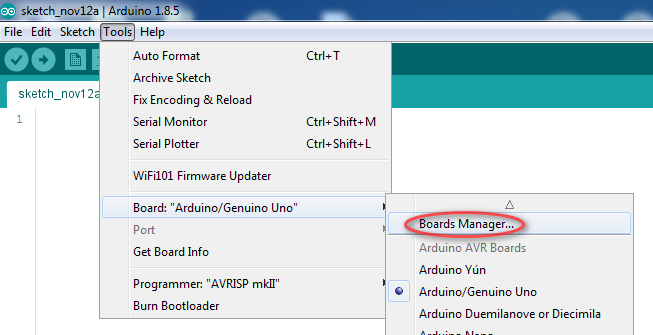
Now go to Tools —> Board —> Boards Manager …
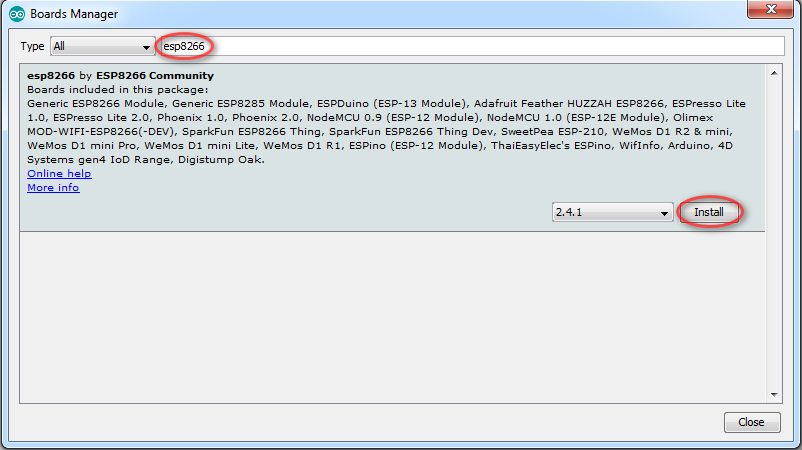
In the search box write esp8266 and click on Install and the installation of the board should start (the installation may take some time depending on the connection speed):
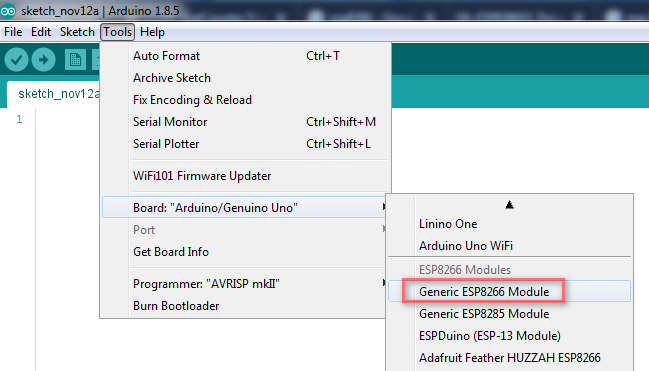
After the installation select the ESP-01 board by going to: Tools —> Board: —> Generic ESP8266 Module
Now every thing is finished and we can start our ESP8266 programming.
Program the ESP8266 (ESP-01) module with Arduino UNO board:
As known the Arduino UNO board contains Microchip ATmega16U2 microcontroller which is used as USB-to-serial converter. This chip (ATmega16U2) can be used to program (flash) the ESP-01 Wi-iF module, circuit connections are shown below:
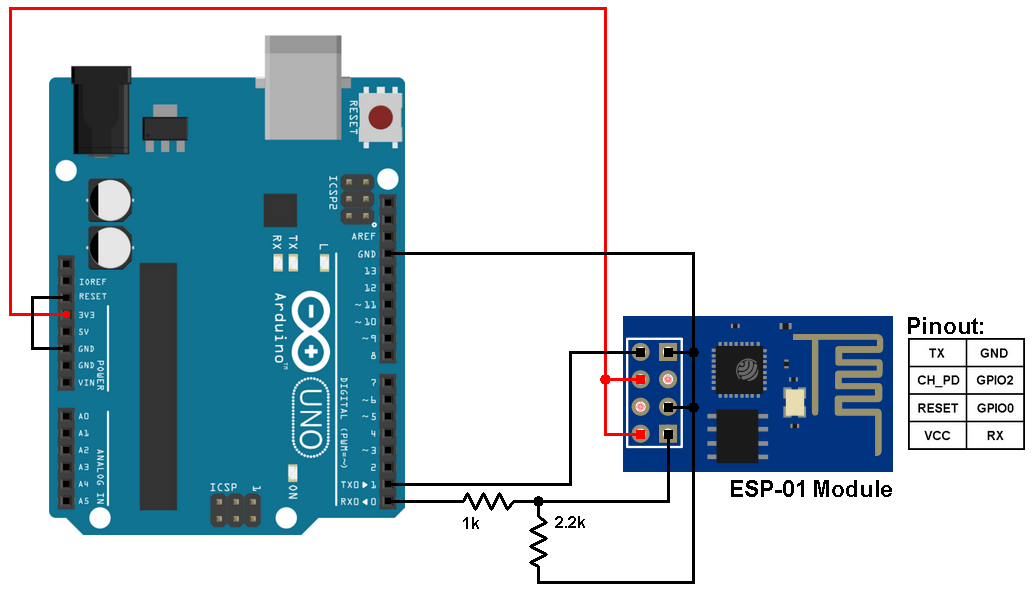
In the circuit there are 2 resistor one of 1k ohm and the other one of 2.2k ohm. The two resistors are used to step down the 5V which comes to arduino into about 3.43V which goes to the ESP-01 board (connected to RX pin of the ESP-01) because the ESP8266EX chip works with 3.3V only and applying a 5V directly may damage it.
On the other hand, the TX pin of the ESP-01 is connected directly to the Arduino board without any voltage level converter because here the ESP-01 sends data (at 3.3V) to the Arduino board using this pin.
The ESP-01 is supplied with 3.3V which comes from the Arduino board.
There is other ways to build a programmer for the ESP-01 module for example by using FT232RL USB to serial converter from FTDI Chip which is shown below:
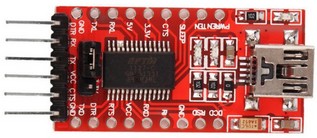
With this module we can choose between 5V and 3.3V (using a jumper) and here we’ve to select 3.3V.
LED Blink with ESP8266 (ESP-01):
This is a simple example which we should start with, it’s the LED blinking example. In this example I’m going to connect one LED to ESP-01 board GPIO2 pin, and make this LED blinks. Circuit diagram is shown below:
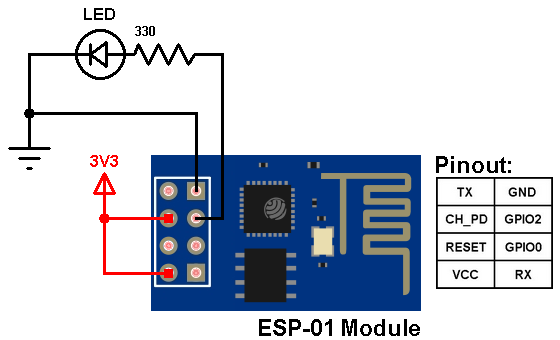
The LED is connected to pin GPIO2 of the ESP-01 module through a 330 ohm resistor.
The ESP-01 module needs a 3.3V supply. We can get the 3.3V for example from Arduino UNO board, or using AMS1117 3V3 voltage regulator which steps down 5V into 3.3V, or directly from 3.3V source.
Arduino code for ESP8266 module:
1 2 3 4 5 6 7 8 9 10 11 12 13 14 15 16 17 18 | // LED Blink example for ESP8266 (ESP-01) module #define LED 2 // LED is connected to GPIO2 void setup() { pinMode(LED, OUTPUT); // Configure LED pin as output } void loop() { digitalWrite(LED, HIGH); // Turn the LED on delay(500); // wait 1/2 second digitalWrite(LED, LOW); // turn the LED off delay(500); // wait 1/2 second } |
Discover more from Simple Circuit
Subscribe to get the latest posts sent to your email.


can u send data from sensors to googlesheets