This post shows how to decode IR remote controls which use the Philips RC5 protocol with full hardware interrupt method and without using any external library.
About RC5 protocol:
The RC5 has 14 bits per 1 code transmission, the 14 bits can be divided into 4 parts:
The first 2 bits are start bits and they are always logic 1.
The third bit called toggle bit, it can be logic 1 or logic 0.
The next 5 bits are address bits, each device type has its address number for example TV address number is 0, CD player address = 20 …………
And the last 6 bits are command bits, each button has its command number.
For the same device for example TV all the remote control buttons has the same address but each button has its command.
The toggle bit changes whenever a button is pressed.
The RC5 protocol uses Manchester coding, a logic 0 is represented by a logic high in the first half and a logic low in the second half, whereas a logic 0 is represented by a logic low in the first half and a logic high in the second half. The length of each half is 889µs which means the length of 1 bit is 1778µs. The links below from Wikipedia has more details about the RC5 protocol:
RC-5
Components required:
- Arduino board
- RC5 IR remote control
- 16×2 LCD screen
- IR receiver
- 47µF capacitor
- 10K ohm variable resistor
- 330 ohm resistor
- Protoboard
- Jumper wires
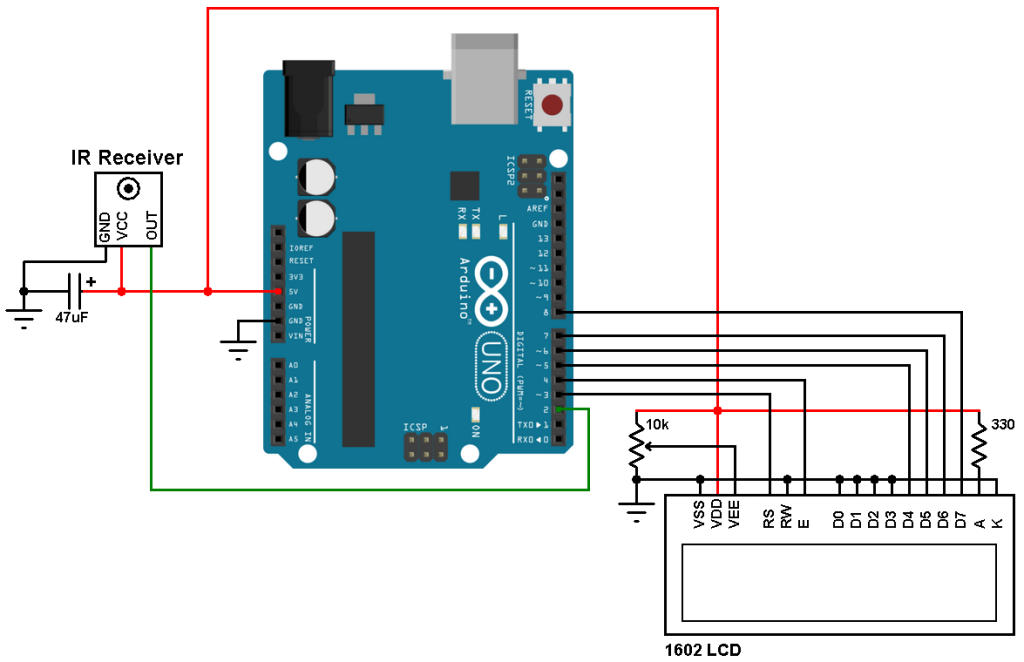
Arduino RC5 decoder circuit:
Project circuit schematic is shows below.
The output of the IR receiver is connected to the Arduino UNO pin 2 which is external hardware pin (INT0).
Arduino RC-5 remote control decoder code:
Note that there is no remote control library used in this example.
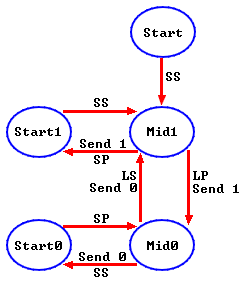
Before writing the C code of the decoder, I drew a simple state machine of the RC5 protocol which helped me a lot in the code. The state machine is shown below.
Where:
SP : Short Pulse (About 889µs)
LP : Long Pulse (About 1778µs)
SS: Short Space (About 889µs)
LS : Long Space (About 1778µs)
Programming hints:
Arduino external hardware interrupt (INT0 on pin 2) is used to detect the IR signals (IR receiver output goes from high to low when it starts receiving IR signal), and after the detection of the IR signal the microcontroller starts following the state machine shown above. So this is fully hardware interrupt based software.
The message of the RC5 protocol is 14-bit long, 2 start bits (always 1), toggle bit, address (5 bits) and command (6 bits). The length of 1 bit is 1778µs which can be divided into two parts of 889µs. A logic 1 is represented by 889µs low and 889µs high. A logic zero is represented by 889µs high and 889µs low.
The RC5 protocol has 4 states: start1, mid1, start0 and mid0.
The IR receiver output is logic high at idle state and when it receives a burst it changes the output to logic low.
The output of the IR receiver is connected to the external interrupt pin and every change in the pin status generates an interrupt and Timer1 starts calculating, Timer1 value will be used in the next interrupt, this means Timer1 calculates the time between two interrupts which is pulse time or space time.
Timer1 increments by 2 every 1 us, its interrupt is used as a timeout calculator (very long pulse or very long space) and interrupted it resets the decoding process.
The decoding results are displayed on 1602 LCD screen and it can be displayed on PC via serial monitor after small modifications.
Full Arduino code is the one below with commented lines.
1 2 3 4 5 6 7 8 9 10 11 12 13 14 15 16 17 18 19 20 21 22 23 24 25 26 27 28 29 30 31 32 33 34 35 36 37 38 39 40 41 42 43 44 45 46 47 48 49 50 51 52 53 54 55 56 57 58 59 60 61 62 63 64 65 66 67 68 69 70 71 72 73 74 75 76 77 78 79 80 81 82 83 84 85 86 87 88 89 90 91 92 93 94 95 96 97 98 99 100 101 102 103 104 105 106 107 108 109 110 111 112 113 114 115 116 117 118 119 120 121 122 123 124 125 126 127 128 129 130 131 132 133 | // RC5 Protocol decoder Arduino code // Define number of Timer1 ticks (with a prescaler of 1/8) #define short_time 1400 // Used as a minimum time for short pulse or short space ( ==> 700 us) #define med_time 2400 // Used as a maximum time for short pulse or short space ( ==> 1200 us) #define long_time 4000 // Used as a maximum time for long pulse or long space ( ==> 2000 us) // include LCD library code #include <LiquidCrystal.h> // LCD module connection (RS, E, D4, D5, D6, D7) LiquidCrystal lcd(3, 4, 5, 6, 7, 8); char text[3]; boolean rc5_ok = 0, toggle_bit; byte rc5_state = 0, j, address, command; unsigned int rc5_code; void setup() { // set up the LCD's number of columns and rows lcd.begin(16, 2); lcd.setCursor(0, 0); lcd.print("ADS:0x00 TGL: 0"); lcd.setCursor(0, 1); lcd.print("CMD:0x00"); // Timer1 module configuration TCCR1A = 0; TCCR1B = 0; // Disable Timer1 module TCNT1 = 0; // Set Timer1 preload value to 0 (reset) TIMSK1 = 1; // enable Timer1 overflow interrupt attachInterrupt(0, RC5_read, CHANGE); // Enable external interrupt (INT0) } void RC5_read() { unsigned int timer_value; if(rc5_state != 0){ timer_value = TCNT1; // Store Timer1 value TCNT1 = 0; // Reset Timer1 } switch(rc5_state){ case 0 : // Start receiving IR data (initially we're at the beginning of mid1) TCNT1 = 0; // Reset Timer1 TCCR1B = 2; // Enable Timer1 module with 1/8 prescaler ( 2 ticks every 1 us) rc5_state = 1; // Next state: end of mid1 j = 0; return; case 1 : // End of mid1 ==> check if we're at the beginning of start1 or mid0 if((timer_value > long_time) || (timer_value < short_time)){ // Invalid interval ==> stop decoding and reset rc5_state = 0; // Reset decoding process TCCR1B = 0; // Disable Timer1 module return; } bitSet(rc5_code, 13 - j); j++; if(j > 13){ // If all bits are received rc5_ok = 1; // Decoding process is OK detachInterrupt(0); // Disable external interrupt (INT0) return; } if(timer_value > med_time){ // We're at the beginning of mid0 rc5_state = 2; // Next state: end of mid0 if(j == 13){ // If we're at the LSB bit rc5_ok = 1; // Decoding process is OK bitClear(rc5_code, 0); // Clear the LSB bit detachInterrupt(0); // Disable external interrupt (INT0) return; } } else // We're at the beginning of start1 rc5_state = 3; // Next state: end of start1 return; case 2 : // End of mid0 ==> check if we're at the beginning of start0 or mid1 if((timer_value > long_time) || (timer_value < short_time)){ rc5_state = 0; // Reset decoding process TCCR1B = 0; // Disable Timer1 module return; } bitClear(rc5_code, 13 - j); j++; if(timer_value > med_time) // We're at the beginning of mid1 rc5_state = 1; // Next state: end of mid1 else // We're at the beginning of start0 rc5_state = 4; // Next state: end of start0 return; case 3 : // End of start1 ==> check if we're at the beginning of mid1 if((timer_value > med_time) || (timer_value < short_time)){ // Time interval invalid ==> stop decoding TCCR1B = 0; // Disable Timer1 module rc5_state = 0; // Reset decoding process return; } else // We're at the beginning of mid1 rc5_state = 1; // Next state: end of mid1 return; case 4 : // End of start0 ==> check if we're at the beginning of mid0 if((timer_value > med_time) || (timer_value < short_time)){ // Time interval invalid ==> stop decoding TCCR1B = 0; // Disable Timer1 module rc5_state = 0; // Reset decoding process return; } else // We're at the beginning of mid0 rc5_state = 2; // Next state: end of mid0 if(j == 13){ // If we're at the LSB bit rc5_ok = 1; // Decoding process is OK bitClear(rc5_code, 0); // Clear the LSB bit detachInterrupt(0); // Disable external interrupt (INT0) } } } ISR(TIMER1_OVF_vect) { // Timer1 interrupt service routine (ISR) rc5_state = 0; // Reset decoding process TCCR1B = 0; // Disable Timer1 module } void loop() { if(rc5_ok){ // If the mcu receives RC5 message with successful rc5_ok = 0; // Reset decoding process rc5_state = 0; TCCR1B = 0; // Disable Timer1 module toggle_bit = bitRead(rc5_code, 11); // Toggle bit is bit number 11 address = (rc5_code >> 6) & 0x1F; // Next 5 bits are for address command = rc5_code & 0x3F; // The 6 LSBits are command bits lcd.setCursor(15, 0); lcd.print(toggle_bit); // Display toggle bit sprintf(text, "%02X", address); lcd.setCursor(6, 0); lcd.print(text); // Display address in hex format sprintf(text, "%02X", command); lcd.setCursor(6, 1); lcd.print(text); // Display command in hex format attachInterrupt(0, RC5_read, CHANGE); // Enable external interrupt (INT0) } } |
The video below shows a simple hardware circuit of the project:
Discover more from Simple Circuit
Subscribe to get the latest posts sent to your email.


Hey!
I’m actually building something very similar, but both receiver AND transmitter. your receiver code look great(and A LOT easier than mine), but i wonder about how to transmit the data.
I wrote something like that:
void send_0() {
cnt++;
digitalWrite(CON_PIN, HIGH);
delayMicroseconds(889);
digitalWrite(CON_PIN, LOW);
delayMicroseconds(889);
}
void send_1() {
cnt++;
digitalWrite(CON_PIN, LOW);
delayMicroseconds(889);
digitalWrite(CON_PIN, HIGH);
delayMicroseconds(889);
if (cnt == 14) { //the cnt parts are just to eventually turn off the IR LED after 14 bits
digitalWrite(CON_PIN, LOW);
cnt = 0;
}
}
But it seems this doesn’t work… and I have no idea how to go about it.
Any ideas how to do that?
Note: transmitter and receiver are two separate Arduino UNOs