This topic shows how to get started with Arduino and SD card (microSD cards). It shows how to read information about SD card connected to the Arduino board. The example reports volume type, free space and other information using the SD library, sending it over the serial port. Also Proteus simulation of the Arduino and SD card is available with a small video.
Arduino has a very nice SD card library, with this library the interfacing is very simple. The Arduino SD library allows for reading from and writing to SD cards. It is built on sdfatlib by William Greiman. The library supports FAT16 and FAT32 file systems on standard SD cards and SDHC cards. It uses short 8.3 names for files.
The communication between the microcontroller and the SD card uses SPI, which takes place on digital pins 11, 12, and 13 (on most Arduino boards) or 50, 51, and 52 (Arduino Mega). Additionally, another pin must be used to select the SD card. This can be the hardware SS pin – pin 10 (on most Arduino boards) or pin 53 (on the Mega) – or another pin specified in the call to SD.begin().
Hardware Required:
- Arduino board
- SD card with FAT16 or FAT32 file system
- SD card socket (connector)
- 10K ohm resistor
- 3 x 3.3K ohm resistor
- 3 x 2.2K ohm resistor
- Breadboard
- Jumper wires
The circuit:
Example circuit schematic diagram is shown below.
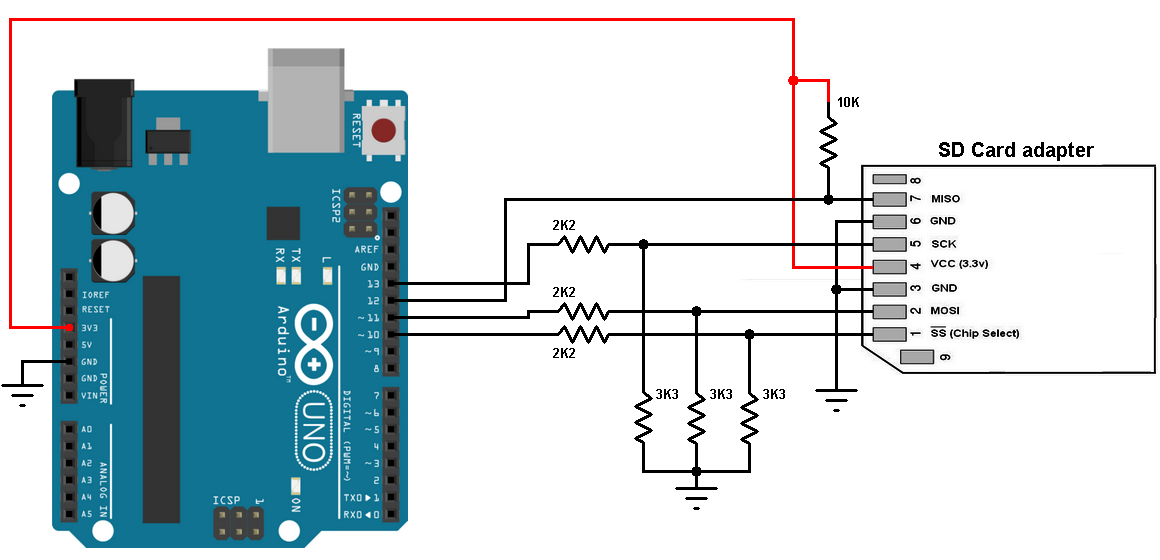
(Grounded terminals are connected together)
The SD card is supplied from the Arduino board with 3.3V.
In the circuit there are 3 voltage dividers, each one consists of 2.2K and 3.3K resistors, they are used to step down 5V that comes from the arduino into 3V which is sufficient for the SD card signals. The voltage dividers are used for SD card signals: SCK (serial clock), MOSI (master out slave in) and SS (chip select). The Arduino sends these signals from pins 13, 11 and 10 respectively. The SD card MISO is connected directly to the arduino because this path is used by the SD card to send data to the arduino (with voltage of 3.3V).
Connecting the SD card directly to the arduino without voltage level converters or voltage dividers may damage it.
Arduino Code:
I got the code below from arduino examples (with minor modifications), it collects information about the SD card connected to the Arduino and print it to Arduino IDE serial monitor.
1 2 3 4 5 6 7 8 9 10 11 12 13 14 15 16 17 18 19 20 21 22 23 24 25 26 27 28 29 30 31 32 33 34 35 36 37 38 39 40 41 42 43 44 45 46 47 48 49 50 51 52 53 54 55 56 57 58 59 60 61 62 63 64 65 66 67 68 69 70 71 72 73 74 75 76 77 78 79 80 81 82 83 84 85 86 87 88 89 90 91 | // Interfacing Arduino with SD card example (get SD card info) // http://simple-circuit.com/ // include the SD library: #include <SPI.h> #include <SD.h> // set up variables using the SD utility library functions: Sd2Card card; SdVolume volume; SdFile root; void setup() { // Open serial communications and wait for port to open: Serial.begin(9600); while (!Serial) { ; // wait for serial port to connect. Needed for native USB port only } Serial.print("\nInitializing SD card..."); // we'll use the initialization code from the utility libraries // since we're just testing if the card is working! if (!card.init()) { Serial.println("initialization failed. Things to check:"); Serial.println("* is a card inserted?"); Serial.println("* is your wiring correct?"); Serial.println("* did you change the chipSelect pin to match your shield or module?"); while (1); } else { Serial.println("Wiring is correct and a card is present."); } // print the type of card Serial.println(); Serial.print("Card type: "); switch (card.type()) { case SD_CARD_TYPE_SD1: Serial.println("SD1"); break; case SD_CARD_TYPE_SD2: Serial.println("SD2"); break; case SD_CARD_TYPE_SDHC: Serial.println("SDHC"); break; default: Serial.println("Unknown"); } // Now we will try to open the 'volume'/'partition' - it should be FAT16 or FAT32 if (!volume.init(card)) { Serial.println("Could not find FAT16/FAT32 partition.\nMake sure you've formatted the card"); while (1); } Serial.print("Clusters: "); Serial.println(volume.clusterCount()); Serial.print("Blocks x Cluster: "); Serial.println(volume.blocksPerCluster()); Serial.print("Total Blocks: "); Serial.println(volume.blocksPerCluster() * volume.clusterCount()); Serial.println(); // print the type and size of the first FAT-type volume uint32_t volumesize; Serial.print("Volume type is: FAT"); Serial.println(volume.fatType(), DEC); volumesize = volume.blocksPerCluster(); // clusters are collections of blocks volumesize *= volume.clusterCount(); // we'll have a lot of clusters volumesize /= 2; // SD card blocks are always 512 bytes (2 blocks are 1KB) Serial.print("Volume size (Kb): "); Serial.println(volumesize); Serial.print("Volume size (Mb): "); volumesize /= 1024; Serial.println(volumesize); Serial.print("Volume size (Gb): "); Serial.println((float)volumesize / 1024.0); Serial.println("\nFiles found on the card (name, date and size in bytes): "); root.openRoot(volume); // list all files in the card with date and size root.ls(LS_R | LS_DATE | LS_SIZE); } void loop(void) { } |
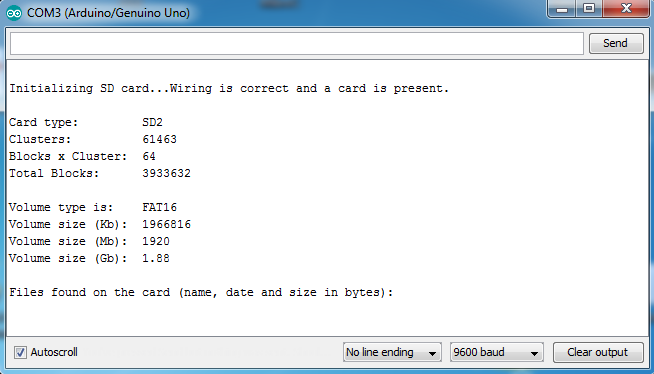
I placed an empty (with no file) 2GB micro SD card with FAT16 file system and I got the result shown below:
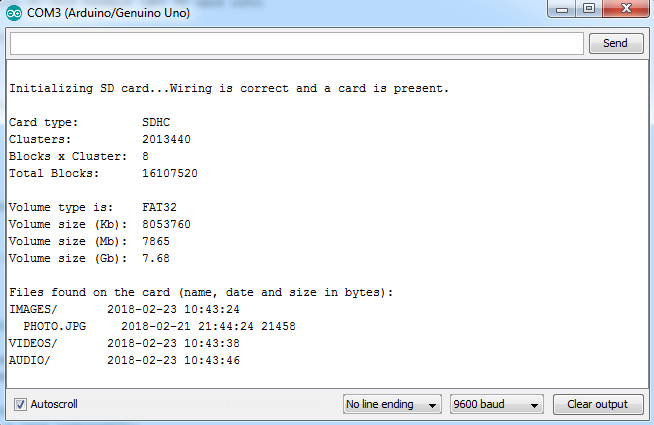
and the following image shows a 8GB micro SD card formatted with FAT32 file system. There are 3 folders in this SD card: Images, Videos and Audio, the Images folder contains 1 file named Photo (Photo.jpg with extension) and the other folders are empty:
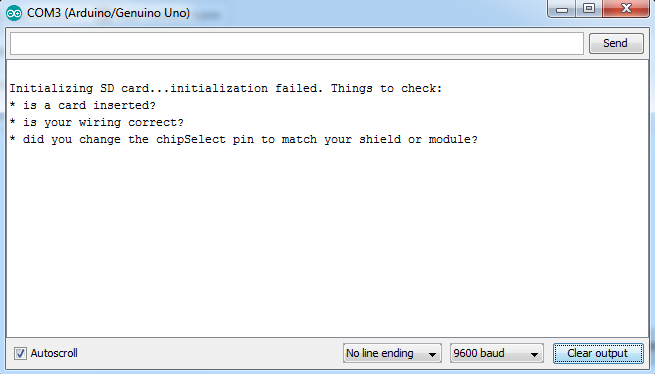
If there is no card or the Arduino can’t connect to it, serial monitor will display the message below:
Proteus simulation of the example is shown in the video below:
Proteus simulation file download:
Download
SD card image file download:
Download
Reference:
https://www.arduino.cc/
Discover more from Simple Circuit
Subscribe to get the latest posts sent to your email.


My proteus 8.9 sp0 is showing
Internal exception: access violation in module ‘UNKNOWN’ [55d54447]
If you got same error when you was working on this project please help me. And please give us link of Arduino library which you are using.
Thank you
i can`t run audio by using it……
hi when i am simulating my Proteus, it is showing failed simulation?Why?
hi i connected sd card interfacing with Arduino uno and i given pin description MOSI 11, MISO 12, SCK 13, CS 10, iam try to save the ultrasonic sensor values in sd card excel format if any body can know this please reply me thank you
why we required sd card image file.
The image file is required for Proteus simulation only.
Thanks for your code. Did you try changing CS on Arduino using SD.begin(pin)? It seems not working