This Arduino project shows how to build a digital thermometer using LM335 analog temperature sensor where temperature values are printed on 1602 LCD screen (in degrees Celsius and Kelvin).
About the LM335 sensor:
the LM335 is a 3-pin device (like a transistor) which converts temperature into analog voltage. This sensor requires an ADC (Analog-to-Digital Converter) module in order to convert the analog voltage into digital data.
The LM335 temperature sensor has the following features (from the datasheet):
- Directly Calibrated to the Kelvin Temperature Scale
- 1°C Initial Accuracy Available
- Operates from 400 μA to 5 mA
- Less than 1-Ω Dynamic Impedance
- Easily Calibrated
- Wide Operating Temperature Range
- 200°C Overrange
- Low Cost
The LM335 has a breakdown voltage directly proportional to absolute temperature at 10 mV/°K. If the LM335 output voltage for example is 3.03 (3030 mV) that means the temperature is: 303 Kelvin = 30 °Celsius.
Hardware Required:
- Arduino board
- LM335 Temperature sensor —-> datasheet
- 1602 LCD screen
- LM4040 – 4.1V (4.096V output shunt voltage reference) —-> datasheet
- 10k ohm variable resistor (or potentiometer)
- 2.2k ohm resistor
- 1k ohm resistor
- Breadboard
- Jumper wires
Interfacing Arduino with LM335 Sensor Circuit:
The image below shows project circuit diagram.
The LM335 sensor has 3 pins (from left to right):
Pin 1 for calibration, not used in this example,
Pin 2: output,
Pin 3: GND (ground).
The output pin of the LM335 sensor is connected to Arduino analog pin 5 (A5). A resistor is connected between the output of the LM335 sensor and 5V, I chose the value of 2.2k ohm because as written in the datasheet for optimum accuracy the current flows through the LM335 sensor should be 1mA. For example if the temperature = 27°C, the output will be 3.00V and assume the supply voltage is exactly 5.00V that means the current flows through the sensor is ( 5 – 3)/2.2 = 0.90mA which is good enough. Also the value 2.2k is a standard value and well used.
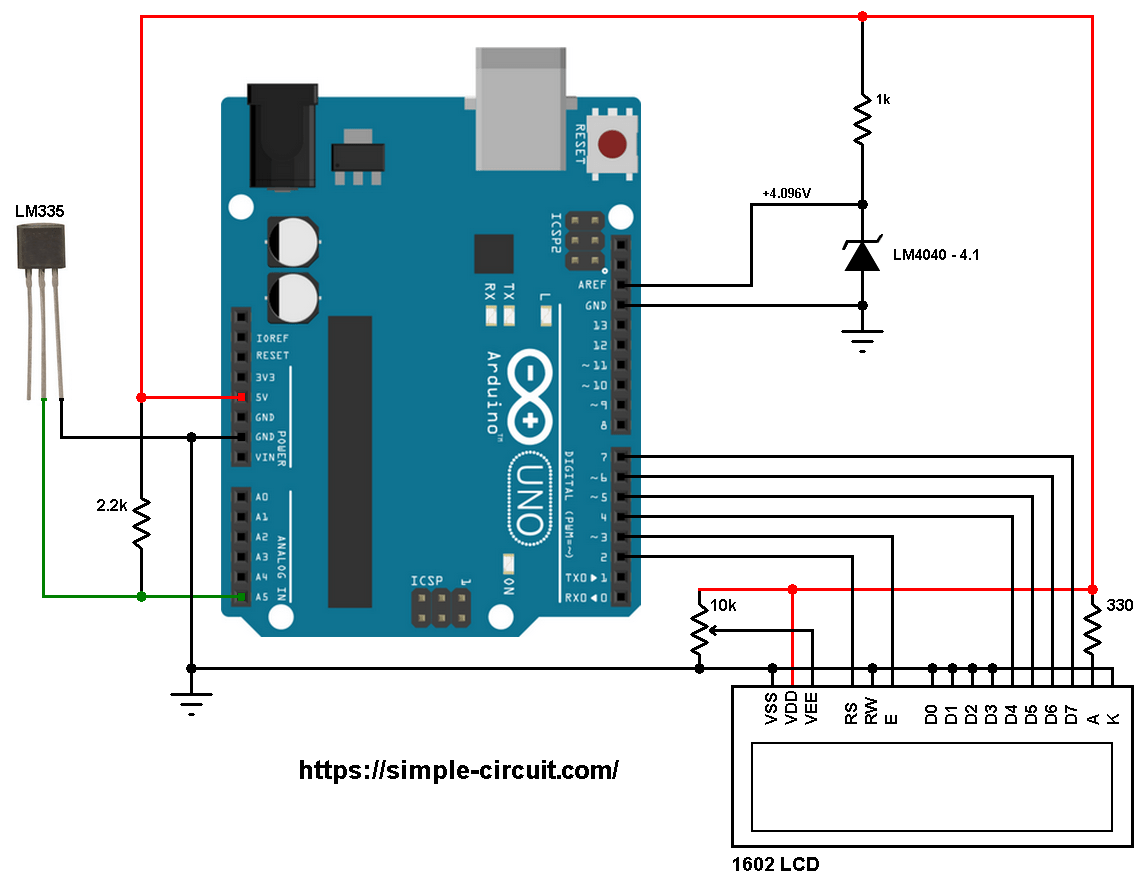
Why the LM4040-4.1?
The LM4040-4.1 is a shunt voltage reference chip (not voltage regulator) with output voltage approximately fixed to 4.096V.
The LM4040-4.1 provides a precise voltage of 4.096V which is then connected to pin AREF of the Arduino board. This voltage is used as positive reference of the ADC module, the negative reference is GND (0V). This gives us better results then when we use VDD as positive reference of the ADC module because VDD is not fixed to 5.000 Volts.
The 1602 LCD screen (2 rows and 16 columns) is used to display temperature values in degrees Celsius and degrees Fahrenheit where:
RS —> Arduino digital pin 2
E —> Arduino digital pin 3
D4 —> Arduino digital pin 4
D5 —> Arduino digital pin 5
D6 —> Arduino digital pin 6
D7 —> Arduino digital pin 7
VSS, RW, D0, D1, D2, D3 and K are connected to Arduino GND,
VEE to the 10k ohm variable resistor (or potentiometer) output,
VDD to Arduino 5V and A to Arduino 5V through 330 ohm resistor.
VEE pin is used to control the contrast of the LCD. A (anode) and K (cathode) are the back light LED pins.
Interfacing Arduino with LM335 Sensor Code:
The Arduino uno board microcontroller (ATmega328P) has a 10-bit ADC module, this means the digital value of the input analog voltage varies between 0 (0V) and 1023 (4.096V). By multiplying the digital value by 4 we get the temperature in tenths Kelvin, or simply the voltage in milliVolts (4 = 1000*4.096/1024). The temperature in tenths degree Celsius = tenths Kelvin – 2732 (because: °C = K – 273.16).
To get the actual value of each quantity we’ve to divide it by 10. The line below shows an example for temperature in Kelvin:
1 | sprintf(k_buffer, "%03u.%1u K", k_temp/10, k_temp % 10); |
We get the first 3 digits by dividing the tenths value by 10, and the tenths number (number after the decimal point) of the actual temperature value is equal to the reminder of that division (tenths value % 10).
The resolution of this thermometer is 0.4°C (0.4 K).
Full Arduino code:
1 2 3 4 5 6 7 8 9 10 11 12 13 14 15 16 17 18 19 20 21 22 23 24 25 26 27 28 29 30 31 32 33 34 35 36 37 38 39 40 41 42 43 44 45 46 47 48 49 50 51 52 53 54 55 | /************************************************************************ * * Interfacing Arduino with LM335 analog temperature sensor. * Temperature values are printed on 16x2 LCD screen (in °C and K). * This is a free software with NO WARRANTY. * http://simple-circuit.com/ * ************************************************************************/ #include <LiquidCrystal.h> // include Arduino LCD library // LCD module connections (RS, E, D4, D5, D6, D7) LiquidCrystal lcd(2, 3, 4, 5, 6, 7); void setup(void) { lcd.begin(16, 2); // set up the LCD's number of columns and rows lcd.setCursor(0, 0); // move cursor to column 0, row 0 [position (0, 0)] lcd.print("Temp ="); analogReference(EXTERNAL); // set positive reference voltage to external } // variables char c_buffer[8], k_buffer[8]; // main loop void loop() { delay(1000); // wait a second // get temperature in tenths Kelvin int k_temp = analogRead(A5) * 4; // 4 = 4096/1024 // calculate temperature in tenths °C int c_temp = k_temp - 2732; if (c_temp >= 1000) // if temperature >= 100.0 °C sprintf(c_buffer, "%03u.%1u%cC", c_temp / 10, c_temp % 10, 223); else { if (c_temp < 0) // if temperature < 0 sprintf(c_buffer, "-%02u.%1u%cC", abs(c_temp) / 10, abs(c_temp) % 10, 223); else // otherwise ( 0 <= temperature < 100 °C) sprintf(c_buffer, " %02u.%1u%cC", (c_temp / 10) % 100, c_temp % 10, 223); } sprintf(k_buffer, "%03u.%1u K", k_temp/10, k_temp % 10); lcd.setCursor(6, 0); // move cursor to position (6, 0) lcd.print(c_buffer); // print c_buffer (temperature in °C) lcd.setCursor(6, 1); // move cursor to position (6, 1) lcd.print(k_buffer); // print f_buffer (temperature in K) } // end of code. |
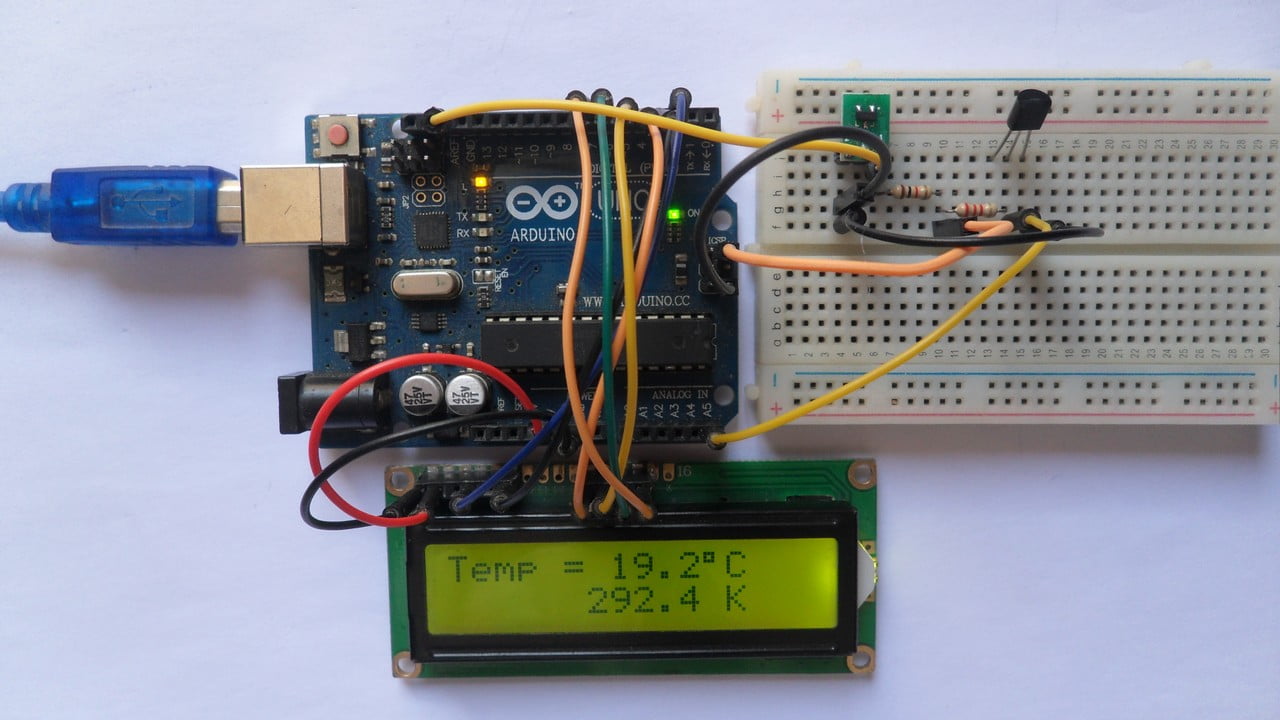
The following picture shows a simple protoboard circuit:
Discover more from Simple Circuit
Subscribe to get the latest posts sent to your email.


Simple circuit, mais intéressant! Merci.
thank u very much i learn more frm u