This example shows how to read and write data to and from an SD card. Example will be tested in a real hardware circuit and simulated with Proteus software.
Last time I tested the simple example which displays SD card information on serial monitor, example link is below:
Arduino and SD card interfacing example
Hardware Required:
- Arduino board
- SD card with FAT16 or FAT32 file system
- SD card socket (connector)
- 10K ohm resistor
- 3 x 3.3K ohm resistor
- 3 x 2.2K ohm resistor
- Breadboard
- Jumper wires
The circuit:
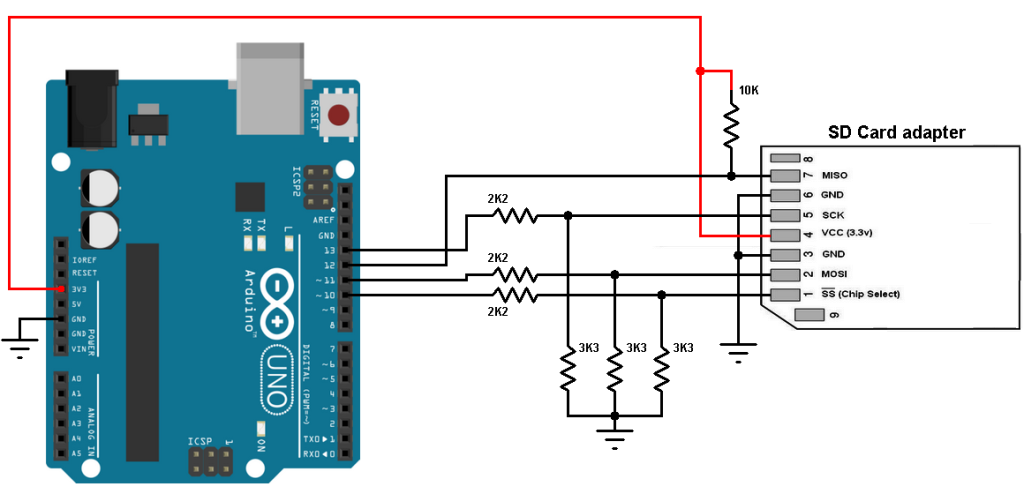
Example circuit schematic diagram is shown below.
(Grounded terminals are connected together)
The SD card is supplied from the Arduino board with 3.3V.
In the circuit there are 3 voltage dividers, each one consists of 2.2K and 3.3K resistors, they are used to step down 5V that comes from the arduino into 3V which is sufficient for the SD card signals. The voltage dividers are used for SD card signals: SCK (serial clock), MOSI (master out slave in) and SS (chip select). The Arduino sends these signals from pins 13, 11 and 10 respectively. The SD card MISO is connected directly to the arduino because this path is used by the SD card to send data to the arduino (with voltage of 3.3V). The master device is the arduino and the slave device is the SD card.
Connecting the SD card directly to the arduino without voltage level converters or voltage dividers may damage it.
Arduino Code:
I got the code below from arduino examples (with minor modifications), it reads and writes data to and from an SD card connected to the Arduino, results are printed to Arduino IDE serial monitor.
1 2 3 4 5 6 7 8 9 10 11 12 13 14 15 16 17 18 19 20 21 22 23 24 25 26 27 28 29 30 31 32 33 34 35 36 37 38 39 40 41 42 43 44 45 46 47 48 49 50 51 52 53 54 55 56 57 58 | // Read and write data to and from an SD card using Arduino #include <SPI.h> // Include SPI library (needed for the SD card) #include <SD.h> // Include SD library File myFile; void setup() { // Open serial communications and wait for port to open: Serial.begin(9600); while (!Serial) { ; // wait for serial port to connect. Needed for native USB port only } Serial.print("Initializing SD card..."); if (!SD.begin()) { Serial.println("initialization failed!"); while (1); } Serial.println("initialization done."); // open the file. note that only one file can be open at a time, // so you have to close this one before opening another. myFile = SD.open("test.txt", FILE_WRITE); // if the file opened okay, write to it: if (myFile) { Serial.print("Writing to test.txt..."); myFile.println("testing 1, 2, 3."); // close the file: myFile.close(); Serial.println("done."); } else { // if the file didn't open, print an error: Serial.println("error opening test.txt"); } // re-open the file for reading: myFile = SD.open("test.txt"); if (myFile) { Serial.println("test.txt:"); // read from the file until there's nothing else in it: while (myFile.available()) { Serial.write(myFile.read()); } // close the file: myFile.close(); } else { // if the file didn't open, print an error: Serial.println("error opening test.txt"); } } void loop() { } |
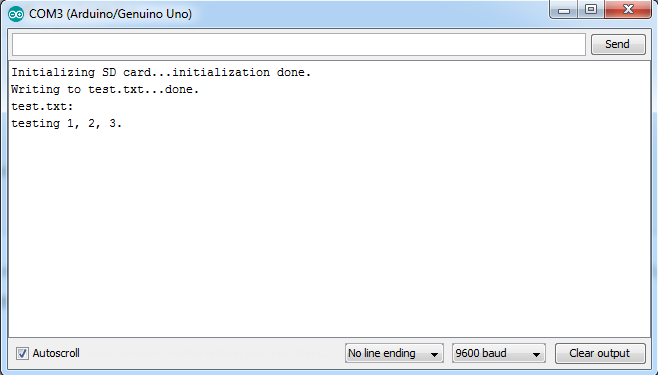
As a result, I placed a samsung 2 GB micro SD card formatted with FAT16 file system and I got the result shown below (Arduino IDE serial monitor):
Opening the file with Microsoft windows:
Proteus simulation should give the same results as shown in the following video:
Proteus simulation file download:
Download
SD card image file download:
Download
Reference:
https://www.arduino.cc/
Discover more from Simple Circuit
Subscribe to get the latest posts sent to your email.


