Building a data logger using Arduino and SD card is so easy, this topic shows how to build a simple temperature and humidity data logger with DHT11 sensor.
The DHT11 sensor is used to sense the relative humidity and temperature and the SD card is used to save the values of the humidity and the temperature every 1 second. The values of the temperature and humidity are saved in .TXT file which is stored in the SD card.
Related projects:
Arduino and SD card interfacing example
Arduino and SD card example – Read and write files
Arduino interfacing with DHT11 sensor and LCD
Hardware Required:
- Arduino board
- DHT11 sensor
- SD card
- SD card socket (connector)
- 10K ohm resistor
- 4.7K ohm resistor
- 3 x 3.3K ohm resistor
- 3 x 2.2K ohm resistor
- Breadboard
- Jumper wires
Arduino data logger using SD card and DHT11 sensor circuit:
Arduino datalogger circuit diagrams are shown below, both circuits are well working.
The first circuit consists of three voltage dividers to step down the 5V into 3V, the voltage dividers are for: SS (chip select), MOSI (master in slave out) and SCK (serial clock) signals.
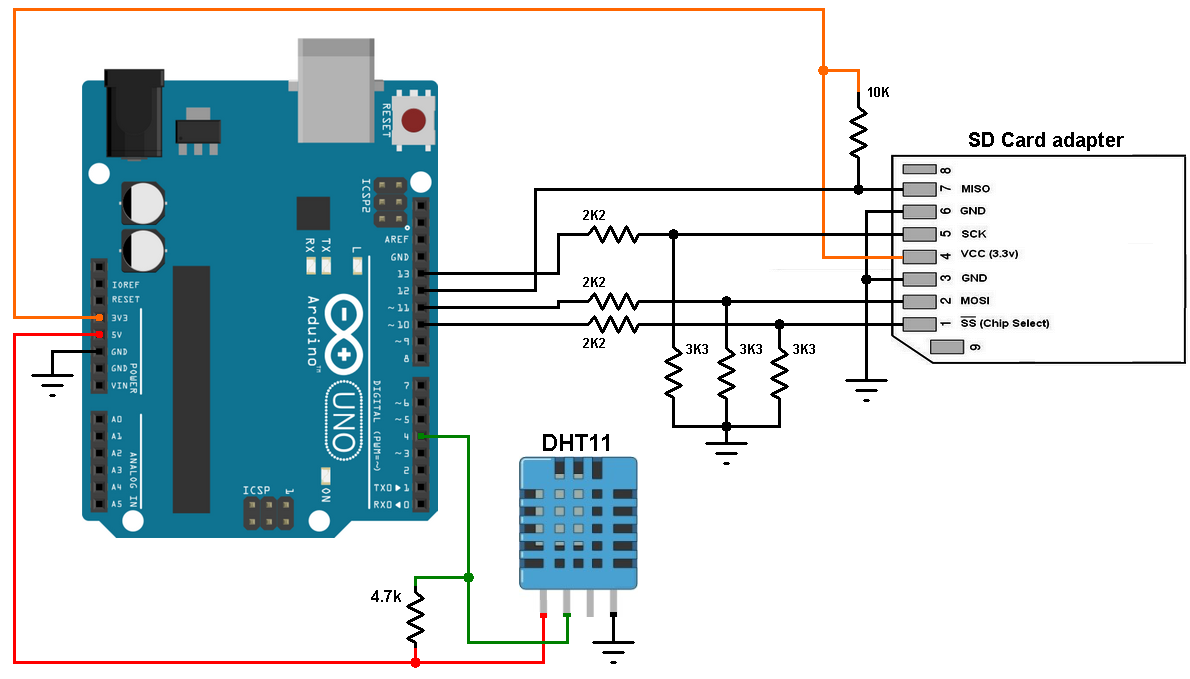
(All grounded terminals are connected together)
and the second circuit uses micro SD card module, this module is powered with 5V (comes from the Arduino board), it has AMS1117 voltage regulator and a voltage level converter (74LVC125A) which converts the 5V signals into 3.3V for lines: SS, MOSI and SCK:
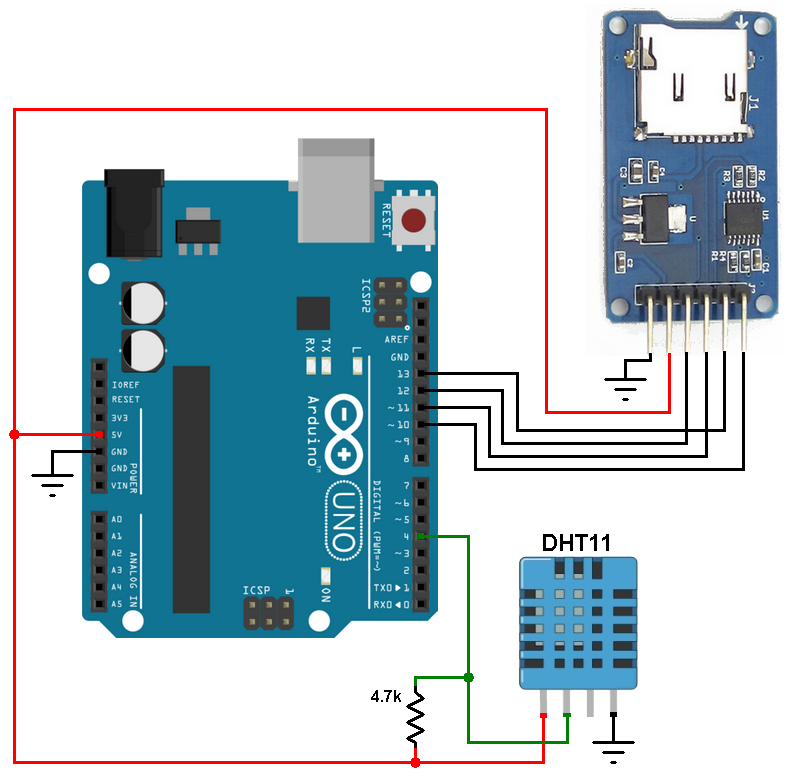
(All grounded terminals are connected together)
With the micro SD card module the connections are more simpler, the sd card module is supplied with 5V which comes from the Arduino board.
The SD card module has 6 pins which are (from left to right): GND, VCC, MISO, MOSI, SCK and CS (chip select).
Arduino data logger code:
The code below reads temperature and humidity from the DHT11 sensor, then it saves the data into the SD card within a file named DHT11Log.txt and finally it sends the same data serially to PC. The reading and storing of data is done every 1 second.
1 2 3 4 5 6 7 8 9 10 11 12 13 14 15 16 17 18 19 20 21 22 23 24 25 26 27 28 29 30 31 32 33 34 35 36 37 38 39 40 41 42 43 44 45 46 47 48 49 50 51 52 53 54 55 56 57 58 59 | // Arduino data logger with SD card and DHT11 humidity and temperature sensor #include <SPI.h> // Include SPI library (needed for the SD card) #include <SD.h> // Include SD library #include <DHT.h> // Include DHT sensor library File dataFile; #define DHTPIN 4 // DHT11 data pin is connected to Arduino pin 4 #define DHTTYPE DHT11 // DHT11 sensor is used DHT dht(DHTPIN, DHTTYPE); // Initialize DHT library void setup() { // Open serial communications and wait for port to open: Serial.begin(9600); while (!Serial) ; // wait for serial port to connect. Needed for native USB port only Serial.print("Initializing SD card..."); if (!SD.begin()) { Serial.println("initialization failed!"); while (1); } Serial.println("initialization done."); delay(2000); } uint16_t line = 1; void loop() { delay(1000); // Read humidity byte RH = dht.readHumidity(); //Read temperature in degree Celsius byte Temp = dht.readTemperature(); dataFile = SD.open("DHT11Log.txt", FILE_WRITE); // if the file opened okay, write to it: if (dataFile) { Serial.print(line); Serial.print(": Temperature = "); Serial.print(Temp); Serial.print("°C, Humidity = "); Serial.print(RH); Serial.println("%"); // Write data to SD card file (DHT11Log.txt) dataFile.print(line++); dataFile.print(": Temperature = "); dataFile.print(Temp); dataFile.print("°C, Humidity = "); dataFile.print(RH); dataFile.println("%"); dataFile.close(); } // if the file didn't open, print an error: else Serial.println("error opening DHT11Log.txt"); } |
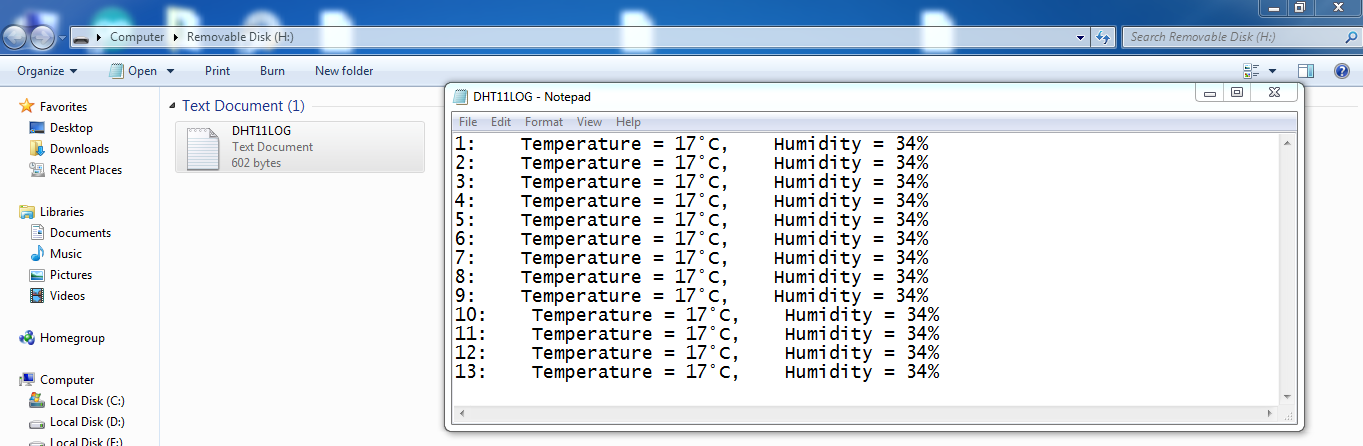
As a result, I powered my circuit and after few seconds I turned it OFF, I removed my 2 GB FAT16 SD card from the circuit and placed it in the PC, I opened my SD card with windows and I got the file shown below:
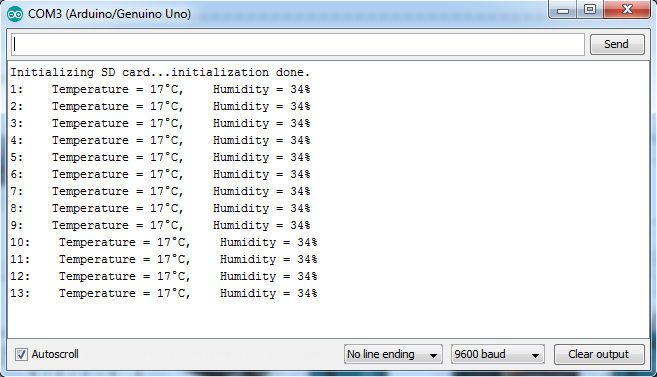
Arduino IDE serial monitor gave me the window shown below:
The video below shows a simulation of the Arduino datalogger using Proteus, I got the same result as the real hardware circuit:
Downloads:
Adafruit library for DHT series (after extracting put the folder named DHT in the library folder of Arduino):
Download
Proteus simulation file download:
Download
SD card image file download:
Download
Discover more from Simple Circuit
Subscribe to get the latest posts sent to your email.


Hello sir:
I’ve got the same problem.
Which after the code type in,but the output of sensor are all 0%(both the temperature and humidity).
As the above you said need add code into the program, which should it add in?
And my sensor is use DHT22,have any different of Jumper wires connections?
Hi,
I have tried to do this project, but Arduino is not reading sensor data.
Why is happening this ?
Check your Data pin on your DHT11, add this code in your loop function after reading the values:
if (isnan(h) || isnan(t)) {
Serial.println(F(“Failed to read from DHT sensor!”));
return;
}