This post shows how to control stepper motor speed and direction of rotation using Arduino UNO board and PS2 joystick.
The stepper motor used in this example is 28BYJ-48 (unipolar stepper motor) which usually comes with its driver board.
In the last Arduino project I build a simple controller for this stepper motor, project link is below:
Arduino Unipolar Stepper Motor Control
The joystick (PS2 Joystick) consists of two potentiometers of 10k ohm (one for the X-axis and the other for the Y-axis) and a push-button.

Hardware Required:
- Arduino UNO board
- 28BYJ-48 stepper motor (with ULN2003A driver board)
- Joystick
- 5V power source
- Bread board
- Jumper wires
Stepper motor control with Arduino and joystick circuit:
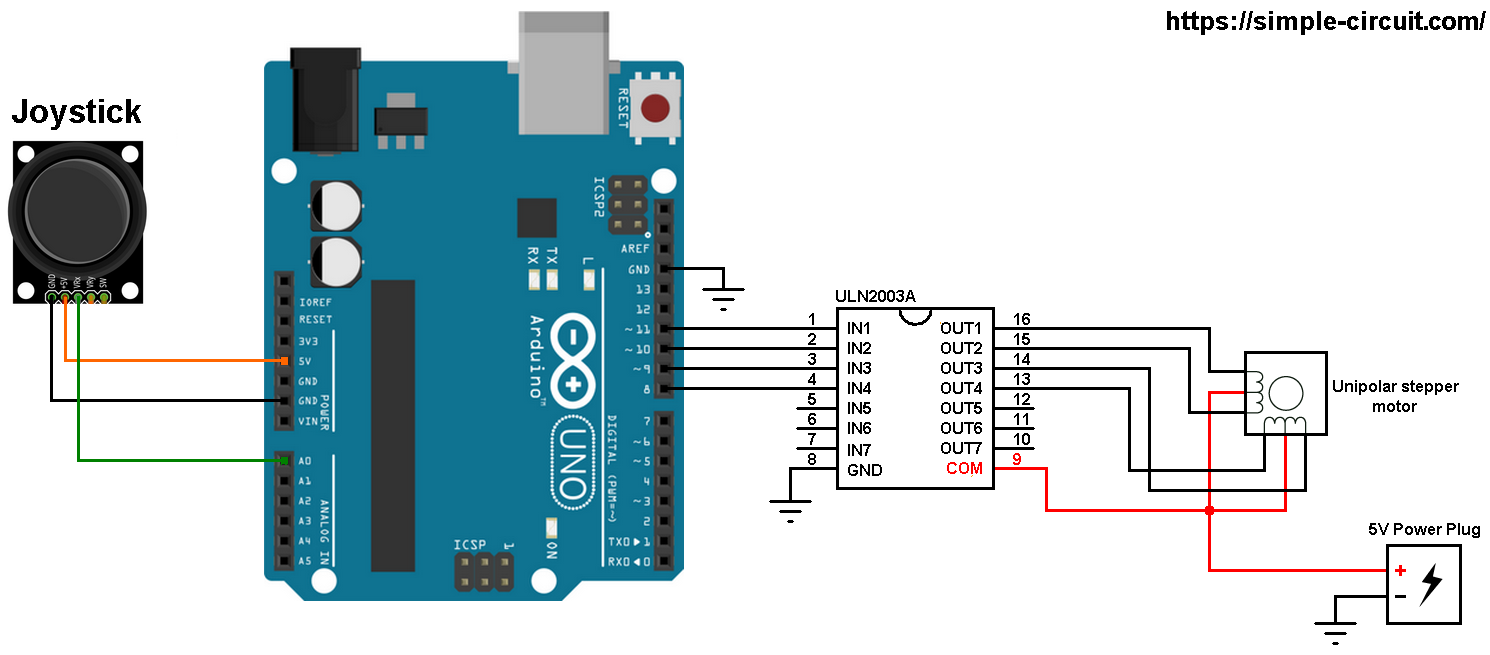
Project circuit schematic diagram is shown below (all grounded terminals are connected together).
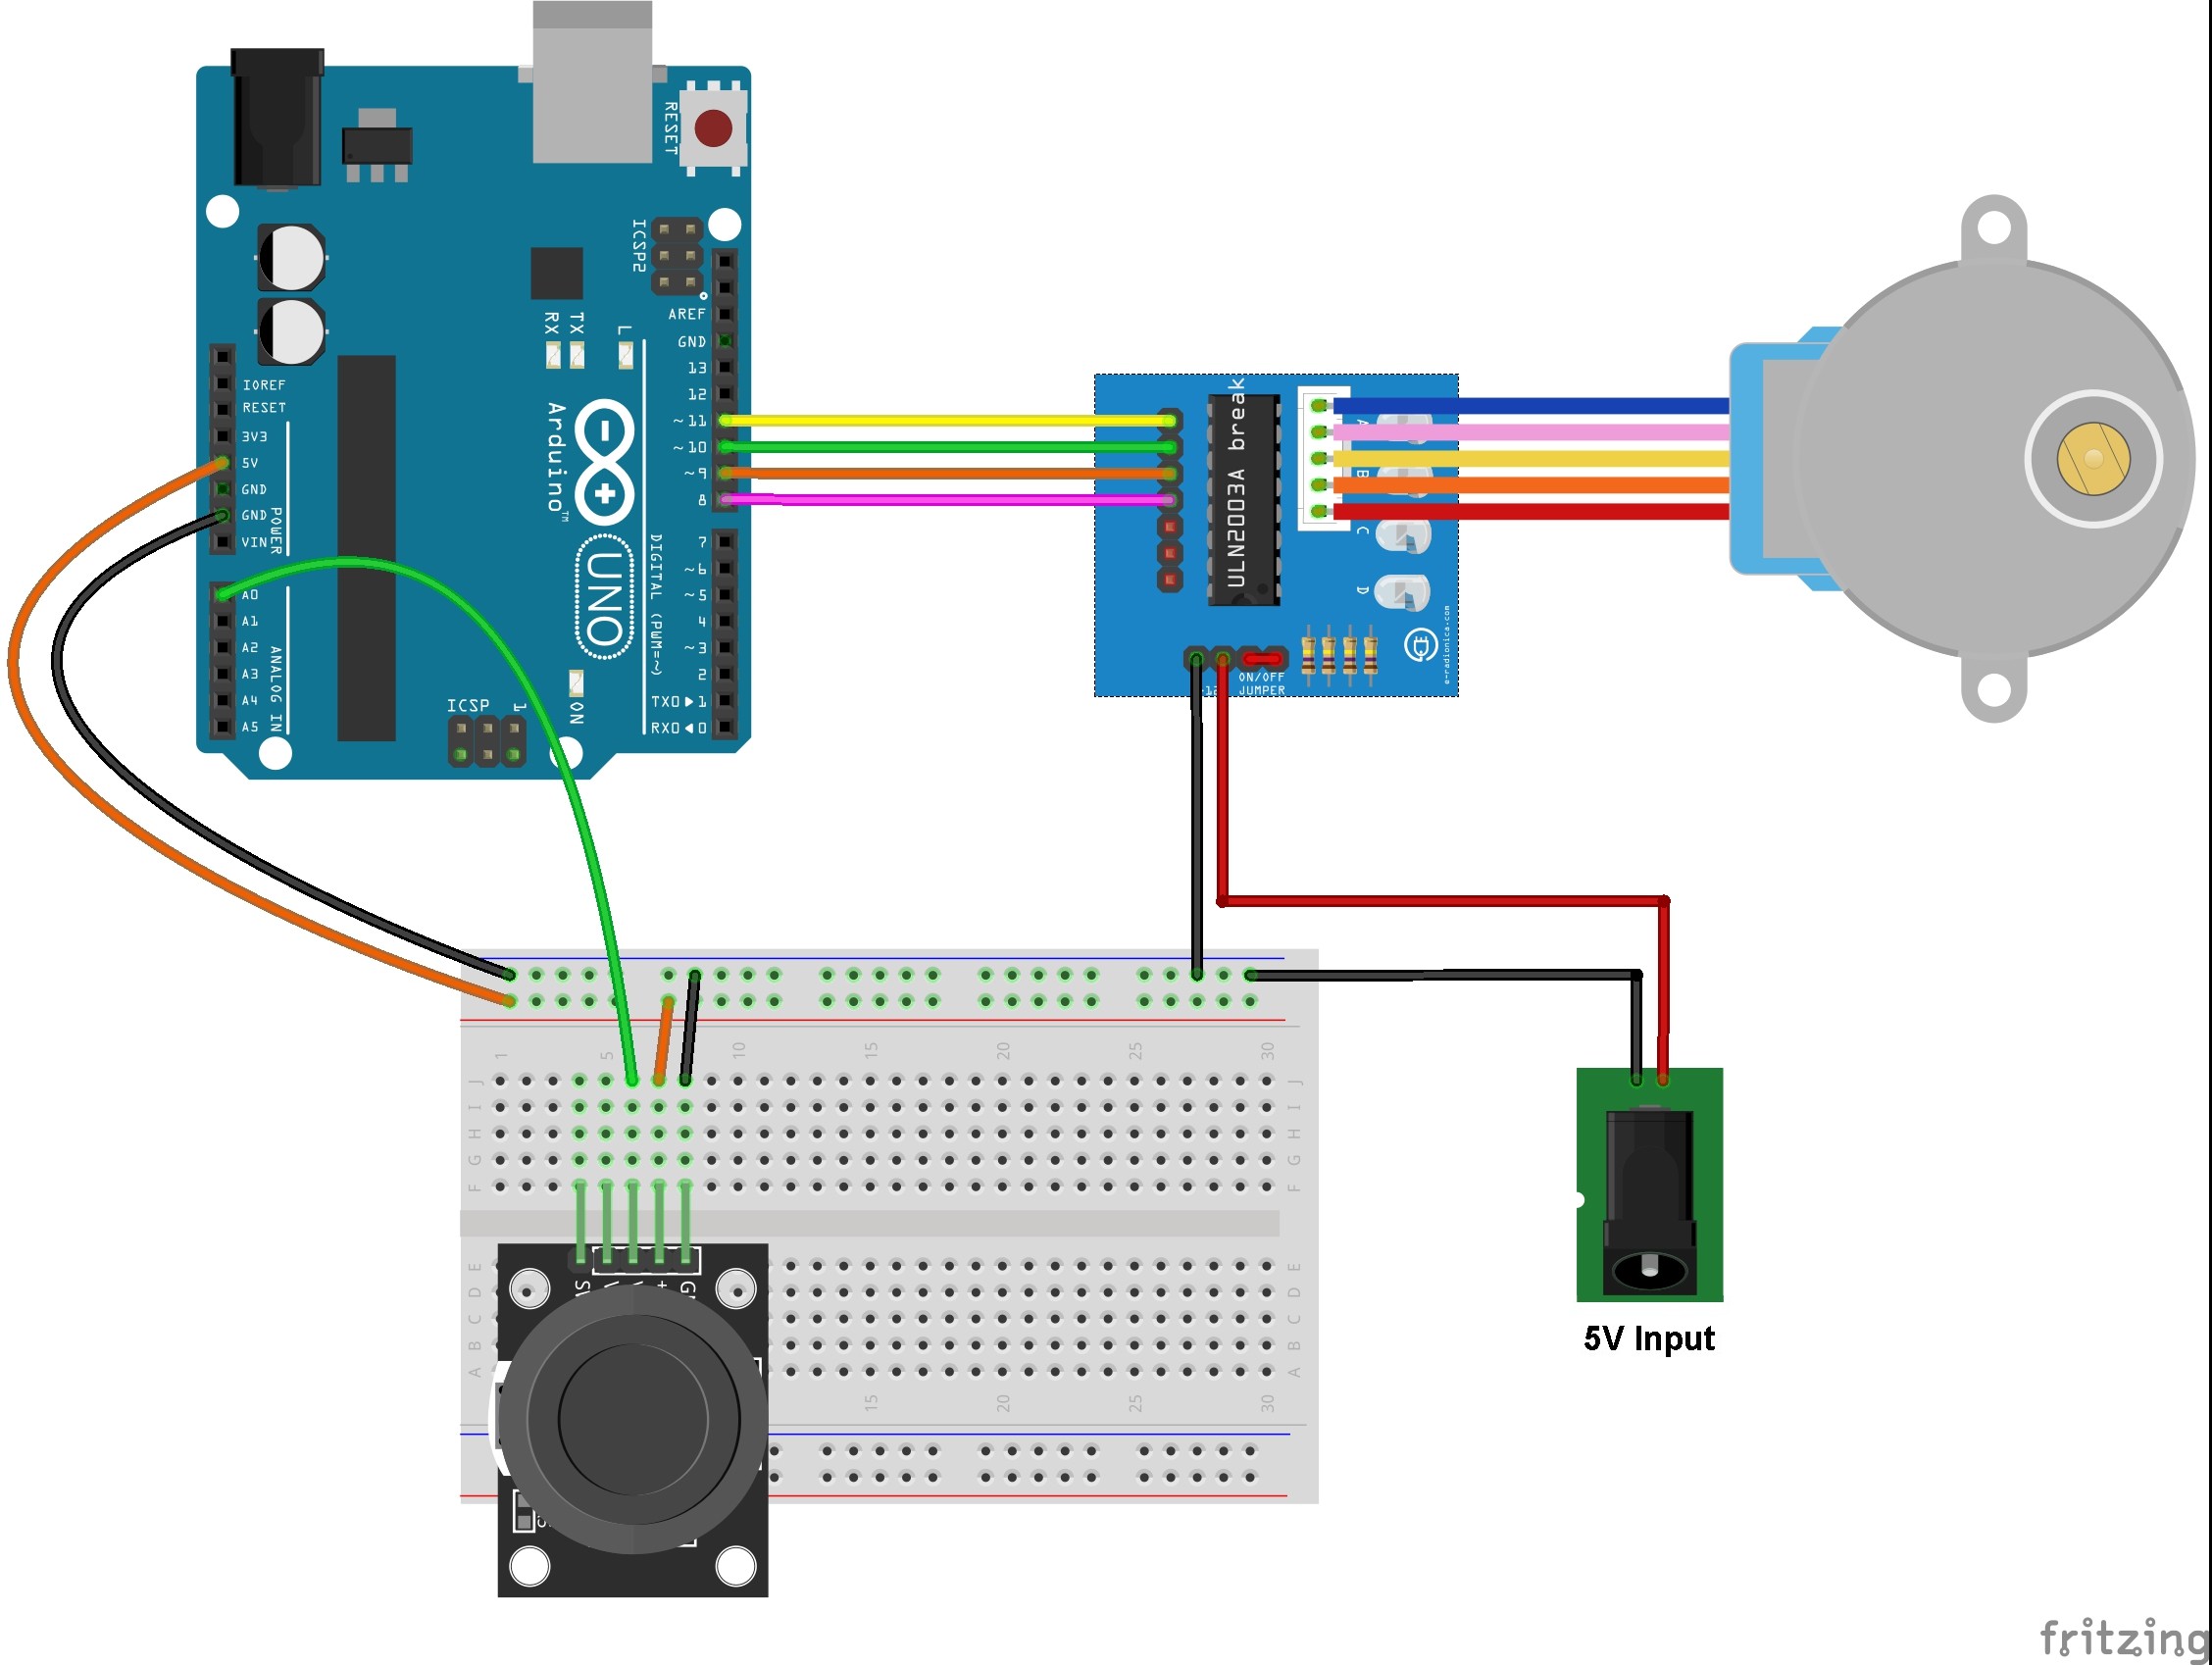
and the following image shows fritzing circuit:
The stepper motor is connected to the ULN2003A board which is supplied with external power source of 5V. The control lines (IN1, IN2, IN3 and IN4) of this board are connected to the Arduino as follows:
IN1 to Arduino pin 11
IN2 to Arduino pin 10
IN3 to Arduino pin 9
IN4 to Arduino pin 8
The joystick board has 5 pins: GND, +5V, VRX, VRY and SW where:
GND and +5V are power supply pins
VRX is the X-axis potentiometer output
VRY is the Y-axis potentiometer output
SW is the push button terminal (the other terminal is connected to GND).
The output of the X-axis potentiometer (VRX) is connected to Arduino analog pin A0, Y-axis potentiometer output (VRY) can also be used. The switch pin (SW) is not used in this example.
Using the X-axis and the Y-axis potentiometers we can control two stepper motors independently.
Stepper motor control with Arduino and joystick code:
In this example I used Arduino stepper motor library (built-in) which simplifies the code, it’s included in the code using the following line:
1 | #include <Stepper.h> |
The stepper motor which I used in this project is 28BYJ-48, this motor equipped with speed reducer of 1/64. The internal motor has 32 steps per one revolution which means the external shaft has 2048 steps per one revolution (64 x 32). Number of steps is defined in the code as shown below:
1 | #define STEPS 32 |
and the connection of the control lines of the stepper motor are defined as:
1 2 3 4 5 6 7 8 | // define stepper motor control pins #define IN1 11 #define IN2 10 #define IN3 9 #define IN4 8 // initialize stepper library Stepper stepper(STEPS, IN4, IN2, IN3, IN1); |
The joystick potentiometer output pin is connected to Arduino analog pin 0, it’s defined in the code as:
1 2 | // joystick pot output is connected to Arduino A0 #define joystick A0 |
When the joystick released, the potentiometer is in middle position and its output voltage is approximately 2.5V, reading it with Arduino should give a digital value of about 511( Arduino UNO ADC module resolution is 10-bit).
In the code I made 3 intervals:
The first one between 500 and 523: in this interval the joystick is released and the stepper motor is not moving at all (all outputs are low).
The second interval when digital value is greater than or equal to 523 where the motor moves in the first direction.
The last interval when the digital value is less than or equal to 500 where the motor moves in the other direction.
The speed of the motor is always between 5 and 500 RPM. Moving the joystick to maximum (both directions) causes the motor to move in maximum speed.
Rest of code is described through comments.
1 2 3 4 5 6 7 8 9 10 11 12 13 14 15 16 17 18 19 20 21 22 23 24 25 26 27 28 29 30 31 32 33 34 35 36 37 38 39 40 41 42 43 44 45 46 47 48 49 50 51 52 53 54 55 56 57 58 59 60 61 62 63 64 65 66 67 68 69 70 71 72 73 74 75 76 77 | /* * Unipolar stepper motor speed and direction control with Arduino * and joystick * This is a free software with NO WARRANTY. * http://simple-circuit.com/ */ // include Arduino stepper motor library #include <Stepper.h> // define number of steps per revolution #define STEPS 32 // define stepper motor control pins #define IN1 11 #define IN2 10 #define IN3 9 #define IN4 8 // initialize stepper library Stepper stepper(STEPS, IN4, IN2, IN3, IN1); // joystick pot output is connected to Arduino A0 #define joystick A0 void setup() { } void loop() { // read analog value from the potentiometer int val = analogRead(joystick); // if the joystic is in the middle ===> stop the motor if( (val > 500) && (val < 523) ) { digitalWrite(IN1, LOW); digitalWrite(IN2, LOW); digitalWrite(IN3, LOW); digitalWrite(IN4, LOW); } else { // move the motor in the first direction while (val >= 523) { // map the speed between 5 and 500 rpm int speed_ = map(val, 523, 1023, 5, 500); // set motor speed stepper.setSpeed(speed_); // move the motor (1 step) stepper.step(1); val = analogRead(joystick); } // move the motor in the other direction while (val <= 500) { // map the speed between 5 and 500 rpm int speed_ = map(val, 500, 0, 5, 500); // set motor speed stepper.setSpeed(speed_); // move the motor (1 step) stepper.step(-1); val = analogRead(joystick); } } } |
The following video shows a simple hardware circuit of the project:


Hi, is it possible to create a limit for the stepper motors. For example, it can only turn 180° clockwise and 180° counterclockwise.
Ho do I increase joystick sensitivity ?
do I have to add some more speed values in “int speed_” ?
2 errors :
– missing 1 Ground on fritzing circuit
– missing #include on code
😉
missing Stepper.h after #include on code
Yah, me too, this will not compile. Thanks for the effort.
great! thanks
Hi, nice post. seems the speed is a kind of slow, can you increase the speed?
Thanks
Adam
Hello, I’ve been following your projects for quite sometime, and me as a newbie, is really a great help. Just a clarification, in your video, you have a capacitor in the board, but in your illustration there’s none. Can you help me clear this out? Thanks a lot.
The capacitor is helpful in reducing surge current on the power supply, it’s not necessary for the circuit to work if your supply current is sufficent.
Merci beaucoup pour le code …Il fonctionne à merveille.
hi! Thank you it works well, my question is if i could increase the speed more than 500rpm? Thanks!!!
If your motor supports that then yes you can do that just modify the map function (lines: 51 & 65), replace the last 500 by your max speed value!
hi 3 stepper motor control how do I need to use a code can you help
My motors still spin very slightly when its at LOW I also tried 0. any ideas why my motors are still spinning even when the joystick is in the middle position.
Ya this doesn’t work.
porfavor ayudeme con toda la programacion
Please could you pass me the complete code by email. Thank you
The complete code is the one shown above!
But the part of the void setup would be missing