This Arduino tutorial shows how to print and scroll text on MAX7219 LED dot matrix display. A potentiometer connected to Arduino analog channel is used to control the speed of the moving text. We’ll also see the simulation of this project using Labcenter Electronics Proteus circuit simulation software.
In the last post in this blog, I put a detailed information about the MAX7219 LED dot matrix display and how to interface it with Arduino development board, post link is the one below:
Interfacing MAX7219 LED Dot Matrix Display with Arduino
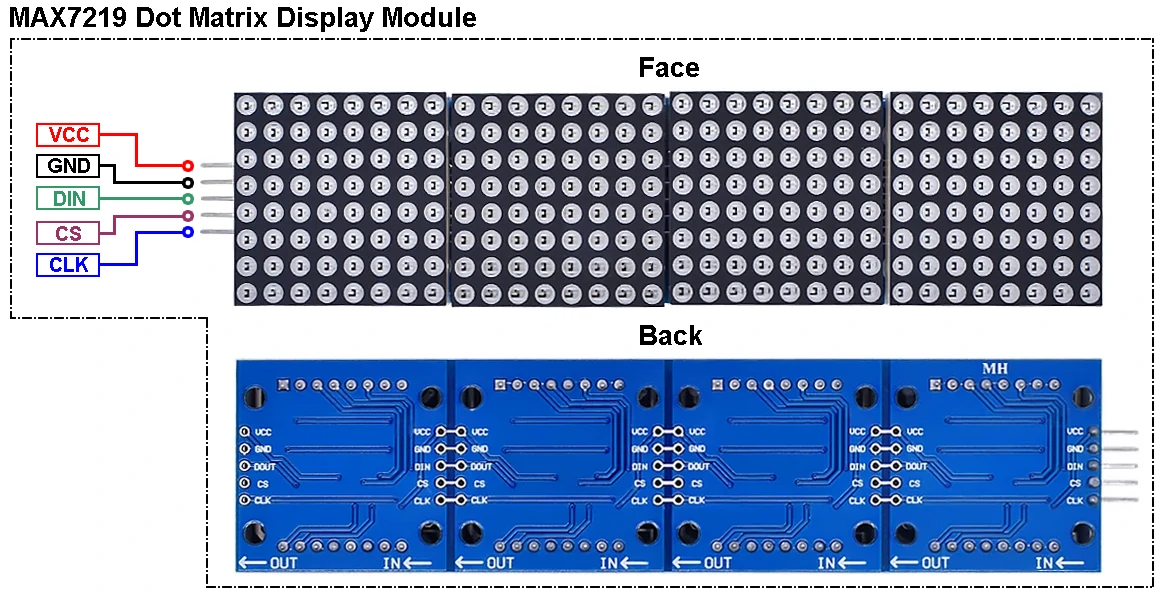
The MAX7219 LED dot matrix module used in this project is shown below, it just four cascaded devices and has a resolution of 8×32.
Hardware required:
This is a summary of project required parts.
- Arduino board
- MAX7219 LED dot matrix display module (4 cascaded devices) —> MAX7219 IC datasheet
- External 5V, 1A source
- 10k potentiometer
- Breadboard & some jumper wires
MAX7219 Dot Matrix Scrolling Text Example with Arduino Circuit:
The image below shows project circuit diagram.

As shown in the circuit diagram, the wring is very simple as described below:
MAX7219 module GND pin is connected to Arduino GND pin.
MAX7219 module DIN pin is connected to Arduino digital pin 11.
MAX7219 module CS (LOAD) pin is connected to Arduino digital pin 10.
MAX7219 module CLK pin is connected to Arduino digital pin 13.
The MAX7219 module has a total of 256 LEDs and powering this number of LEDs requires a lot of current the Arduino board and most Laptop USB ports cannot provide (max 500mA for most USB ports). For this reason an external power source of 5V and at least 1A is needed. Positive terminal of this power supply is connected to VCC pin of the MAX7219 module and negative terminal (or ground) is connected to GND pin of the MAX7219 module.
Note that Arduino digital pins 10, 11, and 13 are hardware SPI pins of the ATMEGA328P microcontroller respectively for SS (Slave Select), MOSI (Master-Out Slave-In) and SCK (Serial Clock).
In this example the potentiometer is used to control scrolling speed, its output is connected to Arduino analog channel 0.
Interfacing MAX7219 LED Dot Matrix with Arduino Code:
To be able to compile & upload project Arduino code, two libraries for the MAX7219 display are required. The first library is “MD_MAX72xx” which can be installed by going to:
Sketch menu —> Include Library —> Manage Libraries. In the Library Manager, search for “MD_MAX72xx” and install the library made by MajicDesigns.
The 2nd library is “MD_Parola” which also can be installed online using Arduino IDE Library Manager, just search for “MD_Parola” and install the library made by MajicDesigns.
GitHub links for the two libraries:
MD_MAX72XX
MD_Parola
The “MD_Parola” is a nice library for dot matrix display modules and it does support different hardware types. The given link below contains a useful documentation about it:
Parola Library for Arduino Documentation
Programming hints:
All the used libraries are included in the Arduino code as given below:
1 2 3 | #include <MD_Parola.h> // include MajicDesigns Parola library #include <MD_MAX72xx.h> // include MajicDesigns MAX72xx LED matrix library #include <SPI.h> // include Arduino SPI library |
MD_Parola Library configuration:
As mentioned above, we have a four cascaded MAX7219 devices and this number is defined in the Arduino code as shown below.
The CS (LOAD) pin of the display module is connected to Arduino digital pin 10.
Note that we’re using dot matrix type: FC-16. It’s also defined in Arduino code.
1 2 3 4 | #define HARDWARE_TYPE MD_MAX72XX::FC16_HW // this line defines our dot matrix hardware type #define MAX_DEVICES 4 // define number of total cascaded modules #define CS_PIN 10 // define CS (Chip Select) pin MD_Parola display = MD_Parola(HARDWARE_TYPE, CS_PIN, MAX_DEVICES); |
Potentiometer output is connected to Arduino A0 pin, it is defined in the code as:
1 | #define POTPIN A0 // define speed control potentiometer output pin connection |
Another configurations are required for the scrolling function which are: Scroll speed, Scroll direction (left-to-right or right-to-left), Scroll align (left or right), and Scroll pause (time in milliseconds). These configuration are made in the Arduino code as shown below:
1 2 3 4 | uint8_t scrollSpeed = 150; // set initial scroll speed, can be a value between 10 (max) and 150 (min) textEffect_t scrollEffect = PA_SCROLL_LEFT; // scroll direction, right-to-left direction textPosition_t scrollAlign = PA_LEFT; // scroll align uint16_t scrollPause = 2000; // scroll pause in milliseconds |
Rest of Arduino code is described through comments.
Full Arduino Code:
1 2 3 4 5 6 7 8 9 10 11 12 13 14 15 16 17 18 19 20 21 22 23 24 25 26 27 28 29 30 31 32 33 34 35 36 37 38 39 40 41 42 43 44 45 46 47 48 49 50 51 52 53 54 55 56 57 | /******************************************************************************** * Interfacing MAX7219 LED dot matrix display with Arduino - Text scroll example. * This is a free software with NO WARRANTY. * http://simple-circuit.com/ /********************************************************************************/ #include <MD_Parola.h> // include MajicDesigns Parola library #include <MD_MAX72xx.h> // include MajicDesigns MAX72xx LED matrix library #include <SPI.h> // include Arduino SPI library #define HARDWARE_TYPE MD_MAX72XX::FC16_HW // this line defines our dot matrix hardware type (FC-16) #define MAX_DEVICES 4 // define number of total cascaded modules #define CS_PIN 10 // define CS (Chip Select) pin MD_Parola display = MD_Parola(HARDWARE_TYPE, CS_PIN, MAX_DEVICES); #define POTPIN A0 // define speed control potentiometer output pin connection uint8_t scrollSpeed = 150; // set initial scroll speed, can be a value between 10 (max) and 150 (min) textEffect_t scrollEffect = PA_SCROLL_LEFT; // scroll direction, right-to-left direction textPosition_t scrollAlign = PA_LEFT; // scroll align uint16_t scrollPause = 2000; // scroll pause in milliseconds // setup function void setup(void) { // initialize the dot matrix display display.begin(); // set the intensity (brightness) of the display (choose a number between 0 and 15) display.setIntensity(3); // clear the whole display display.displayClear(); // print text on the display display.displayText("Hello world, This is an Arduino text scrolling example!", scrollAlign, scrollSpeed, scrollPause, scrollEffect, scrollEffect); } // main loop function void loop(void) { uint16_t an = analogRead(POTPIN); // read analog data from potentiometer output int16_t speed = map(an, 0, 1023, 150, 10); // map previous value between 150 & 10 (min & max speed) if ( speed != display.getSpeed() ) // check if speed changed display.setSpeed(speed); // set new scrolling speed if (display.displayAnimate()) { // animate the display display.displayReset(); // reset the current animation } } // end of code. |
Interfacing MAX7219 LED Dot Matrix with Arduino Video:
The following video shows my simple DIY circuit of this project where Arduino NANO board is used.
Interfacing MAX7219 LED Dot Matrix with Arduino Proteus Simulation Video:
This project can be easily simulated using Proteus simulation software as shown in this video.
Arduino with MAX7219 module Proteus simulation file download:
Proteus simulation file of this project can be downloaded from the below Google Drive link. Use Proteus version 8.15 or higher to open it.
DOWNLOAD
Discover more from Simple Circuit
Subscribe to get the latest posts sent to your email.


not working, all matrices display same text
Great tutorial! Thanks for sharing this detailed guide on how to create a scrolling text display using the MAX7219 LED dot matrix with Arduino. This is a fantastic project for both beginners and experienced Arduino enthusiasts.