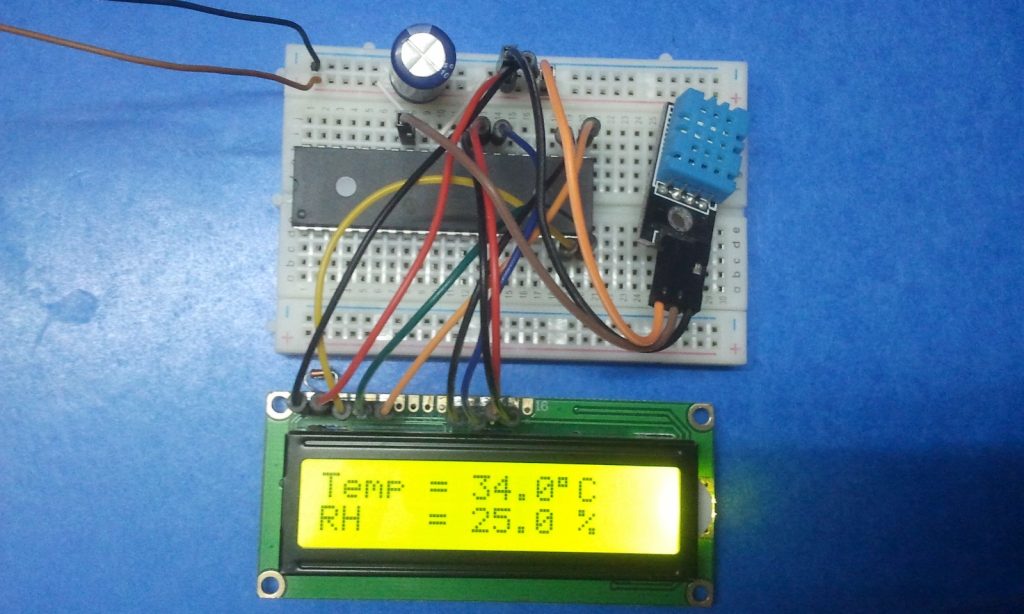
This topic shows how to interface Microchip PIC16F887 microcontroller with DHT11 (RHT01) relative humidity and temperature sensor (digital sensor) where the compiler used in this project is MikroElektronika mikroC Pro for PIC.
Related Projects:
DHT22 Sensor interface with PIC microcontroller – mikroC Projects
Interfacing PIC16F887 with DHT11 sensor – CCS C compiler
Hardware Required:
- PIC16F887 microcontroller —> datasheet
- DHT11 Sensor (RHT01) —> datasheet
- 16×2 LCD screen
- 10k variable resistor (or potentiometer)
- 4.7k ohm resistor
- 5V Power source
- Breadboards
- Jumper wires
- PIC MCU Programmer (PICkit 3, PICkit 4…)
Interfacing PIC MCU with DHT11 sensor circuit:
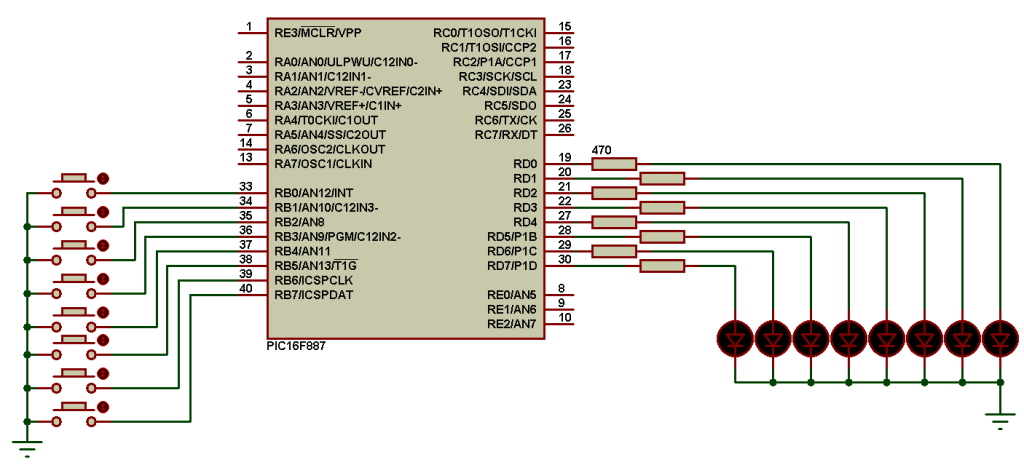
Circuit diagram is shown below.

(All grounded terminals are connected together).
The DHT11 sensor has four pins (from left to right):
Pin 1: VCC pin, connected to circuit VCC (+5V).
Pin 2: data pin, connected to PIC16F887 microcontroller RB0 pin.
Pin 3: not connected pin.
Pin 4: GND pin, connected to circuit ground.
The 1602 LCD screen (2 rows and 16 columns) is used to display the RMS value of the applied voltage, it is connected to the PIC18F46K22 MCU as follows:
RS —> pin RD0
E —> pin RD1
D4 —> pin RD2
D5 —> pin RD3
D6 —> pin RD4
D7 —> pin RD5
VSS, RW, D0, D1, D2, D3, and K are connected to circuit ground
VEE to the variable resistor (or potentiometer) output
VDD to +5V and A to +5V through 330 ohm resistor.
VEE pin is used to control the contrast of the LCD. A (anode) and K (cathode) are the back light LED pins.
The internal oscillator of the microcontroller is used and MCLR pin function is disabled.
Interfacing PIC MCU with DHT11 sensor mikroC Pro for PIC code:
Configuration words are:
CONFIG1 : 0x2CD4
CONFIG2 : 0x0700
The configuration words can be changed from: Project –> Edit Project …
Functions used in the code:
void Start_Signal(void): used to send start signal to the DHT11 sensor.
unsigned short Check_Response(): used to detect the response signal which comes from the DHT11 sensor, this function returns 1 if OK and 0 if error.
unsigned short Read_Data(unsigned short* dht_data): this function reads 1 byte (8 bits) from the sensor, data are saved in the variable dht_data. Returns 0 if OK and 1 if error (time out error).
1 2 3 4 5 6 7 8 9 10 11 12 13 14 15 16 17 18 19 20 21 22 23 24 25 26 27 28 29 30 31 32 33 34 35 36 37 38 39 40 41 42 43 44 45 46 47 48 49 50 51 52 53 54 55 56 57 58 59 60 61 62 63 64 65 66 67 68 69 70 71 72 73 74 75 76 77 78 79 80 81 82 83 84 85 86 87 88 89 90 91 92 93 94 95 96 97 98 99 100 101 102 103 104 105 106 107 108 109 110 111 112 113 114 115 116 117 118 119 120 121 122 123 124 125 126 127 128 129 130 | // Interfacing DHT11 sensor with PIC16F887 mikroC code // Internal oscillator used @ 8MHz // Configuration words: CONFIG1 = 0x2CD4 // CONFIG2 = 0x0700 // LCD module connections sbit LCD_RS at RD0_bit; sbit LCD_EN at RD1_bit; sbit LCD_D4 at RD2_bit; sbit LCD_D5 at RD3_bit; sbit LCD_D6 at RD4_bit; sbit LCD_D7 at RD5_bit; sbit LCD_RS_Direction at TRISD0_bit; sbit LCD_EN_Direction at TRISD1_bit; sbit LCD_D4_Direction at TRISD2_bit; sbit LCD_D5_Direction at TRISD3_bit; sbit LCD_D6_Direction at TRISD4_bit; sbit LCD_D7_Direction at TRISD5_bit; // End LCD module connections // DHT11 sensor connection (here data pin is connected to pin RB0) sbit DHT11_PIN at RB0_bit; sbit DHT11_PIN_Direction at TRISB0_bit; // End DHT11 sensor connection char temperature[] = "Temp = 00.0 C "; char humidity[] = "RH = 00.0 % "; unsigned short T_byte1, T_byte2, RH_byte1, RH_byte2, CheckSum ; void Start_Signal(void) { DHT11_PIN_Direction = 0; // Configure connection pin as output DHT11_PIN = 0; // Connection pin output low delay_ms(25); // Wait 25 ms DHT11_PIN = 1; // Connection pin output high delay_us(25); // Wait 25 us DHT11_PIN_Direction = 1; // Configure connection pin as input } unsigned short Check_Response() { TMR1H = 0; // Reset Timer1 TMR1L = 0; TMR1ON_bit = 1; // Enable Timer1 module while(!DHT11_PIN && TMR1L < 100); // Wait until DHT11_PIN becomes high (cheking of 80µs low time response) if(TMR1L > 99) // If response time > 99µS ==> Response error return 0; // Return 0 (Device has a problem with response) else { TMR1H = 0; // Reset Timer1 TMR1L = 0; while(DHT11_PIN && TMR1L < 100); // Wait until DHT11_PIN becomes low (cheking of 80µs high time response) if(TMR1L > 99) // If response time > 99µS ==> Response error return 0; // Return 0 (Device has a problem with response) else return 1; // Return 1 (response OK) } } unsigned short Read_Data(unsigned short* dht_data) { short i; *dht_data = 0; for(i = 0; i < 8; i++){ TMR1H = 0; // Reset Timer1 TMR1L = 0; while(!DHT11_PIN) // Wait until DHT11_PIN becomes high if(TMR1L > 100) { // If low time > 100 ==> Time out error (Normally it takes 50µs) return 1; } TMR1H = 0; // Reset Timer1 TMR1L = 0; while(DHT11_PIN) // Wait until DHT11_PIN becomes low if(TMR1L > 100) { // If high time > 100 ==> Time out error (Normally it takes 26-28µs for 0 and 70µs for 1) return 1; // Return 1 (timeout error) } if(TMR1L > 50) // If high time > 50 ==> Sensor sent 1 *dht_data |= (1 << (7 - i)); // Set bit (7 - i) } return 0; // Return 0 (data read OK) } void main() { OSCCON = 0X70; // Set internal oscillator to 8MHz ANSELH = 0; // Configure all PORTB pins as digital T1CON = 0x10; // Set Timer1 clock source to internal with 1:2 prescaler (Timer1 clock = 1MHz) TMR1H = 0; // Reset Timer1 TMR1L = 0; Lcd_Init(); // Initialize LCD module Lcd_Cmd(_LCD_CURSOR_OFF); // cursor off Lcd_Cmd(_LCD_CLEAR); // clear LCD while(1) { Start_Signal(); // Send start signal to the sensor if(Check_Response()) { // Check if there is a response from sensor (If OK start reding humidity and temperature data) // Read (and save) data from the DHT11 sensor and check time out errors if(Read_Data(&RH_byte1) || Read_Data(&RH_byte2) || Read_Data(&T_byte1) || Read_Data(&T_byte2) || Read_Data(&Checksum)) { Lcd_Cmd(_LCD_CLEAR); // clear LCD lcd_out(1, 5, "Time out!"); // Display "Time out!" } else { // If there is no time out error if(CheckSum == ((RH_Byte1 + RH_Byte2 + T_Byte1 + T_Byte2) & 0xFF)) { // If there is no checksum error temperature[7] = T_Byte1/10 + 48; temperature[8] = T_Byte1%10 + 48; temperature[10] = T_Byte2/10 + 48; humidity[7] = RH_Byte1/10 + 48; humidity[8] = RH_Byte1%10 + 48; humidity[10] = RH_Byte2/10 + 48; temperature[11] = 223; // Put degree symbol (°) lcd_out(1, 1, temperature); lcd_out(2, 1, humidity); } // If there is a checksum error else { Lcd_Cmd(_LCD_CLEAR); // clear LCD lcd_out(1, 1, "Checksum Error!"); } } } // If there is a response (from the sensor) problem else { Lcd_Cmd(_LCD_CLEAR); // clear LCD lcd_out(1, 3, "No response"); lcd_out(2, 1, "from the sensor"); } TMR1ON_bit = 0; // Disable Timer1 module delay_ms(1000); // Wait 1 second } } // End of code |
The video below shows a Proteus simulation of the project:
Discover more from Simple Circuit
Subscribe to get the latest posts sent to your email.

foarte fain, de folos pentru masina de spalat care traieste mai mult cu CALGON!!!!!!!
Hello thank you for your effort, i would like to know why do i get time out! message on my lcd display, and how to fix that.
I would be grateful
Hi, congratulations for all what you do,
Please how to display the decimal part of the temperature?
Thanks
The resolution of the DHT11 sensor is 1°C which means there is no decimal part (because the second byte of the temperature is always 0).
DHT22 Provides a resolution of 0.1°C, that means always there is one number after the decimal point.
Thank you
hello plz can i have the library of the DHT11 for porteus 8 ?