The DS18B20 temperature sensor is a 3-pin electronic component (like a simple transistor) from Analog Devices (formerly Maxim Integrated) which uses 1-wire protocol to communicate with master device (microprocessor, microcontroller ….).
The DS18B20 sensor provides 9-bit to 12-bit Celsius temperature measurement resolution (programmable resolution).
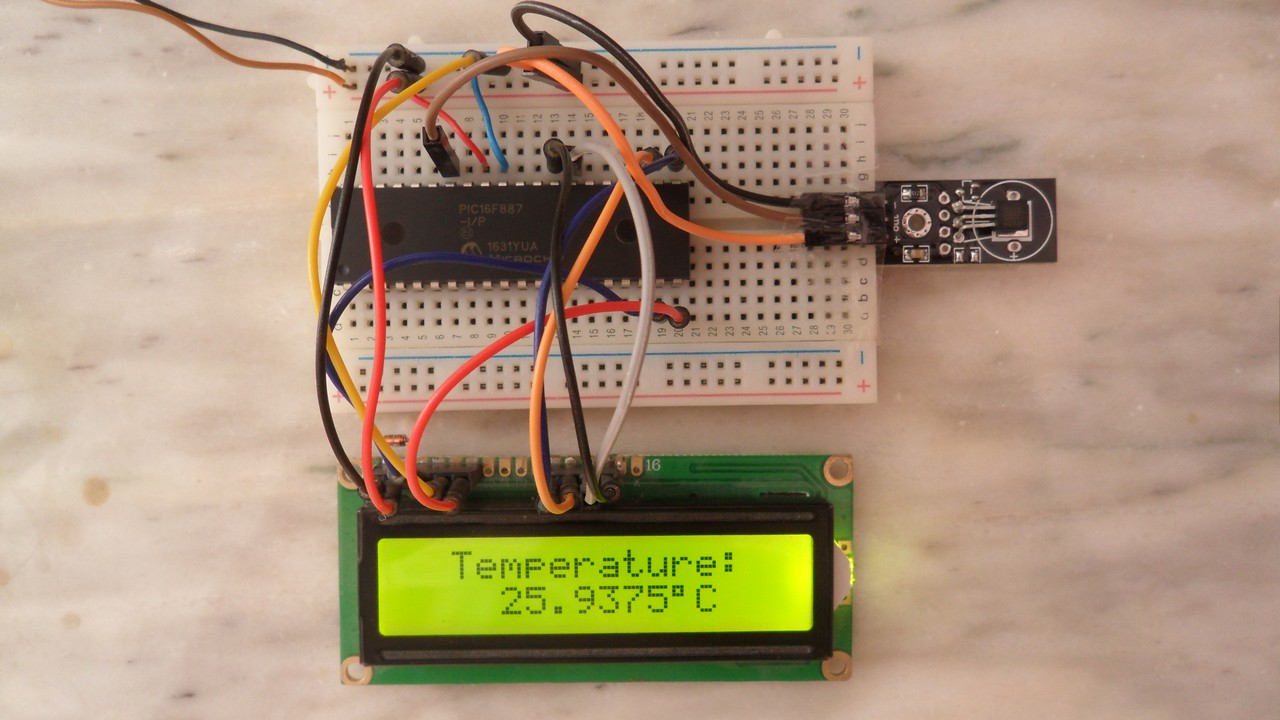
This topic shows how to interface PIC16F887 microcontroller with DS18B20 temperature sensor where temperature value is displayed on 16×2 LCD screen.
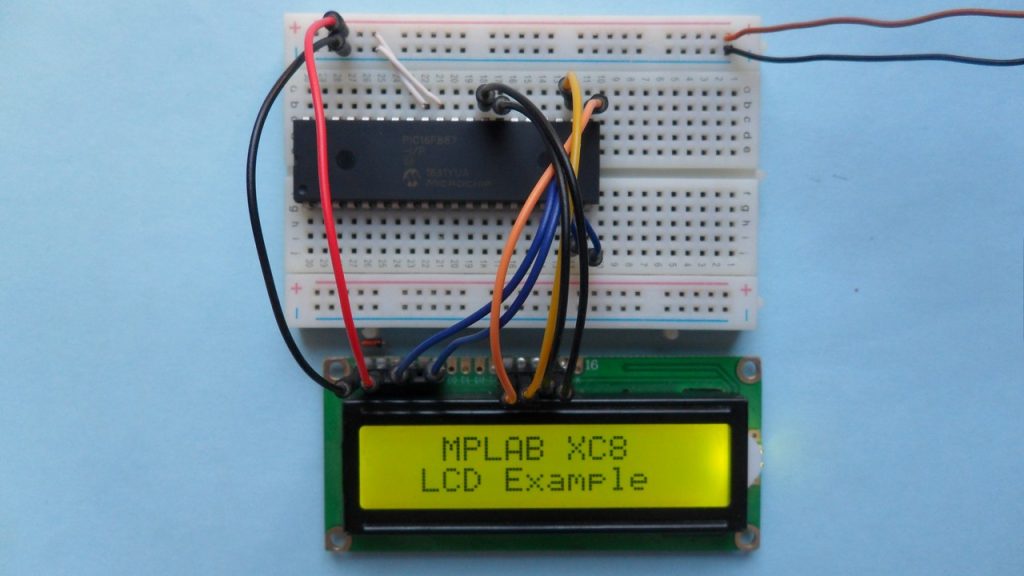
The compiler used in this project is Microchip MPLAB XC8 (MPLAB X IDE with MPLAB XC8 compiler).
Components Required:
- PIC16F887 microcontroller —-> datasheet
- DS18B20 temperature sensor —-> datasheet
- 16×2 LCD screen
- 4.7k ohm resistor
- 330 ohm resistor
- 10k ohm variable resistor or potentiometer
- Power source with 5 VDC
- PIC Microcontroller programmer (PICkit 3, PICkit 4…)
- Breadboard
- Jumper wires
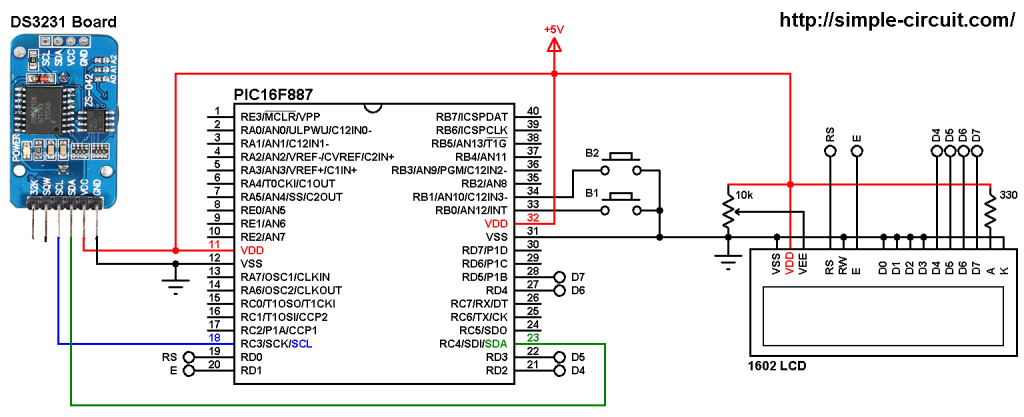
Interfacing DS18B20 sensor with PIC microcontroller circuit:
The following image shows project circuit schematic diagram.

(All grounded terminals are connected together)
The DS18B20 sensor has 3 pins (from left to right): GND, data and VCC (+5V). The data pin is connected to PIC16F887 pin RB1 (#34).
The 16×2 LCD screen is connected to the PIC16F887 microcontroller as follows:
RS —> RD0 pin
E —> RD1 pin
D4 —> RD2 pin
D5 —> RD3 pin
D6 —> RD4 pin
D7 —> RD5 pin
VSS, RW, D0, D1, D2, D3 and K are connected to circuit GND (ground)
VEE to the variable resistor (or potentiometer) output pin
VDD to +5V and A to +5V through 330 ohm resistor
VEE pin is used to control the contrast of the LCD. A (anode) and K (cathode) are the back light LED pins.
In this project the PIC16F887 microcontroller runs with its internal oscillator @ 8 MHz, MCLR pin is configured as an input pin.
Interfacing DS18B20 sensor with PIC microcontroller C code:
The C code below is for MPLAB XC8 compiler, it was tested with version 2.00 installed on MPLAB X IDE version 5.05.
To be able to compile the C code, a small LCD library for MPLAB XC8 compiler is required which can be downloaded from the following link:
MPLAB XC8 LCD Library
after the download, add the library file (LCD_Lib.c) to project folder.
Functions used in the code:
The default resolution of DS18B20 is 12-bit which means the step of the temperature is 0.0625°C. More details are in the datasheet of the device.
__bit ds18b20_start(): used to know if the DS18B20 sensor is correctly connected to the circuit, returns 1 if OK and 0 if error.
void ds18b20_write_bit(uint8_t value): writes (sends) 1 bit to the DS18B20 sensor, this bit is the LSB of the 8-bit variable ‘value’ which may be 1 or 0.
void ds18b20_write_byte(uint8_t value): writes 1 byte (8 bits) to the DS18B20 sensor, this function is based on the previous function. This function writes LSB (Least Significant Bit) first.
__bit ds18b20_read_bit(void): reads 1 bit from the DS18B20 sensor, returns the read value (1 or 0).
uint8_t ds18b20_read_byte(void): reads 1 byte (8 bits) from the DS18B20 sensor, this function is based on the previous function. This function reads LSB first.
__bit ds18b20_read(uint16_t *raw_temp_value): reads the temperature raw data which is 16-bit long (two 8-bit registers), the data is stored in the variable raw_temp_value, returns 1 if OK and 0 if error.
The microcontroller used in this example is PIC16F887, configuration words are:
1 2 | #pragma config CONFIG1 = 0x2CD4 #pragma config CONFIG2 = 0x0700 |
Where:
- In-Circuit Debugger disabled
- Low voltage programming disabled
- Fail-Safe Clock Monitor enabled
- Internal/External Switchover mode enabled
- Brown-out Reset (BOR) disabled
- Data memory code protection disabled
- Program memory code protection disabled
- RE3/MCLR pin function is digital input, MCLR internally tied to VDD
- Power-up Timer (PWRT) disabled
- Watchdog Timer (WDT) disabled
- INTOSCIO oscillator: I/O function on RA6/OSC2/CLKOUT pin, I/O function on RA7/OSC1/CLKIN
- Flash Program Memory Self Write disabled
- Brown-out Reset set to 4.0V
Full MPLAB XC8 code:
1 2 3 4 5 6 7 8 9 10 11 12 13 14 15 16 17 18 19 20 21 22 23 24 25 26 27 28 29 30 31 32 33 34 35 36 37 38 39 40 41 42 43 44 45 46 47 48 49 50 51 52 53 54 55 56 57 58 59 60 61 62 63 64 65 66 67 68 69 70 71 72 73 74 75 76 77 78 79 80 81 82 83 84 85 86 87 88 89 90 91 92 93 94 95 96 97 98 99 100 101 102 103 104 105 106 107 108 109 110 111 112 113 114 115 116 117 118 119 120 121 122 123 124 125 126 127 128 129 130 131 132 133 134 135 136 137 138 139 140 141 142 143 144 145 146 147 148 149 150 151 152 153 154 155 156 157 158 159 160 161 162 163 164 165 166 167 168 169 170 171 172 173 174 175 176 177 178 179 180 181 182 183 184 185 186 187 188 | /* * Interfacing PIC16F887 microcontroller with DS18B20 temperature sensor. * C Code for MPLAB XC8 compiler. * Internal oscillator used @ 8MHz. * This is a free software with NO WARRANTY. * http://simple-circuit.com/ */ // set configuration words #pragma config CONFIG1 = 0x2CD4 #pragma config CONFIG2 = 0x0700 // DS18B20 data pin is connected to pin RB1 #define DS18B20_PIN RB1 #define DS18B20_PIN_Dir TRISB1 //LCD module connections #define LCD_RS RD0 #define LCD_EN RD1 #define LCD_D4 RD2 #define LCD_D5 RD3 #define LCD_D6 RD4 #define LCD_D7 RD5 #define LCD_RS_DIR TRISD0 #define LCD_EN_DIR TRISD1 #define LCD_D4_DIR TRISD2 #define LCD_D5_DIR TRISD3 #define LCD_D6_DIR TRISD4 #define LCD_D7_DIR TRISD5 //End LCD module connections #include <xc.h> #define _XTAL_FREQ 8000000 #include <stdint.h> // include stdint header #include "LCD_Lib.c" // include LCD driver source file uint16_t raw_temp; char temp[] = "000.0000 C"; __bit ds18b20_start() { DS18B20_PIN = 0; // send reset pulse to the DS18B20 sensor DS18B20_PIN_Dir = 0; // configure DS18B20_PIN pin as output __delay_us(500); // wait 500 us DS18B20_PIN_Dir = 1; // configure DS18B20_PIN pin as input __delay_us(100); // wait 100 us to read the DS18B20 sensor response if (!DS18B20_PIN) { __delay_us(400); // wait 400 us return 1; // DS18B20 sensor is present } return 0; // connection error } void ds18b20_write_bit(uint8_t value) { DS18B20_PIN = 0; DS18B20_PIN_Dir = 0; // configure DS18B20_PIN pin as output __delay_us(2); // wait 2 us DS18B20_PIN = (__bit)value; __delay_us(80); // wait 80 us DS18B20_PIN_Dir = 1; // configure DS18B20_PIN pin as input __delay_us(2); // wait 2 us } void ds18b20_write_byte(uint8_t value) { for(uint8_t i = 0; i < 8; i++) ds18b20_write_bit(value >> i); } __bit ds18b20_read_bit(void) { static __bit value; DS18B20_PIN = 0; DS18B20_PIN_Dir = 0; // configure DS18B20_PIN pin as output __delay_us(2); DS18B20_PIN_Dir = 1; // configure DS18B20_PIN pin as input __delay_us(5); // wait 5 us value = DS18B20_PIN; // read and store DS18B20 state __delay_us(100); // wait 100 us return value; } uint8_t ds18b20_read_byte(void) { uint8_t value = 0; for(uint8_t i = 0; i < 8; i++) value |= ds18b20_read_bit() << i; return value; } __bit ds18b20_read(uint16_t *raw_temp_value) { if (!ds18b20_start()) // send start pulse return 0; // return 0 if error ds18b20_write_byte(0xCC); // send skip ROM command ds18b20_write_byte(0x44); // send start conversion command while(ds18b20_read_byte() == 0); // wait for conversion complete if (!ds18b20_start()) // send start pulse return 0; // return 0 if error ds18b20_write_byte(0xCC); // send skip ROM command ds18b20_write_byte(0xBE); // send read command // read temperature LSB byte and store it on raw_temp_value LSB byte *raw_temp_value = ds18b20_read_byte(); // read temperature MSB byte and store it on raw_temp_value MSB byte *raw_temp_value |= (uint16_t)(ds18b20_read_byte() << 8); return 1; // OK --> return 1 } /*************************** main function *********************/ void main(void) { OSCCON = 0x70; // set internal oscillator to 8MHz ANSELH = 0; // configure all PORTB pins as digital __delay_ms(1000); // wait 1 second LCD_Begin(); // initialize LCD module LCD_Goto(3, 1); // move cursor to column 3, row 1 LCD_Print("Temperature:"); temp[8] = 223; // put degree symbol ( ° ) while(1) { if(ds18b20_read(&raw_temp)) { if(raw_temp & 0x8000) // if the temperature is negative { temp[0] = '-'; // put minus sign (-) raw_temp = (~raw_temp) + 1; // change temperature value to positive form } else { if((raw_temp >> 4) >= 100) // if the temperature >= 100 °C temp[0] = '1'; // put 1 of hundreds else // otherwise temp[0] = ' '; // put space ' ' } // put the first two digits ( for tens and ones) temp[1] = ( (raw_temp >> 4) / 10 ) % 10 + '0'; // put tens digit temp[2] = (raw_temp >> 4) % 10 + '0'; // put ones digit // put the 4 fraction digits (digits after the point) // why 625? because we're working with 12-bit resolution (default resolution) temp[4] = ( (raw_temp & 0x0F) * 625) / 1000 + '0'; // put thousands digit temp[5] = (((raw_temp & 0x0F) * 625) / 100 ) % 10 + '0'; // put hundreds digit temp[6] = (((raw_temp & 0x0F) * 625) / 10 ) % 10 + '0'; // put tens digit temp[7] = ( (raw_temp & 0x0F) * 625) % 10 + '0'; // put ones digit LCD_Goto(4, 2); // move cursor to column 4 row 2 LCD_Print(temp); // print temp } else { LCD_Goto(4, 2); // move cursor to column 4 row 2 LCD_Print(" Error! "); } __delay_ms(1000); // wait 1 second } } /*************************** end main function ********************************/ |
Proteus simulation of the project should give a result similar to what’s shown in the following video where PIC18F4550 microcontroller is used (connections between the PIC16F887 and the 1602 LCD are not the same):
Related Projects:
Interfacing LCD with PIC microcontroller | MPLAB Projects
Interfacing DHT11 sensor with PIC microcontroller | MPLAB Projects
Interfacing DHT22 sensor with PIC microcontroller | MPLAB Projects
Discover more from Simple Circuit
Subscribe to get the latest posts sent to your email.


what’s up friend
I’m trying to replicate your code with a PIC18F4550, but no matter how hard I try, I can’t get the sensor to connect to the pic, it always shows ERROR, as far as I can trace the problem is in the START FUNCTION, it always returns 0, according to me configuring the ADCON1 should work, but no, it always enters the ERROR message 🙁
Hello,
I’m getting a very very strange reading with this code.
I’m using my own lcd library ( but it clearly works perfectly )
And as i remove the pull up resistor the code suddenly stops running and the lcd doesn’t refresh anymore.
When i reconnect the resistor we start get readings once again.
So i conclude the sensor is working like it shoud.
But like right now i’m measuring 6,4375°c and i’m writing this code in a warm room in my t-shirt 🙂
When i touch the sensor i clearly see the temp reading rising.
But then when we would measure 16°C he suddenly drops to 0°C to sart counting up again.
Same for descending temp readings.
So there must be a problem in the conversion and i have a slight idea where to look.
uint16_t doesn’t work for me in MplabX v2.0.5
so i used unsigned_int to replace it. ( so a 2 byte integer )
What should i do to get a correct reading?
Kind regards,
Tom
Thanks buddy, it really helped me out.
Thanks for posting the project, it helped a great deal. I had a little trouble at first with the LCD, but increasing the delay
times in the “LCD_Lib.c” file resolved the problem.