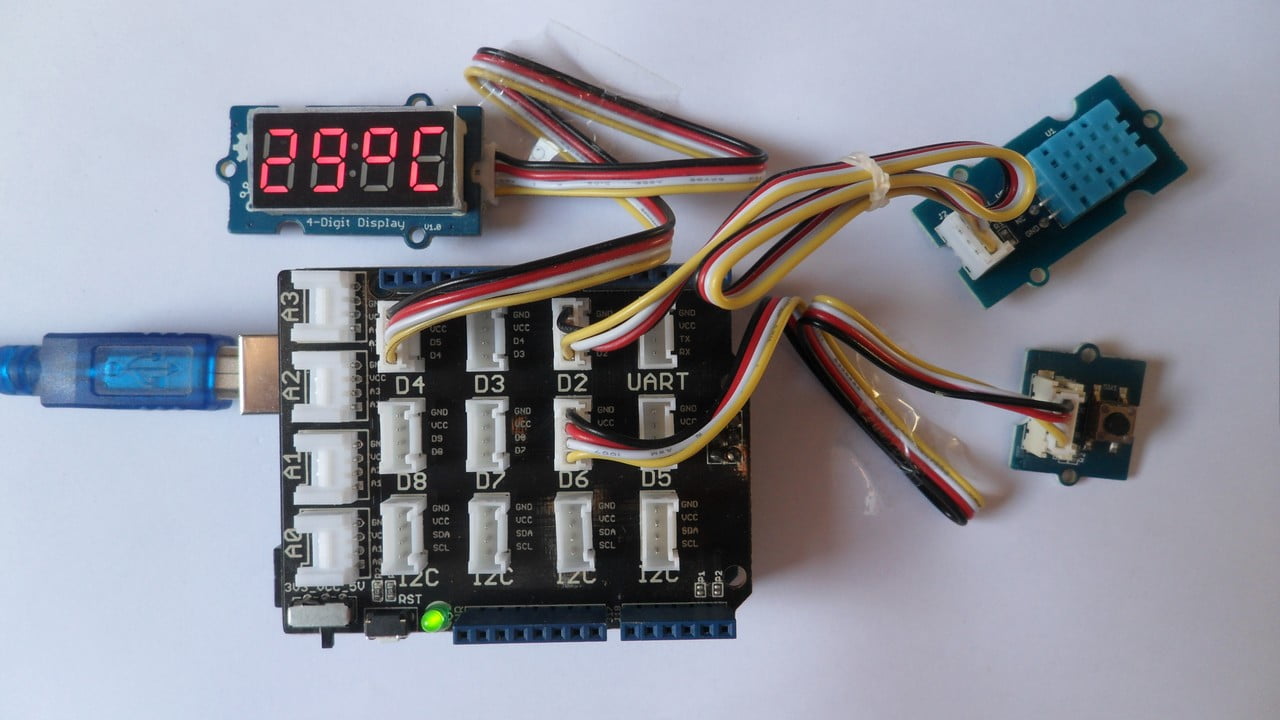
This post shows how to interface Arduino uno board with Seeed Studio Grove DHT11 sensor and 4-digit display.
The Arduino reads temperature & humidity values from the DHT11 sensor and print them on 4-digit 7-segment display which is also provided by Seeed Studio.
At any time, the Grove 4-digit display shows the value of one quantity (temperature or humidity) and the Arduino automatically toggles between them every 10 seconds. A push button (Grove button module) is connected to the Arduino board which is also used for the same purpose.
About the Grove DHT11 Sensor:
It’s a low cost digital temperature and humidity sensor module which based on the new DHT11 sensor. The Grove DHT11 sensor requires only one I/O pin for the communication with the master device.
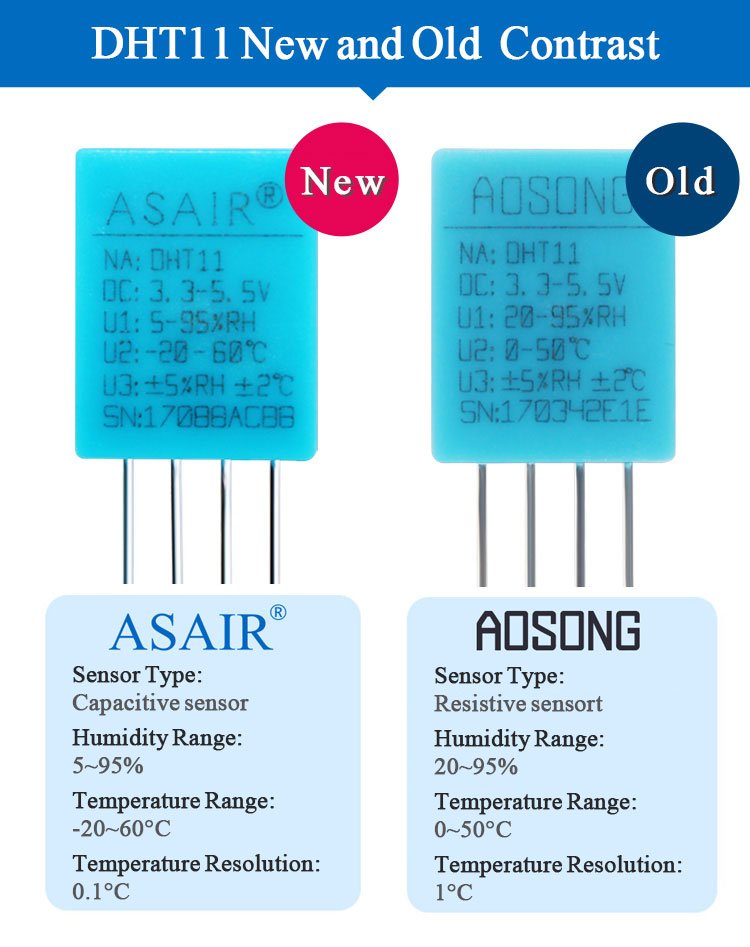
The Grove DHT11 temperature & humidity sensor uses the upgraded version of DHT11. In this version, resistive humidity components is replaced by capacitive humidity components, temperature and humidity measurement ranges are wider and temperature resolution is higher.
The following image shows the basic differences between old (AOSONG) and new (ASAIR) versions:
Grove DHT11 Features:
- Full range temperature compensation Calibrated
- Single bus digital output
- High precision capacitive humidity sensor
- Long transmission distance and excellent long-term stability
- Low power consumption
- Cost-effective
Grove DHT11 hardware overview:
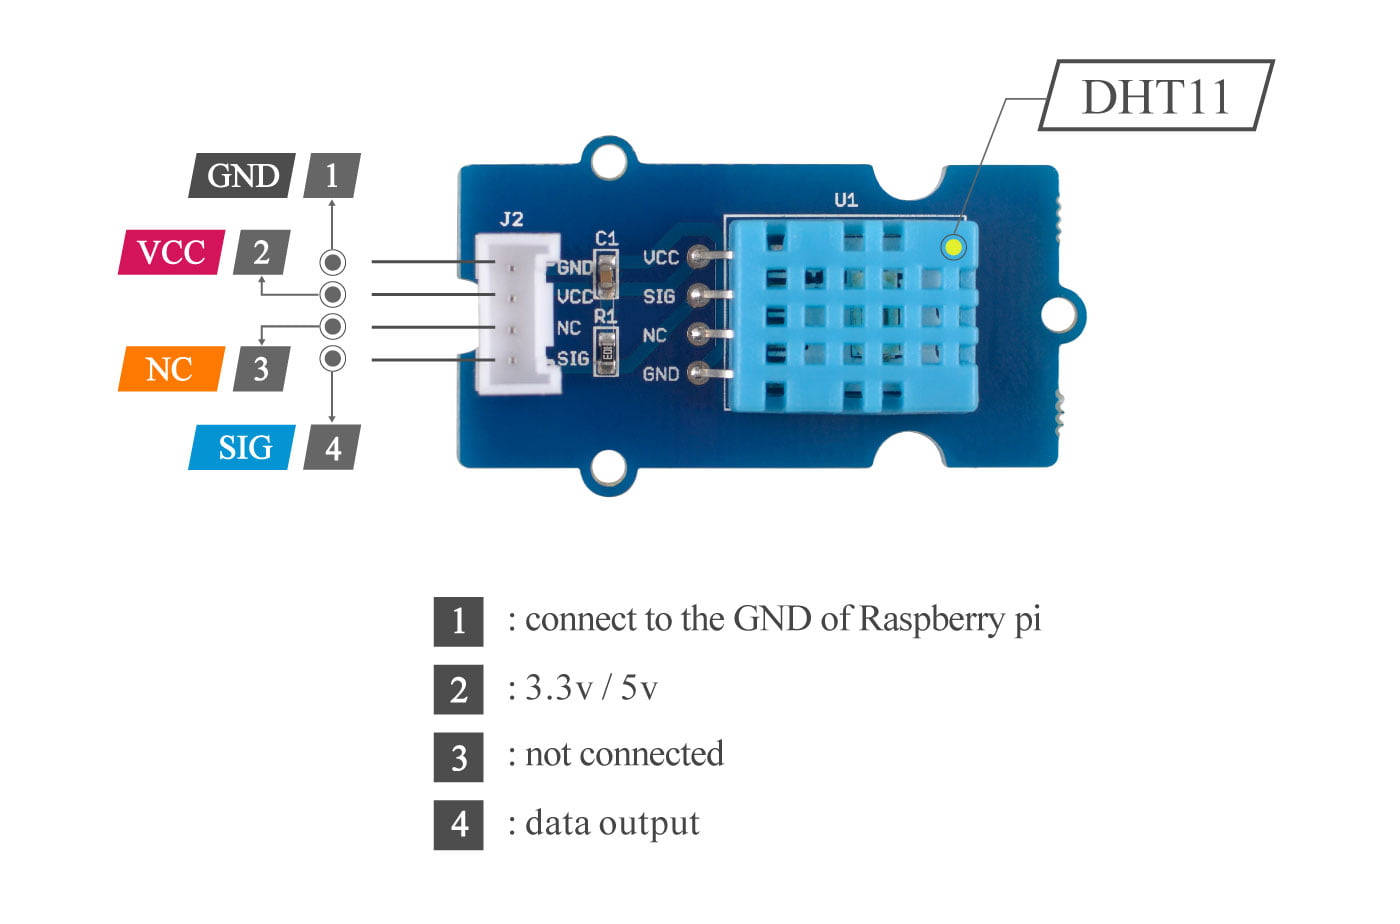
The following image shows a basic hardware overview of the Grove DHT11 sensor board.
About the Grove 4-digit display:
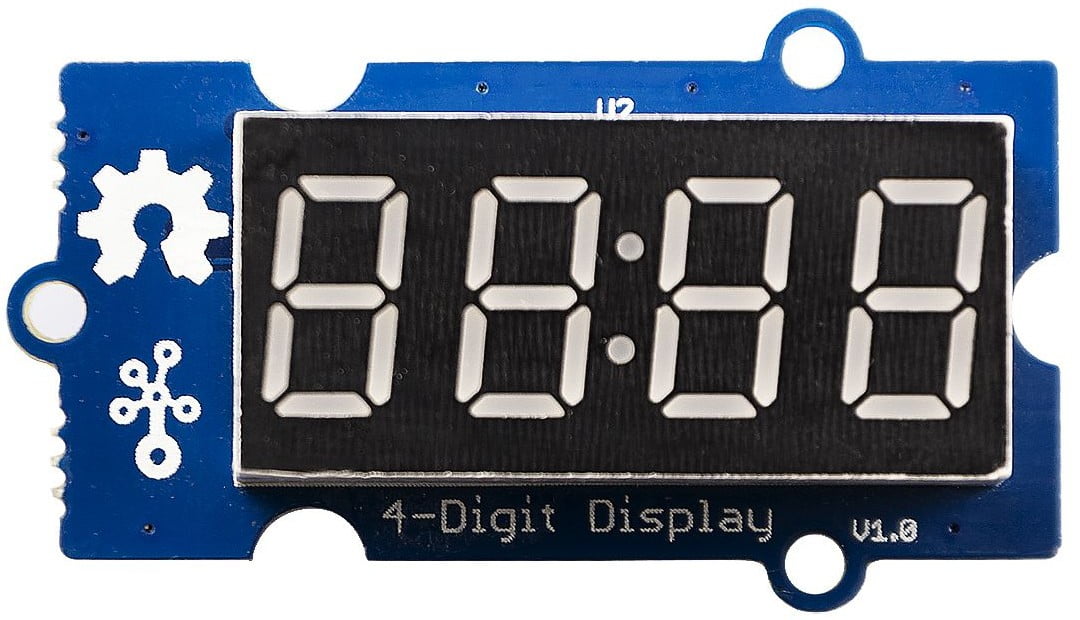
The Grove 4-digit display module is shown below (face):
And the following image shows its back:
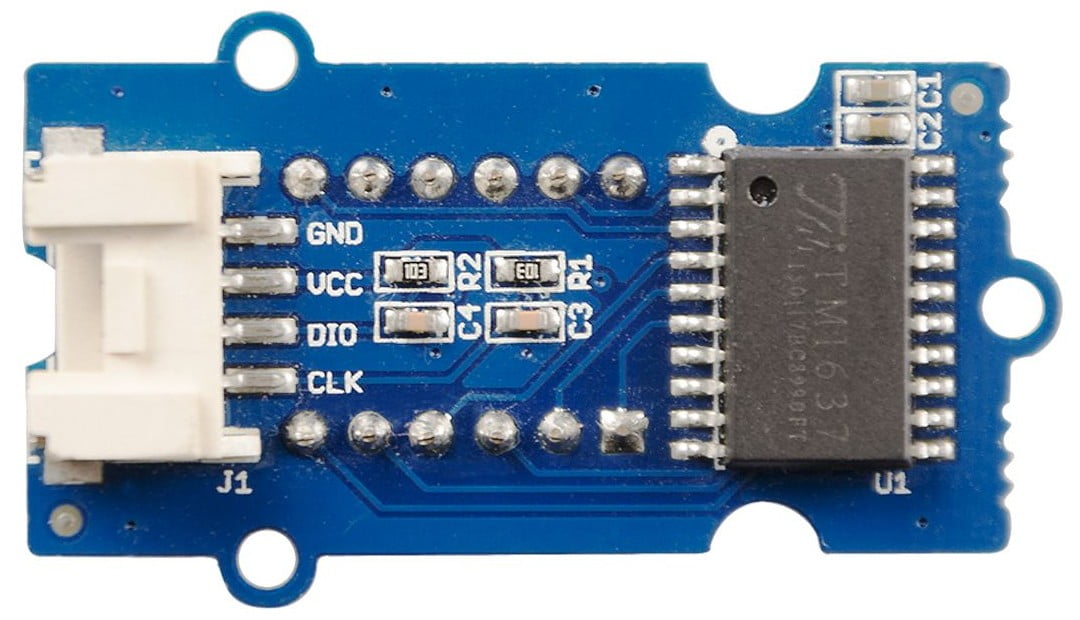
The Grove 4-digit display module consists of TM1637 integrated circuit (datasheet), 2x10k SMD resistors, 4 SMD capacitors and Grove 4-pin cable socket. SMD: Surface Mounted Device.
With the TM1637 IC, number of pins required by the 4-digit 7-segment display is minimized to 2.
This module supports 3.3V and 5V systems.
This display module is connected to Seeed Studio Base Shield via 4-pin Grove cable, the base shield is an add-on board that directly mounted to the Arduino/Genuino uno board.
The 4-pin cable pins are: GND, VCC, DIO (data input/output) and CLK (clock).
The digital pins DIO and CLK control the displayed content and the brightness of the display.
Grove button:
The following image shows the Grove button module:
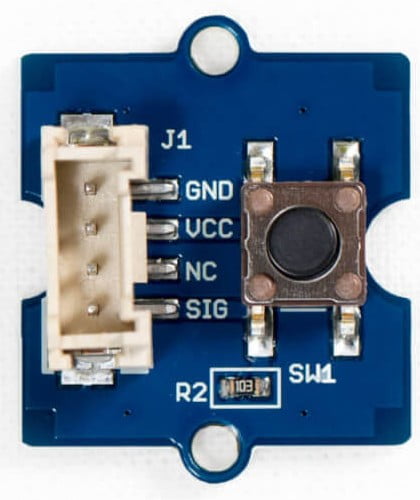
The button module has a pull down resistor of 10k ohm, if the button is pressed the state of SIG (signal) pin will change from low to high.
Hardware Required:
- Arduino/Genuino UNO board —> Board details
- Grove base shield —> official page
- Grove DHT11 sensor —> official page
- Grove 4-digit display —> official page
- Grove button module —> official page
- 3 x Grove 4-pin cable
Arduino with Grove DHT11 sensor 4-digit display circuit:
The following image shows the connection of the 3 modules with the Grove base shield where three 4-pin cables are used for the connection between the Grove modules.
Note that the base shield is directly mounted to the Arduino UNO board.
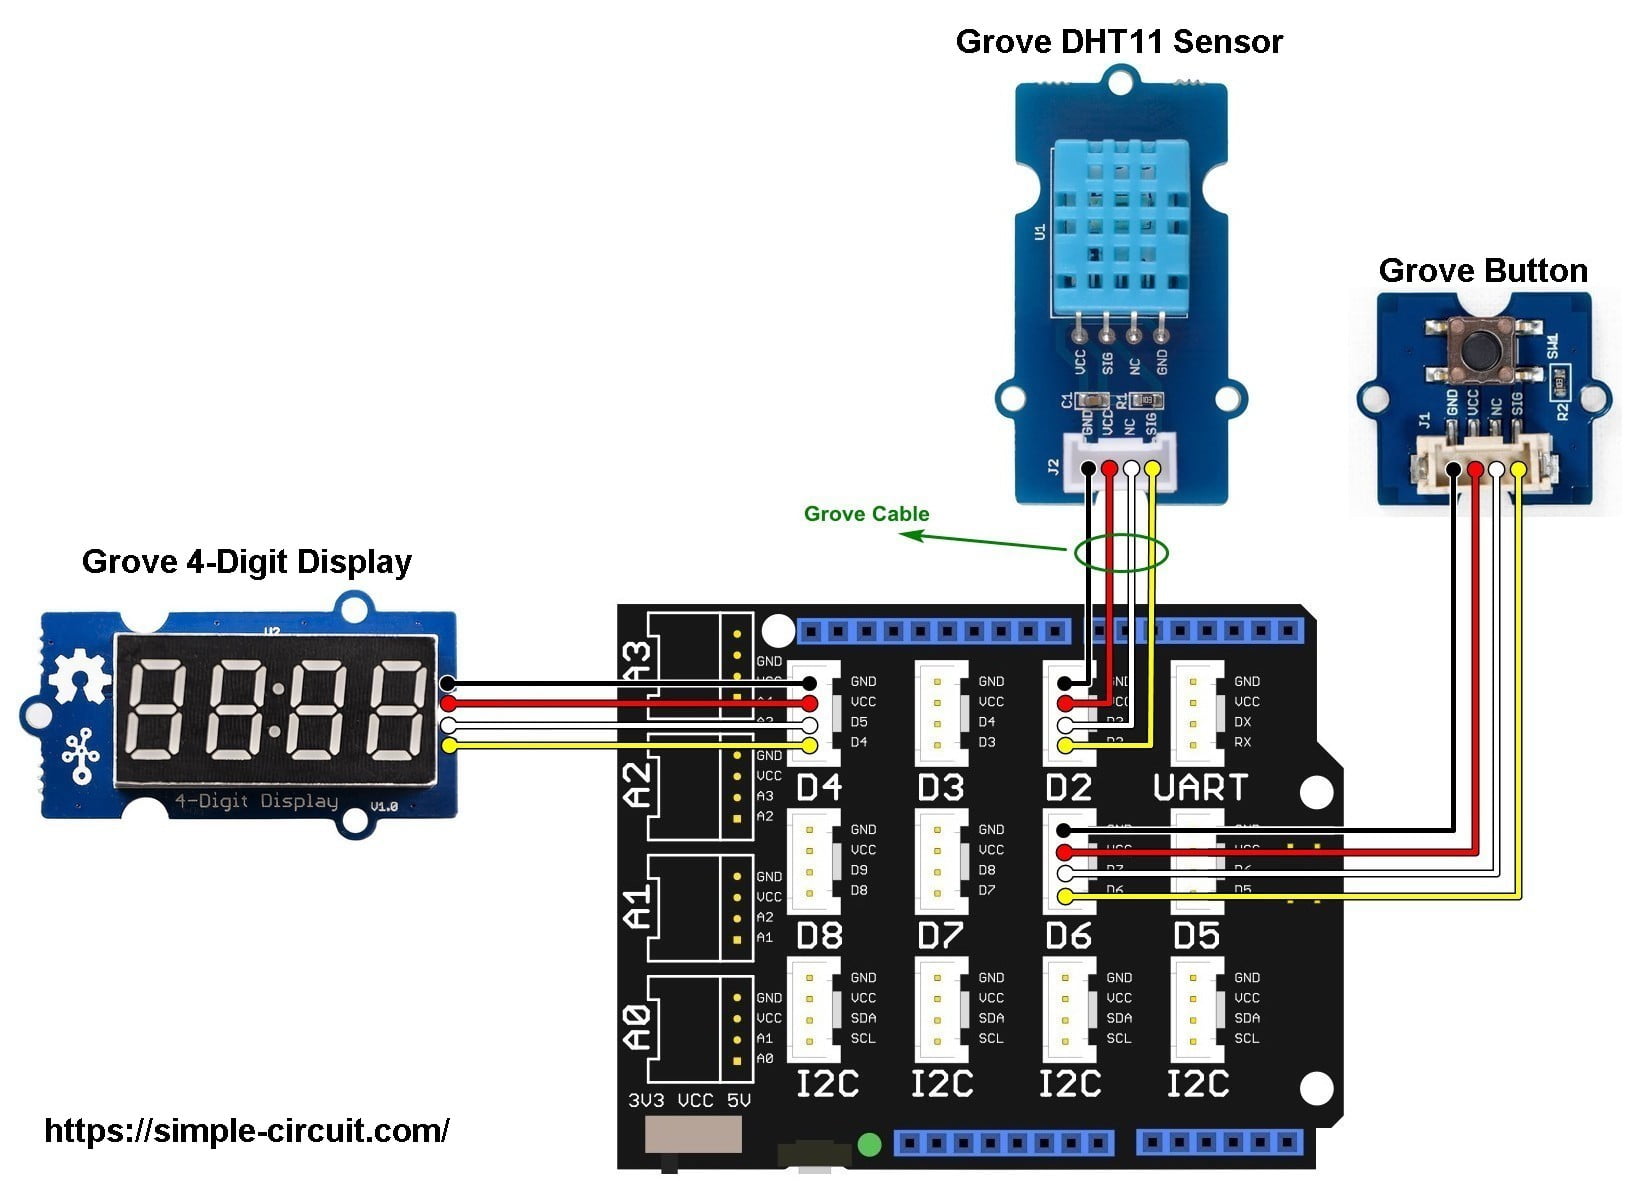
The Grove DHT11 sensor module is connected to base shield port D2 with:
GND pin is connected to Arduino GND,
VCC pin is connected to Arduino +5V pin,
NC is a not connected pin (it looks as it is connected to pin D3),
SIG (signal) pin is connected to Arduino digital pin 2.
The Grove 4-digit display is connected to base shield port D4 where:
GND pin is connected to Arduino GND,
VCC pin is connected to Arduino +5V pin,
DIO is connected to Arduino digital pin 4,
CLK is connected to Arduino digital pin 5.
The Grove button module is connected to base shield port D6 where:
GND pin is connected to Arduino GND,
VCC pin is connected to Arduino +5V pin,
NC (not connected) is not connected pin (using the 4-pin cable it looks as it is connected to base shield D7 pin),
SIG pin is connected to Arduino digital pin 6.
Arduino with Grove DHT11 sensor 4-digit display code:
To be able to compile the Arduino code below with no error, a library for the 4-digit display (TM1637) is required, download link is below:
Grove 4-digit display Library
Seeed Studio provide a library for their Grove DHT11 sensor but I recommend to use the one given by Adafruit Industries which can be installed also through library manager (in the search box write “dht sensor” and choose the one written by Adafruit) or manually, download links are below:
Adafruit DHT library —> direct link
After the manually download of the 2 library files, go to Arduino IDE —> Sketch —> Include Library —> Add .ZIP Library … and browse for the .zip file (previously downloaded).
The same thing for the 2nd library file.
In the Arduino code there are 2 libraries which are included as shown below:
1 2 | #include "TM1637.h" // include TM1637 library #include "DHT.h" // include adafruit DHT library |
Definition of sensor type, its data pin connection and the initialization of the DHT library:
1 2 3 4 5 6 7 8 9 | // define DHT11 data pin connection #define DHTPIN 2 // define sensor type as DHT11 #define DHTTYPE DHT11 // initialize DHT11 library with the previous defined // sensor type and data pin DHT dht11(DHTPIN, DHTTYPE); |
Definition of the Grove 4-digit display pins (CLK and DIO) and initialization of its library (TM1637 library):
1 2 3 4 5 | #define CLK 4 // define TM1637 clock pin #define DIO 5 // define TM1637 data pin // initialize the TM1637 library TM1637 tm1637(CLK, DIO); |
Rest of code is described through comments.
The resolution of temperature and humidity measurements are respectively is 1°C and 1%.
Full Arduino code:
1 2 3 4 5 6 7 8 9 10 11 12 13 14 15 16 17 18 19 20 21 22 23 24 25 26 27 28 29 30 31 32 33 34 35 36 37 38 39 40 41 42 43 44 45 46 47 48 49 50 51 52 53 54 55 56 57 58 59 60 61 62 63 64 65 66 67 68 69 70 71 72 73 74 75 76 77 78 79 80 81 82 83 84 85 86 87 88 89 90 91 92 | /************************************************************************** * * Arduino with Grove DHT11 temperature & humidity sensor, 4-digit display * and button modules. * This is a free software with NO WARRANTY. * https://simple-circuit.com/ * *************************************************************************/ #include "TM1637.h" // include TM1637 library #include "DHT.h" // include adafruit DHT library // define DHT11 data pin connection #define DHTPIN 2 // define sensor type as DHT11 #define DHTTYPE DHT11 // initialize DHT11 library with the previous defined // sensor type and data pin DHT dht11(DHTPIN, DHTTYPE); #define CLK 4 // define TM1637 clock pin #define DIO 5 // define TM1637 data pin // initialize the TM1637 library TM1637 tm1637(CLK, DIO); #define button 6 // button signal is connected to Arduino digital pin 6 void setup() { // initialize the TM1637 display tm1637.init(); // set display brightness (from 0 to 7) tm1637.set(3); tm1637.write(2, 0x63); // print ° on 2nd digit (0 is most left digit) // initialize the DHT11 sensor dht11.begin(); } // code variables bool type = 0; byte humi = 0, temp = 0, auto_change; unsigned long previousMillis = 0; // main loop void loop() { if (type == 0) { tm1637.display(0, humi / 10); tm1637.display(1, humi % 10); tm1637.write(3, 0x5C); // print % } else { tm1637.display(0, temp / 10); tm1637.display(1, temp % 10); tm1637.write(3, 0x39); // print C } if ( digitalRead(button) ) { // if button is pressed type = !type; auto_change = 0; while( digitalRead(button) ); // wait for the button release return; } if ( millis() - previousMillis >= 1000 ) { // read humidity and temperature quantities every 1 second previousMillis = millis(); // save current millis time // read humidity humi = dht11.readHumidity(); // read temperature temp = dht11.readTemperature(); auto_change++; if(auto_change > 9) { // change the displayed quantity every 10 seconds auto_change = 0; type = !type; } } } // end of code. |
Arduino with Grove DHT11 Sensor 4-Digit Display Video:
The following video shows my simple hardware circuit:
Discover more from Simple Circuit
Subscribe to get the latest posts sent to your email.


Well…. His code does not work anyway:)
Sir ,my project is to make a dehumidifier ,with dht11, Tm1637 and arduino nano ,i search a lot in youtube and good ,but I can’t find what I was looking for ?,i don’t know how to make programs to run arduino , i try to learn from you tube and Google ,but it’s is so confusing ,but am trying ,to learn ,soo can you please help me to make the cod for my project ,i want to display the digits and symbols ,as shown as your project with dht11 and tm1637 , but I need a setting , to set the relative humidity manuly ,by setting with set push button and value up and down botton ,total 3 botton need , when set Value (humidity ) reached ,out put pin to be low other wise it should be high so i can connect to pelter plate and also I want to bilink the humidity value blink when it set button pushes , please sir can you make this program code for me ,I can make any complex circuit ,but program is difficult for me so please please sir can you please make this program code for me, thanks