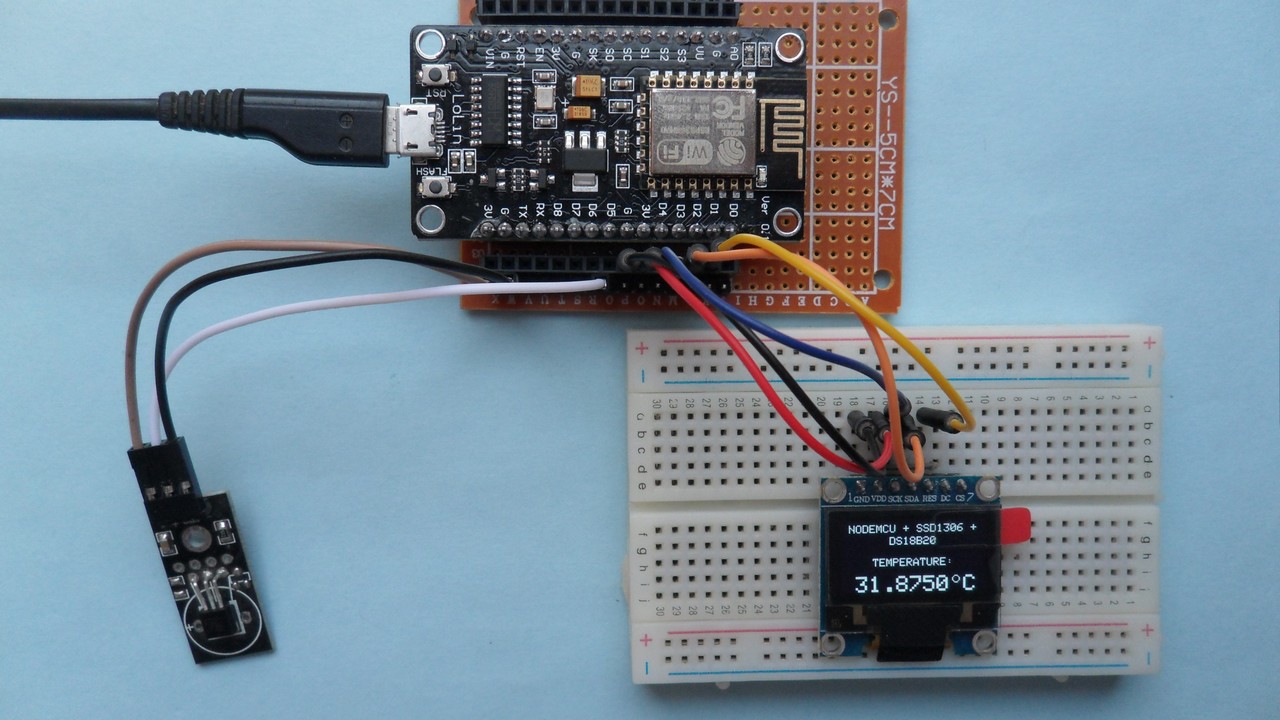
This small post shows how to build a simple temperature measurement station using ESP8266 NodeMCU development board and DS18B20 digital temperature sensor where the measured temperature is displayed on SSD1306 OLED screen (128×64 Pixel) and sent serially to Arduino IDE serial monitor.
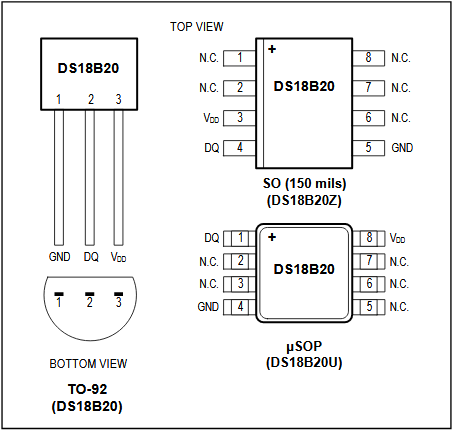
The DS18B20 sensor is a 3-pin electronic component (like a simple transistor) from Maxim (formerly Dallas) which uses 1-wire protocol to communicate with master device (microprocessor, microcontroller ….). Each DS18B20 device has a unique 64-bit serial code, which allows multiple DS18B20s to function on the same 1-Wire bus and controlled with one master device.
The DS18B20 sensor provides 9-bit to 12-bit Celsius temperature measurement resolution (programmable resolution).
The DS18B20 sensor is available in 8-Pin SO (150 mils), 8-Pin μSOP, and 3-Pin TO-92 Packages. DS18B20 pin configurations is shown below:
The SSD1306 OLED used in this project is configured to work in I2C mode, some SSD1306 OLED boards may require a small hardware modifications (to select between SPI mode or I2C mode) such as soldering, placing jumpers ….
Related Projects:
ESP8266 NodeMCU interfacing with SSD1306 OLED
ESP8266 NodeMCU interfacing with DHT11 sensor and SSD1306
Interfacing NodeMCU with DHT22 sensor and SSD1306 OLED
Hardware Required:
- ESP8266 NodeMCU development board
- SSD1306 OLED display with 128×64 Pixel resolution
- DS18B20 temperature sensor — datasheet
- 4.7k ohm resistor
- micro USB cable (for programming and powering the circuit)
- Breadboard
- Jumper wires
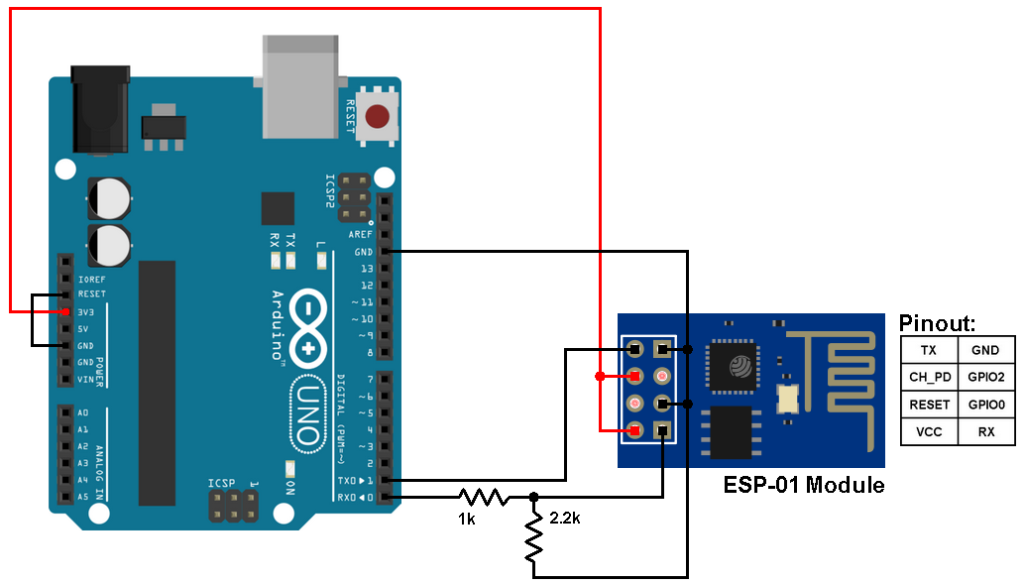
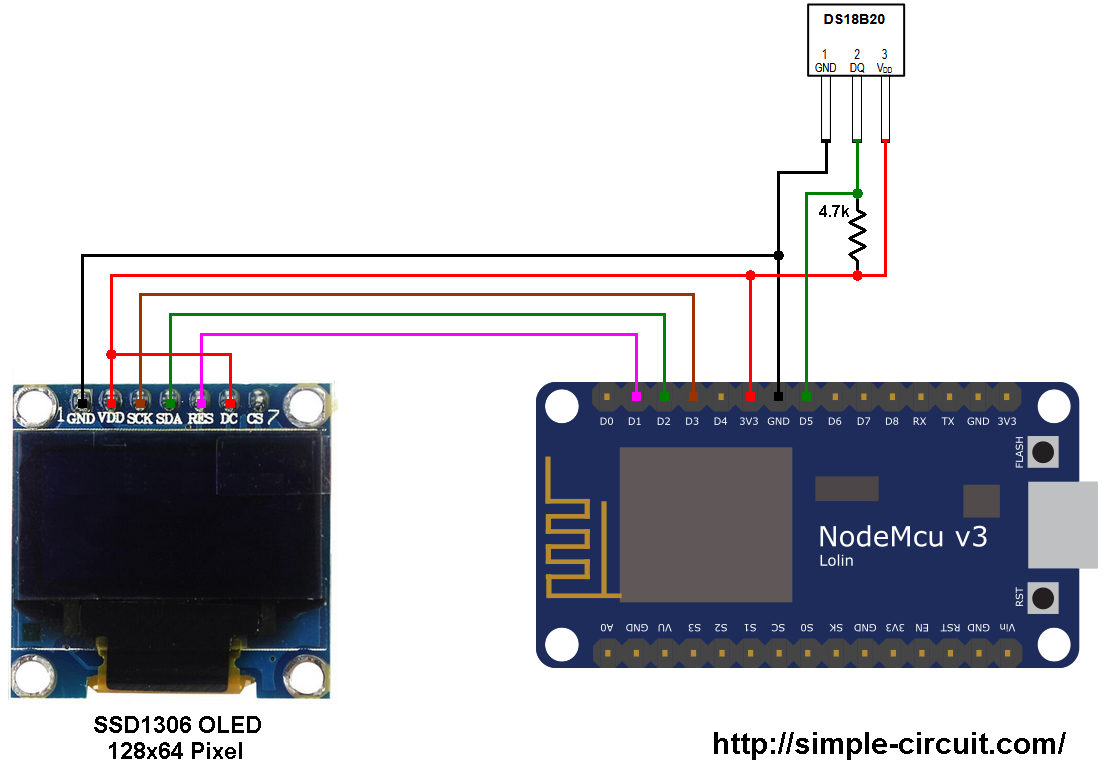
NodeMCU Interfacing with SSD1306 and DS18B20 circuit:
The following image shows project circuit schematic diagram.
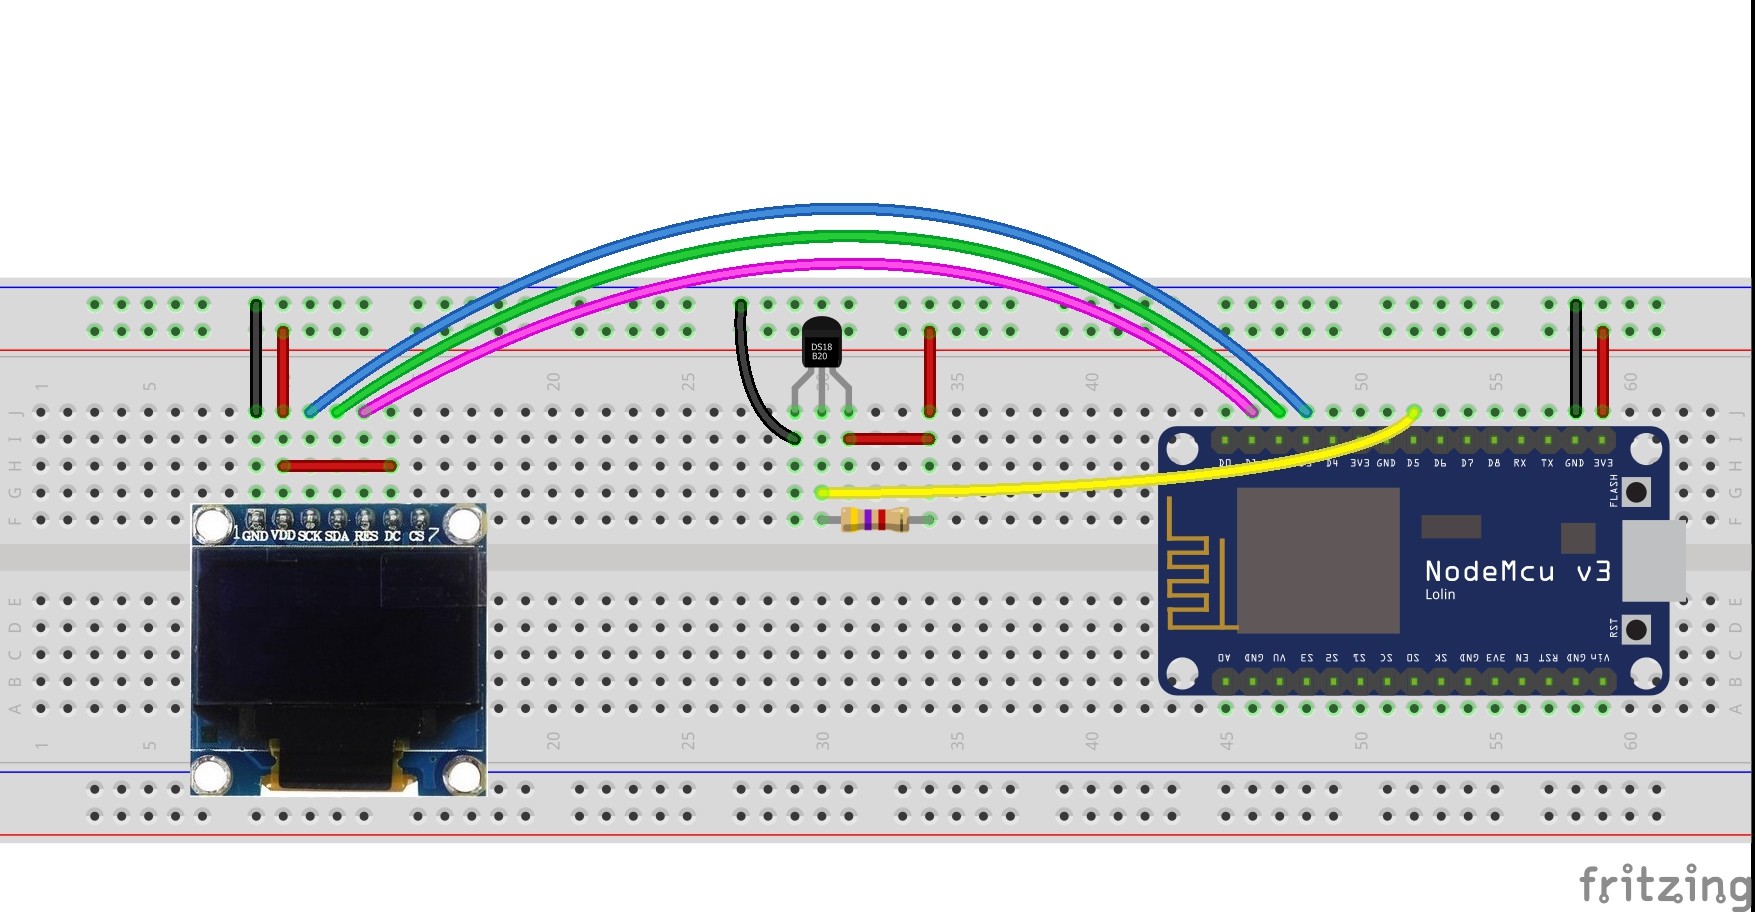
and the following one shows fritzing circuit:
The SDA and SCL lines of the I2C bus come from GPIO4 (D2) and GPIO0 (D3) of the NodeMCU board (respectively), they are connected to SDA and SCL (SCK) pins of the SSD1306 display module.
Reset pin (RES) of the display module is connected to GPIO5 (D1) of the NodeMCU development board.
The DS18B20 sensor has 3 pins: VCC (+5V), data and GND. The data pin is connected to pin D5 (GPIO14) of the NodeMCU module. A pull-up resistor of 4.7k ohm is required for the data pin.
The SSD1306 display module and the DHT22 (AM2302) sensor are supplied with 3.3V which comes from the NodeMCU board.
NodeMCU Interfacing with SSD1306 and DS18B20 code:
Example Arduino code is below, it doesn’t use any library for the DS18B20 sensor, but it requires Adafruit SSD1306 OLED display driver and graphics library.
Functions used in the code:
bool ds18b20_start(): used to know if the DS18B20 sensor is correctly connected to the circuit, returns 1 if OK and 0 if error.
ds18b20_write_bit(bool value): writes (sends) 1 bit to the DS18B20 sensor, the bit is ‘value’ which may be 1 or 0.
ds18b20_write_byte(byte value): writes 1 byte (8 bits) to the DS18B20 sensor, this function is based on the previous function. This function writes LSB first.
bool ds18b20_read_bit(void): reads 1 bit from the DS18B20 sensor, returns the read value (1 or 0).
byte ds18b20_read_byte(void): reads 1 byte from the DS18B20 sensor, this function is based on the previous function. This function reads LSB first.
bool ds18b20_read(int *raw_temp_value): reads the temperature raw data which is 16-bit long (two 8-bit registers), the data is stored in the variable raw_temp_value, returns 1 if OK and 0 if error.
The value of the temperature in degree Celsius is equal to the raw value divided by 16 (in case of 12-bit resolution). The default resolution of the DS18B20 is 12 bits.
1 2 3 4 5 6 7 8 9 10 11 12 13 14 15 16 17 18 19 20 21 22 23 24 25 26 27 28 29 30 31 32 33 34 35 36 37 38 39 40 41 42 43 44 45 46 47 48 49 50 51 52 53 54 55 56 57 58 59 60 61 62 63 64 65 66 67 68 69 70 71 72 73 74 75 76 77 78 79 80 81 82 83 84 85 86 87 88 89 90 91 92 93 94 95 96 97 98 99 100 101 102 103 104 105 106 107 108 109 110 111 112 113 114 115 116 117 118 119 120 121 122 123 124 125 126 127 128 129 130 131 132 133 134 135 136 137 138 139 140 141 142 143 144 145 146 147 148 149 150 151 152 153 154 155 156 157 158 159 160 161 162 163 164 | /************************************************************************************** ESP8266 NodeMCU interfacing with SSD1306 OLED and DS18B20 temperature sensor This is a free software with NO WARRANTY. http://simple-circuit.com/ ***************************************************************************************/ #include <Wire.h> #include <Adafruit_GFX.h> #include <Adafruit_SSD1306.h> #define OLED_RESET 5 // define SSD1306 OLED reset at ESP8266 GPIO5 (NodeMCU D1) Adafruit_SSD1306 display(OLED_RESET); #define DS18B20_PIN 14 // DS18B20 data pin is connected to ESP8266 GPIO14 (NodeMCU D5) int raw_temp; char *temp = "000.0000 C"; void setup(void) { Serial.begin(9600); delay(1000); Wire.begin(4, 0); // set I2C pins [SDA = GPIO4 (D2), SCL = GPIO0 (D3)], default clock is 100kHz // by default, we'll generate the high voltage from the 3.3v line internally! (neat!) display.begin(SSD1306_SWITCHCAPVCC, 0x3D); // initialize with the I2C addr 0x3D (for the 128x64) // init done // Clear the display buffer. display.clearDisplay(); display.setTextSize(1); display.setTextColor(WHITE, BLACK); display.setCursor(7, 4); display.print("NODEMCU + SSD1306 +"); display.setCursor(43, 15); display.print("DS18B20"); display.setCursor(28, 34); display.print("TEMPERATURE:"); display.display(); display.setTextSize(2); } void loop() { display.setCursor(1, 50); if(ds18b20_read(&raw_temp)) { Serial.printf("Temperature = %8.4f°C\r\n", (float)raw_temp / 16); if(raw_temp & 0x8000) // If the temperature is negative { temp[0] = '-'; // Put minus sign (-) raw_temp = ~raw_temp + 1; // Change temperature value to positive form } else { if((raw_temp >> 4) >= 100) // If the temperatue >= 100 °C temp[0] = '1'; // Put 1 of hundreds else // otherwise temp[0] = ' '; // put space ' ' } // Put the first two digits ( for tens and ones) temp[1] = ( (raw_temp >> 4) / 10 ) % 10 + '0'; // Put tens digit temp[2] = (raw_temp >> 4) % 10 + '0'; // Put ones digit // Put the 4 fraction digits (digits after the point) // Why 625: because we're working with 12-bit resolution (default resolution) temp[4] = ( (raw_temp & 0x0F) * 625) / 1000 + '0'; // Put thousands digit temp[5] = (((raw_temp & 0x0F) * 625) / 100 ) % 10 + '0'; // Put hundreds digit temp[6] = (((raw_temp & 0x0F) * 625) / 10 ) % 10 + '0'; // Put tens digit temp[7] = ( (raw_temp & 0x0F) * 625) % 10 + '0'; // Put ones digit display.print(temp); display.drawCircle(102, 53, 3, WHITE); // Put degree symbol ( ° ) } else { Serial.println("Communication Error!"); display.print(" Error! "); } display.display(); delay(1000); } bool ds18b20_start() { bool ret = 0; digitalWrite(DS18B20_PIN, LOW); // Send reset pulse to the DS18B20 sensor pinMode(DS18B20_PIN, OUTPUT); delayMicroseconds(500); // Wait 500 us pinMode(DS18B20_PIN, INPUT_PULLUP); delayMicroseconds(100); //wait to read the DS18B20 sensor response if (!digitalRead(DS18B20_PIN)) { ret = 1; // DS18B20 sensor is present delayMicroseconds(400); // Wait 400 us } return(ret); } void ds18b20_write_bit(bool value) { digitalWrite(DS18B20_PIN, LOW); pinMode(DS18B20_PIN, OUTPUT); delayMicroseconds(2); digitalWrite(DS18B20_PIN, value); delayMicroseconds(80); pinMode(DS18B20_PIN, INPUT_PULLUP); delayMicroseconds(2); } void ds18b20_write_byte(byte value) { byte i; for(i = 0; i < 8; i++) ds18b20_write_bit(bitRead(value, i)); } bool ds18b20_read_bit(void) { bool value; digitalWrite(DS18B20_PIN, LOW); pinMode(DS18B20_PIN, OUTPUT); delayMicroseconds(2); pinMode(DS18B20_PIN, INPUT_PULLUP); delayMicroseconds(5); value = digitalRead(DS18B20_PIN); delayMicroseconds(100); return value; } byte ds18b20_read_byte(void) { byte i, value; for(i = 0; i <8; i++) bitWrite(value, i, ds18b20_read_bit()); return value; } bool ds18b20_read(int *raw_temp_value) { if (!ds18b20_start()) // Send start pulse return(0); ds18b20_write_byte(0xCC); // Send skip ROM command ds18b20_write_byte(0x44); // Send start conversion command while(ds18b20_read_byte() == 0); // Wait for conversion complete if (!ds18b20_start()) // Send start pulse return(0); // Return 0 if error ds18b20_write_byte(0xCC); // Send skip ROM command ds18b20_write_byte(0xBE); // Send read command *raw_temp_value = ds18b20_read_byte(); // Read temperature LSB byte and store it on raw_temp_value LSB byte *raw_temp_value |= (unsigned int)(ds18b20_read_byte() << 8); // Read temperature MSB byte and store it on raw_temp_value MSB byte return(1); // OK --> return 1 } // End of code. |
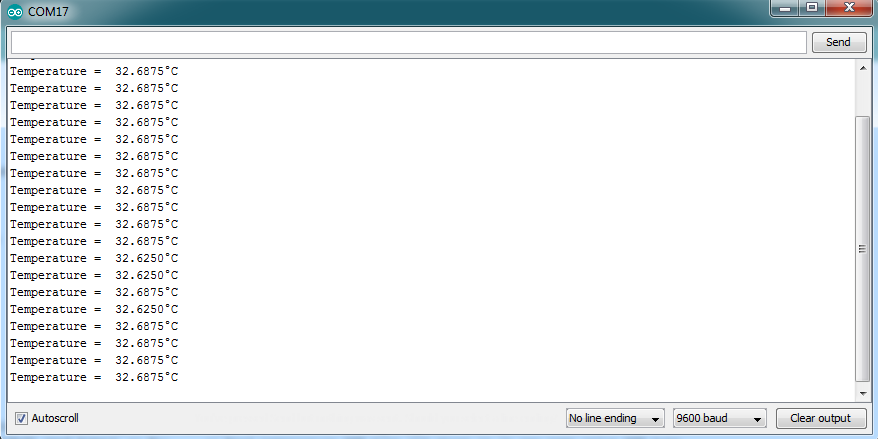
Arduino IDE serial monitor output for temperature and relative humidity is shown below:
Discover more from Simple Circuit
Subscribe to get the latest posts sent to your email.