This post shows how to implement internet clock using ESP8266 NodeMCU Wi-Fi board where time and date are displayed on ST7735 TFT display.
The ST7735 TFT is a color display with resolution of 128×160 pixel, it communicates with the master device using SPI protocol.
TFT: Thin-Film Transistor
SPI: Serial Peripheral Interface
To see how to interface the NodeMCU board with the ST7735 TFT display, visit this post:
Interfacing ESP8266 NodeMCU with ST7735 TFT
Hardware Required:
- ESP8266 NodeMCU board
- ST7735 TFT display module
- micro USB cable (for programming and powering the circuit)
- Breadboard
- Jumper wires
NodeMCU Internet clock with ST7735 TFT circuit:
Project circuit schematic diagram is shown below.
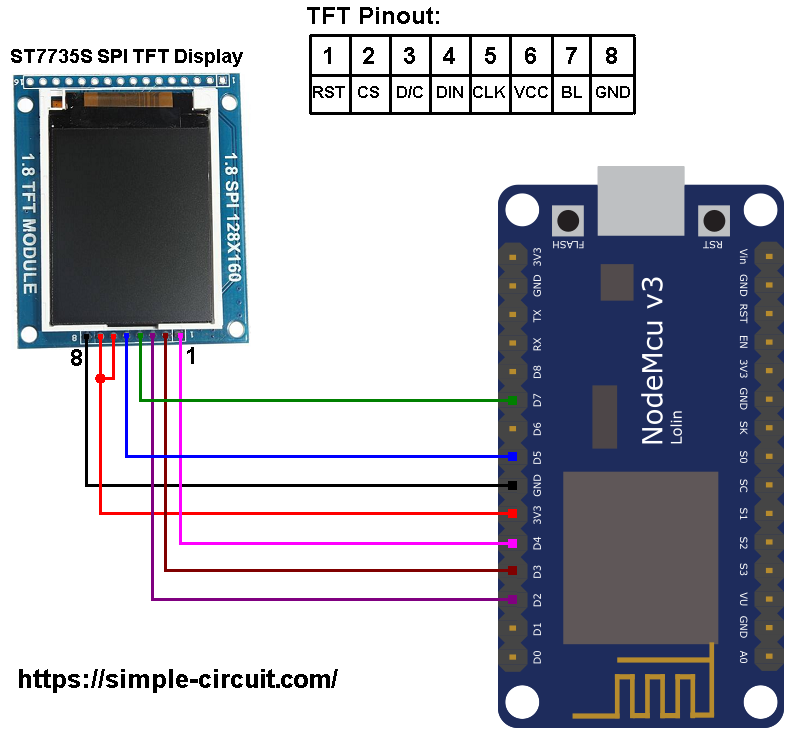
The ST7735S shown in project circuit diagram has 8 pins: (from right to left): RST (reset), CE (chip enable), DC (or D/C: data/command), DIN (data in), CLK (clock), VCC, BL (back light) and Gnd (ground).
The ST7735 display is connected to the NodeMCU board as follows:
RST pin is connected to D4 (ESP8266EX GPIO2),
CS pin is connected to D3 (ESP8266EX GPIO0),
D/C pin is connected to D2 (ESP8266EX GPIO4),
DIN (MOSI) pin is connected to D7 (ESP8266EX GPIO13),
CLK (SCK) pin is connected to D5 (ESP8266EX GPIO14),
VCC and BL are connected to pin 3V3,
GND is connected to pin GND of the NodeMCU board.
Pins D5 (GPIO14) and D7 (GPIO13) are hardware SPI module pins of the ESP8266EX microcontroller respectively for SCK (serial clock) and MOSI (master-out slave-in).
NodeMCU Internet clock with ST7735 TFT circuit:
The following Arduino code requires two libraries from Adafruit Industries:
The first library is a driver for the ST7735 TFT display which can be installed from Arduino IDE library manager (Sketch —> Include Library —> Manage Libraries …, in the search box write “st7735” and install the one from Adafruit).
The second library is Adafruit graphics library which can be installed also from Arduino IDE library manager.
Both libraries can be installed manually, first download them from the following 2 links:
Adafruit ST7735 TFT library —-> direct link
Adafruit graphics library —-> direct link
After the download, go to Arduino IDE —> Sketch —> Include Library —> Add .ZIP Library … and browse for the .zip file (previously downloaded).
The same thing for the other library file.
The other library is NTPClient, this library connects the ESP8266 WiFi to a time server, this server sends time information to the module. NTP: Network Time Protocol.
NTPClient Library — direct link
The last one is Arduino Time library, this library converts Unix timestamp (Unix epoch) into: seconds, minutes, hours, day of the week, day, month and year. The Unix epoch is the number of seconds that have elapsed since January 1, 1970 (midnight UTC/GMT).
Basically the time server sends time in Unix epoch format which needs to be converted, this library does all the job. Download links are below:
Arduino Time Library — direct link
Hints:
All the used libraries are included in the Arduino code as shown below:
1 2 3 4 5 6 | #include <ESP8266WiFi.h> #include <WiFiUdp.h> #include <NTPClient.h> // include NTPClient library #include <TimeLib.h> // Include Arduino time library #include <Adafruit_GFX.h> // include Adafruit graphics library #include <Adafruit_ST7735.h> // include Adafruit ST7735 TFT library |
The connection of ST7735 TFT display with the NodeMCU is as shown below where the display is connected to hardware SPI module of the NodeMCU (pins: SCK and MOSI):
1 2 3 4 5 6 7 8 | // ST7735 TFT module connections #define TFT_RST D4 // TFT RST pin is connected to NodeMCU pin D4 (GPIO2) #define TFT_CS D3 // TFT CS pin is connected to NodeMCU pin D3 (GPIO0) #define TFT_DC D2 // TFT DC pin is connected to NodeMCU pin D2 (GPIO4) // initialize ST7735 TFT library with hardware SPI module // SCK (CLK) ---> NodeMCU pin D5 (GPIO14) // MOSI(DIN) ---> NodeMCU pin D7 (GPIO13) Adafruit_ST7735 tft = Adafruit_ST7735(TFT_CS, TFT_DC, TFT_RST); |
The NTPClient library is configured to get time information (Unix epoch) from the server time.nist.gov (GMT time) and an offset of 1 hour ( ==> GMT + 1 time zone) which is equal to 3600 seconds, configuration line is below:
NTPClient timeClient(ntpUDP, “time.nist.gov”, 3600, 60000);
Full Arduino Code:
1 2 3 4 5 6 7 8 9 10 11 12 13 14 15 16 17 18 19 20 21 22 23 24 25 26 27 28 29 30 31 32 33 34 35 36 37 38 39 40 41 42 43 44 45 46 47 48 49 50 51 52 53 54 55 56 57 58 59 60 61 62 63 64 65 66 67 68 69 70 71 72 73 74 75 76 77 78 79 80 81 82 83 84 85 86 87 88 89 90 91 92 93 94 95 96 97 98 99 100 101 102 103 104 105 106 107 | /************************************************************************** * * WiFi Internet clock (NTP) with ESP8266 NodeMCU (ESP-12E) board and * ST7735 TFT display. * This is a free software with NO WARRANTY. * http://simple-circuit.com/ * *************************************************************************/ #include <ESP8266WiFi.h> #include <WiFiUdp.h> #include <NTPClient.h> // include NTPClient library #include <TimeLib.h> // Include Arduino time library #include <Adafruit_GFX.h> // include Adafruit graphics library #include <Adafruit_ST7735.h> // include Adafruit ST7735 TFT library // ST7735 TFT module connections #define TFT_RST D4 // TFT RST pin is connected to NodeMCU pin D4 (GPIO2) #define TFT_CS D3 // TFT CS pin is connected to NodeMCU pin D3 (GPIO0) #define TFT_DC D2 // TFT DC pin is connected to NodeMCU pin D2 (GPIO4) // initialize ST7735 TFT library with hardware SPI module // SCK (CLK) ---> NodeMCU pin D5 (GPIO14) // MOSI(DIN) ---> NodeMCU pin D7 (GPIO13) Adafruit_ST7735 tft = Adafruit_ST7735(TFT_CS, TFT_DC, TFT_RST); // set WiFi network SSID and password const char *ssid = "YOUR SSID"; const char *password = "YOUR PASSWORD"; WiFiUDP ntpUDP; // 'time.nist.gov' is used (default server) with +1 hour offset (3600 seconds) 60 seconds (60000 milliseconds) update interval NTPClient timeClient(ntpUDP, "time.nist.gov", 3600, 60000); unsigned long unix_epoch; void setup(void) { Serial.begin(9600); tft.initR(INITR_BLACKTAB); // initialize a ST7735S chip, black tab tft.fillScreen(ST7735_BLACK); // fill screen with black color tft.drawFastHLine(0, 44, tft.width(), ST7735_BLUE); // draw horizontal blue line at position (0, 44) tft.setTextColor(ST7735_WHITE, ST7735_BLACK); // set text color to white and black background tft.setTextSize(1); // text size = 1 tft.setCursor(19, 10); // move cursor to position (43, 10) pixel tft.print("ESP8266 NodeMCU"); tft.setCursor(4, 27); // move cursor to position (4, 27) pixel tft.print("Wi-Fi Internet Clock"); WiFi.begin(ssid, password); Serial.print("Connecting."); tft.setCursor(0, 54); // move cursor to position (4, 27) pixel tft.print("Connecting.."); while ( WiFi.status() != WL_CONNECTED ) { delay(500); Serial.print("."); } Serial.println("connected"); tft.print("connected"); delay(2000); tft.fillRect(0, 54, tft.width(), 8, ST7735_BLACK); tft.drawFastHLine(0, 102, tft.width(), ST7735_BLUE); // draw horizontal blue line at position (0, 102) tft.setTextSize(2); // text size = 2 tft.setTextColor(ST7735_MAGENTA, ST7735_BLACK); // set text color to magenta and black background tft.setCursor(37, 112); // move cursor to position (37, 112) pixel tft.print("TIME:"); timeClient.begin(); } void RTC_display() { char dow_matrix[7][10] = {"SUNDAY", "MONDAY", "TUESDAY", "WEDNESDAY", "THURSDAY", "FRIDAY", "SATURDAY"}; byte x_pos[7] = {29, 29, 23, 11, 17, 29, 17}; static byte previous_dow = 0; // print day of the week if( previous_dow != weekday(unix_epoch) ) { previous_dow = weekday(unix_epoch); tft.fillRect(11, 55, 108, 14, ST7735_BLACK); // draw rectangle (erase day from the display) tft.setCursor(x_pos[previous_dow-1], 55); tft.setTextColor(ST7735_CYAN, ST7735_BLACK); // set text color to cyan and black background tft.print( dow_matrix[previous_dow-1] ); } // print date tft.setCursor(4, 79); tft.setTextColor(ST7735_YELLOW, ST7735_BLACK); // set text color to yellow and black background tft.printf( "%02u-%02u-%04u", day(unix_epoch), month(unix_epoch), year(unix_epoch) ); // print time tft.setCursor(16, 136); tft.setTextColor(ST7735_GREEN, ST7735_BLACK); // set text color to green and black background tft.printf( "%02u:%02u:%02u", hour(unix_epoch), minute(unix_epoch), second(unix_epoch) ); } // main loop void loop() { timeClient.update(); unix_epoch = timeClient.getEpochTime(); // get UNIX Epoch time RTC_display(); delay(200); // wait 200ms } // end of code. |

Discover more from Simple Circuit
Subscribe to get the latest posts sent to your email.
Delete rows 77,78,79
В строке 89 tft.printf( “%02u-%02u-%04u”, day(unix_epoch), month(unix_epoch), year(unix_epoch) );
заменить на tft.printf(“%02u-%02u-%04u”); // day(unix_epoch), month(unix_epoch), year(unix_epoch));
В строке 93 tft.printf( “%02u:%02u:%02u”, hour(unix_epoch), minute(unix_epoch), second(unix_epoch) );
заменить на tft.printf(“%02u:%02u:%02u”); // hour(unix_epoch), minute(unix_epoch), second(unix_epoch));
и тогда все прокомпилится
. Variables and constants in RAM (global, static), used 29120 / 80192 bytes (36%)
║ SEGMENT BYTES DESCRIPTION
╠══ DATA 1504 initialized variables
╠══ RODATA 1144 constants
╚══ BSS 26472 zeroed variables
. Instruction RAM (IRAM_ATTR, ICACHE_RAM_ATTR), used 60287 / 65536 bytes (91%)
║ SEGMENT BYTES DESCRIPTION
╠══ ICACHE 32768 reserved space for flash instruction cache
╚══ IRAM 27519 code in IRAM
. Code in flash (default, ICACHE_FLASH_ATTR), used 254092 / 1048576 bytes (24%)
║ SEGMENT BYTES DESCRIPTION
╚══ IROM 254092 code in flash
Compilation error: ‘weekday’ was not declared in this scope
Can I instead of black backgound use LIGHTGREY i have tested and it is not working
The line “void setup(void)” should be “void setup()” as you’ll get an error otherwise. It took me a bit to find this was causing it to fail.
Good to know, but i am surprised that caused an error. Will give it a try once i get the display