This post shows how to build a temperature measurement station using PIC18F46K22 microcontroller and LM335 analog temperature sensor.
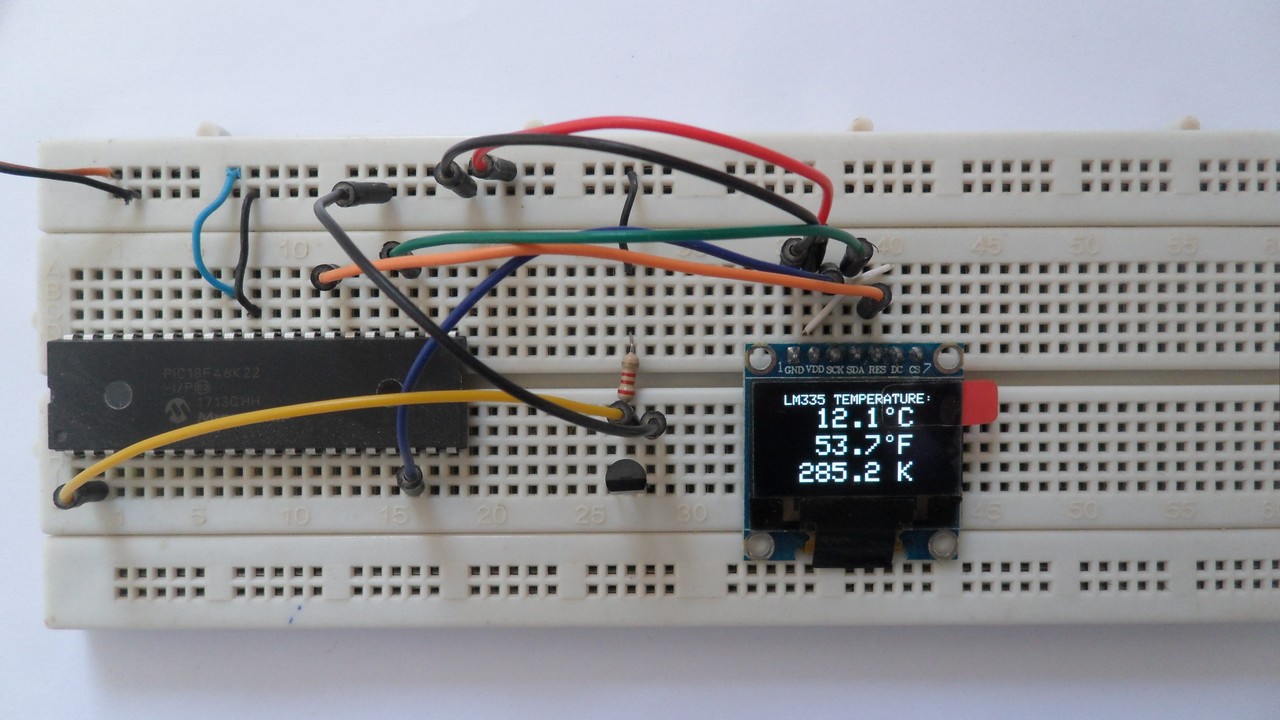
SSD1306 OLED display (128×64 pixel) is used to display environment temperature in degree Celsius, Kelvin and degree Fahrenheit.
CCS C compiler is used in this project.
In this project the SSD1306 OLED is configured to work in I2C mode, make sure that your display is configured to work in I2C mode, some displays need jumper placing or some soldering.
The LM335 sensor is a 3-pin analog device which can measure temperature (converts temperature to analog voltage). This sensor requires an ADC module to convert the analog voltage into digital data. The PIC18F46K22 microcontroller has one ADC module with 10-bit resolution.
ADC: Analog-to-Digital Converter.
The LM335 sensor has the following features (from datasheet):
- Directly Calibrated to the Kelvin Temperature Scale
- 1°C Initial Accuracy Available
- Operates from 400 μA to 5 mA
- Less than 1-Ω Dynamic Impedance
- Easily Calibrated
- Wide Operating Temperature Range
- 200°C Overrange
- Low Cost
The LM335 has a breakdown voltage directly proportional to absolute temperature at 10 mV/°K. For example if the LM335 output voltage is equal to 3.03 (3030 mV) this means the temperature is: 303 Kelvin = 30 °Celsius.
The PIC18F46K22 is an 8-bit microcontroller that has a 10-bit ADC module. The good thing with this microcontroller is the fixed voltage references. With the fixed voltage reference we get a very good results.
Normally, negative and positive references of the ADC module are VSS and VDD, but VDD is not exactly equal to 5.00V and here we should use the fixed voltage reference as a positive reference of the ADC module.
The PIC18F46K22 has 3 fixed voltage references: 1.024V, 2.048V and 4.096V. For example if we set the fixed voltage reference to 4.096V and the ADC module is configured so that the negative and the positive references are VSS and FVR (Fixed Voltage Reference) respectively, in this case the equivalent 10-bit digital value of 4.096 is 1023 and 3.00V is 3.00 * 1023/4.096 = 749 , and so on.
In this project I used 4.096 because the LM335 output is between 2.23V (temperature = -50°C) and 3.98V (temperature = +125°C).
To see how to interface PIC microcontroller with SSD1306 OLED display using CCS C compiler, visit this post:
Interfacing PIC18F4550 with SSD1306 OLED
Hardware Required:
- PIC18F46K22 microcontroller —-> datasheet
- SSD1306 OLED display
- LM335 temperature sensor —-> datasheet
- 2.2k ohm resistor
- 5V source
- Breadboard
- Jumper wires
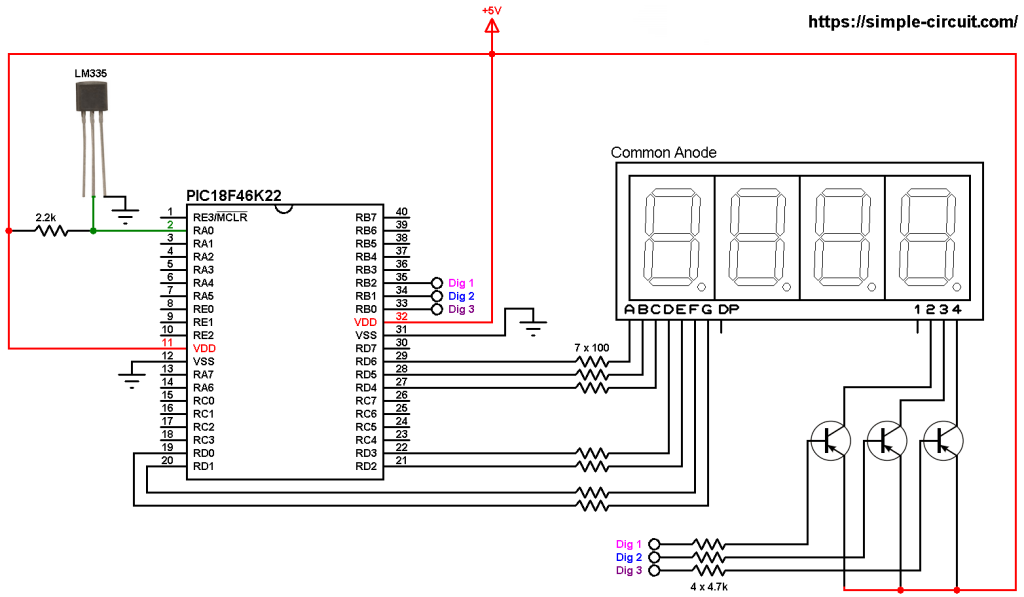
PIC18F46K22 with LM335 sensor and SSD1306 OLED circuit:
The image below shows project circuit diagram.
The LM335 sensor has 3 pins (from left to right):
Pin 1 for calibration, not used in this example.
Pin 2: output.
Pin 3: GND (ground).
The output pin of the LM335 sensor is connected to pin RA0 which is analog channel 0 (AN0). I chose the 2.2k ohm because as written in the datasheet for optimum accuracy the current flows through the LM335 should be 1mA. For example if the temperature = 27°C, the output will be 3.00V and assume the supply voltage is exactly 5.00V that means the current flows through the sensor is ( 5 – 3)/2.2 = 0.90mA which is good enough. Also the value 2.2k is a standard value and well used.
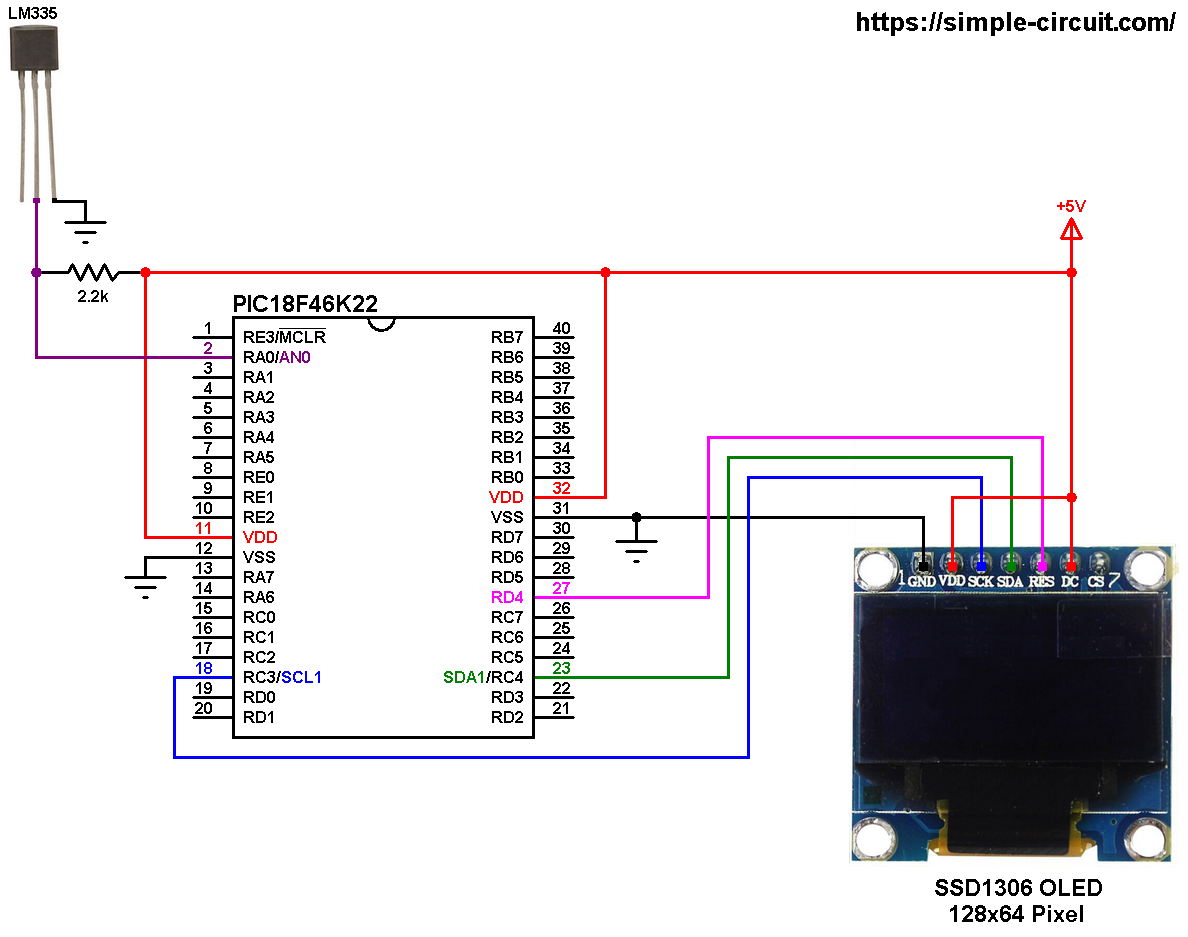
All the grounded terminals are connected together.
The PIC18F46K22 microcontroller has 2 hardware I2C modules (MSSP1 and MSSP2 modules).
In this project I2C1 module is used with SDA1 on pin RC4 (#23) and SCL1 on pin RC3 (#18). The SDA1 pin of the MCU is connected to the SDA pin of the display and the SCL1 pin of the MCU is connected to the SCL pin of the display.
The reset pin of the display is connected to pin RD4 (#27) of the microcontroller.
The SSD1306 OLED display DC pin is connected to VDD which means I2C slave address of the device is 0x7A. If the DC pin is connected to ground (GND) then the I2C slave address becomes 0x78.
In this project the PIC18F46K22 microcontroller runs with its internal oscillator @ 16 MHz, MCLR pin is configured as an input pin.
PIC18F46K22 with LM335 sensor and SSD1306 OLED C code:
The C code below is for CCS C compiler, it was tested with version 5.051.
To be able to compile the C code below with no error, a driver for the SSD1306 OLED display is required, it’s full name (with extension) is SSD1306OLED.C, for more information about this driver, visit the following post:
SSD1306 OLED Library for CCS C compiler
It can be downloaded also from the link below:
SSD1306 OLED Library download
after the download, add the driver file to project folder or CCS C compiler drivers folder.
Programming hints:
The internal fixed voltage reference (FVR) of the PIC18F46K22 microcontroller is set to 4.096V using the following line:
1 | setup_vref(VREF_4v096); // set FVR to 4.096V // FVR: Fixed Voltage Reference |
The ADC module is configured so that it uses its internal clock, voltage references (negative and positive) are set to VSS and FVR respectively where the FVR is the one previously set to 4.096V.
The LM335 output pin is connected to AN0 channel. All these configurations are done in the code as shown below:
1 2 3 4 | setup_adc(ADC_CLOCK_INTERNAL); // set ADC module clock to internal // configure AN0 pin as analog & set voltage references to: VSS - FVR(4.096V) setup_adc_ports(sAN0 | VSS_FVR); set_adc_channel(sAN0); // select AN0 channel |
PIC18F46K22 ADC module is used with 10-bit resolution which means the digital value of the input analog voltage varies between 0 (0V) and 1023 (4.096V). By multiplying the digital value by 4 we get the temperature in tenths Kelvin (4 = 1000*4.096/1024). The temperature in tenths degree Celsius = tenths Kelvin – 2732 (because: °C = K – 273.16), and in tenths degree Fahrenheit = tenth Kelvin x 9/5 – 4597 (because: °F = K x 9/5 – 459.7).
To get the actual value of each quantity we’ve to divide it by 10. The line below shows an example for temperature in Kelvin:
1 | printf(SSD1306_Print, "%03Lu.%1Lu K", tKelvin/10, tKelvin % 10); |
We get the first 3 digits by dividing the tenths value by 10, and the tenths number (number after the decimal point) of the actual temperature value is equal to the reminder of that division (tenths value % 10).
The resolution of this thermometer is 0.4 °C.
CCS C Code:
1 2 3 4 5 6 7 8 9 10 11 12 13 14 15 16 17 18 19 20 21 22 23 24 25 26 27 28 29 30 31 32 33 34 35 36 37 38 39 40 41 42 43 44 45 46 47 48 49 50 51 52 53 54 55 56 57 58 59 60 61 62 63 64 65 66 67 68 69 70 71 72 73 74 75 76 77 78 79 80 81 82 83 84 | /* * Interfacing PIC18F46K22 microcontroller with SSD1306 OLED (128x64 Pixel) * and LM335 analog temperature sensor. * C Code for CCS C compiler. * This is a free software with NO WARRANTY. * http://simple-circuit.com/ */ // SSD1306 OLED reset pin definition #define SSD1306_RST PIN_D4 #include <18F46K22.h> #device ADC = 10 #fuses NOMCLR,NOLVP,NOBROWNOUT,PUT,NOXINST #use delay(internal = 16MHz) #use I2C(MASTER, I2C1, FAST = 400000, stream = SSD1306_STREAM) // initialize I2C // include SSD1306 OLED driver source code #include <SSD1306OLED.c> // main function void main() { delay_ms(1000); // wait a second setup_vref(VREF_4v096); // set FVR to 4.096V // FVR: Fixed Voltage Reference setup_adc(ADC_CLOCK_INTERNAL); // set ADC module clock to internal // configure AN0 pin as analog & set voltage references to: VSS - FVR(4.096V) setup_adc_ports(sAN0 | VSS_FVR); set_adc_channel(sAN0); // select AN0 channel // initialize the SSD1306 OLED with an I2C addr = 0x7A (default address) SSD1306_Begin(SSD1306_SWITCHCAPVCC, SSD1306_I2C_ADDRESS); SSD1306_ClearDisplay(); // clear the display buffer SSD1306_GotoXY(12, 0); // move cursor to position (12, 0) pixel SSD1306_Print("LM335 TEMPERATURE:"); // print text SSD1306_TextSize(2); // set text size to 2 while(TRUE) { int16 tKelvin; signed int16 tCelsius, tFahrenheit; // read analog voltage and convert it to tenths Kelvin (4 = 1000*4.096/1024) tKelvin = (read_adc() + 1) * 4; tCelsius = tKelvin - 2732; // convert tenths Kelvin to tenths °Celsius tFahrenheit = tKelvin * 9/5 - 4597 ; // convert tenths Kelvin to tenths °Fahrenheit // print temperature in °Celsius SSD1306_GotoXY(23, 10); if (tCelsius >= 1000) printf(SSD1306_Print, "%03Lu.%1Lu C", tCelsius/10, tCelsius % 10); else if (tCelsius < 0) printf(SSD1306_Print, "-%02Lu.%1Lu C", abs(tCelsius)/10, abs(tCelsius)%10); else printf(SSD1306_Print, " %02Lu.%1Lu C", tCelsius / 10, tCelsius % 10); // print temperature in °Fahrenheit SSD1306_GotoXY(23, 30); if (tFahrenheit >= 1000) printf(SSD1306_Print, "%03Lu.%1Lu F", tFahrenheit / 10, tFahrenheit % 10); else if (tFahrenheit < 0) printf(SSD1306_Print, "-%02Lu.%1Lu F", abs(tFahrenheit)/10, abs(tFahrenheit)%10); else printf(SSD1306_Print, " %02Lu.%1Lu F", tFahrenheit / 10, tFahrenheit % 10); // print temperature in Kelvin SSD1306_GotoXY(23, 50); printf(SSD1306_Print, "%03Lu.%1Lu K", tKelvin/10, tKelvin % 10); // print degree symblos ( ° ) SSD1306_DrawCircle(88, 12, 2); SSD1306_DrawCircle(88, 32, 2); SSD1306_Display(); // update the display delay_ms(1000); // wait a second } } // end of code. |
Discover more from Simple Circuit
Subscribe to get the latest posts sent to your email.